Updates from December, 2008 Toggle Comment Threads | Keyboard Shortcuts

  • Yury Gitman 1:16 am on December 24, 2008 Permalink | Reply  

    Antisocial toy 

    After solving the movement issue of servo, I started thinking about how to put all these electronic parts into my plush toy. First, I moved one of power supplies to mini breadboard and attached it on the Arduino board. Here I simply used both hot glue and tape.

    Img_2102

    Img_2098

    Img_2099

    Toys were having fun to hang out together!
    Matt’s toy (with accessories made by Hsiang Ju and me) + Hsiang Ju’s duck

    Img_2105

    The box made of cardboard was used to protect the circuit and provide a platform for servo to stand. Two batteries would be legs of the toy.

    Img_2107

    Img_2110_2

    Everyone was working hard =)

    Img_2112

    Img_2113

    Img_2114

    Img_2117

    I started sewing the skin of my toy. It’s a lot of work, trust me.

    Img_2286

    My toy’s head.

    Img_2289

    I got a plastic clown nose from Halloween Adventure, ha ha, and I used it as the head part, just the perfect size. Servo’s fan was attached on the plastic ball by hot glue, and the same, connected the plastic ball and the fur head skin. So toy’s head would turn to specific angles that I set when motor was triggered.

    Img_2294

    Img_2298

    Img_2317

    Img_2319

    However, I made a mistake here. Without making sure where eyes would be, I hot glued the head skin with the plastic red ball. When I wanted to sew the IR sensor on its head, I found it’s hard to separate the fabric from the ball. Since I couldn’t mount the IR sensor at the right place, toy’s eyes were much lower than I originally expected. 

    Img_2322

    Img_2332

    Putting on its skin continuously.

    Img_2343

    Img_2345

    Img_2350

    Img_2353

    Final review document

    Img_2357

    Img_2359

    Img_2364

    Img_2369_2

    Img_2371

    Img_2373

    the testing video is on the way.
    to be continued…

     
  • Yury Gitman 11:55 pm on December 23, 2008 Permalink | Reply  

    Hello, How May I Help You? 

    Snoopdoll

    Do you often have guests over and wonder what they’re doing when you’re not looking?  Perhaps, they’re getting too comfortable and have stopped asking before they open your drawers in the kitchen, bathroom, bedroom, etc. to get what they need? 

    Hello, How May I Help You? is an adorable and friendly solution for such people like you.  Simply place the doll into a drawer of your choice, and turn on the switch before guests arrive.  If they snoop into your drawer, the doll will "greet" them with a message when it opens.

    http://vimeo.com/moogaloop.swf?clip_id=2619450&server=vimeo.com&show_title=1&show_byline=0&show_portrait=0&color=ffffff&fullscreen=1
    How May I Help You? (Final Form) from Fuki on Vimeo.

    (More …)

     
  • Yury Gitman 7:52 pm on December 16, 2008 Permalink | Reply  

    Bchito [bee-chee-to] 

    Do you keep forgetting things everytime you change your purse?

    Now there’s an easy way to remember everything you need to bring with you. It’s called Bchito

    Bchito is small and can be used with any purse.  It’s also available in different presentations to combine it with your outfit…and you’ll remember everything!
    It will help you remind the basics you need to bring with you on certain moments; work, an interview, a date, a gathering with friends, grocery shopping….

    But wait!  There’s more.  Bchito is also handy outside of your purse in those moments when you can’t find what your looking for.  Just place it outside of your purse and it will help you identify the items you need and seems impossible to find in your home.

    http://vimeo.com/moogaloop.swf?clip_id=2546988&server=vimeo.com&show_title=1&show_byline=1&show_portrait=0&color=ff0179&fullscreen=1
    Bchito from Jennifer Dopazo on Vimeo.

     
  • Yury Gitman 6:23 pm on December 16, 2008 Permalink | Reply  

    “The Love Lamp (ohhh yeah!)” 

    "The Love Lamp (ohhh yeah!)" sets the mood for love….everytime! 

    Lovelamp

    A pair of unassuming jeans hang from the lamp waiting to set the mood.

    Here’s how it works:
    1. turn on the lamp by flipping the switch on the condom box
    2. unzip the pants slowly
    3. watch the light turn from white to red
    4. listen to the sweet, sweet sounds of Marvin Gaye "Let’s Get It On"
    5. get it on…

    NICE!

    http://vimeo.com/moogaloop.swf?clip_id=2578884&server=vimeo.com&show_title=1&show_byline=1&show_portrait=0&color=&fullscreen=1
    The LOVE Lamp from Lynn WasHere on Vimeo.

     
  • Yury Gitman 6:05 pm on December 16, 2008 Permalink | Reply  

    Bath Ducky 

    " Quack quack, it is fill!"

    Dscn0871

    This is a modified rubber duck not only giving you a company when you are taking a bath but also watching the bath water for you.  You can save time and energy while waiting for the bath to do other things, because the bath ducky will inform you when the water is full.

      video is on the way

     
    • Ken Talton 1:27 pm on November 5, 2010 Permalink | Reply

      WHERE did you purchase the duck?

  • Yury Gitman 5:43 pm on December 16, 2008 Permalink | Reply  

    Surya 

    http://picasaweb.google.com/s/c/bin/slideshow.swf

    Surya is a toy, who needs love, affection and the Sun to survive. In today’s world of video games, a child needs a companion who would play with her outside or encourage being outdoors. Sun is a source of health and vitality which every child could benefit from. Get Surya for your kid and let both of them enjoy the sun together 🙂

    http://a.parsons.edu/~udays709/toy/sur-cd.mov

     
  • Yury Gitman 5:14 pm on December 16, 2008 Permalink | Reply  

    Compy: The monitor for your monitor! 

    Compy is the monitor for your monitor!

    Img_5663

    Do you spend too much time sitting in front of your computer? Do you
    waste time checking your email over and over instead of going out and
    having a life? Compy is for you!

    Compy clips to your laptop screen, and he sits patiently. He will use his infrared sensor to detect when you are in front of your computer, and if you’re there for 30 minutes, he will alert you! Don’t worry, if you walk away from your laptop, Compy knows and will restart his timer when you come back. He’s always happy to keep an eye on you!

    http://vimeo.com/moogaloop.swf?clip_id=2547096&server=vimeo.com&show_title=1&show_byline=0&show_portrait=0&color=00ADEF&fullscreen=1
    Compy! from Joana Kelly on Vimeo.

    By Joana Kelly (joanawithonen[at]gmail[dot]com)

     
  • Yury Gitman 5:12 pm on December 16, 2008 Permalink | Reply  

    Compy: A peek inside 

    Finally, Compy is up and working! Here are some photos of his guts, and his code is below!

    Compy’s front
    Img_5691
    I added googly eyes and a pipe cleaner bow-tie to give him a little craft charm.

    Compy’s Back
    Img_5692
    His battery pack is attached on the back.

    Compy with his Battery Pack removed
    Img_5694
    The battery pack is attached with velcro. The chip clip which holds Compy onto a laptop is hot glued.

    Compy’s Guts
    Img_5697
    I used an Arduino Mini, and had to put that in a little acrylic box from the Container Store separate from another acrylic box containing the speaker and the IR sensor.
    Code is below!

    (More …)

     
  • Yury Gitman 5:02 pm on December 16, 2008 Permalink | Reply  

    PING. What will it say about you? 

    Pinglogo

    PING is a smart trash/recycling bin that tracks your trash activity and reports it online. His aim is to help you develop better recycling habits by collaborating with others.

    Pingpic_2

    PING is part of a larger concept that asks the question: "If objects had a voice, what would they say about us and how would we respond?"  PING’s ‘voice’ is able to tell users about their trash habits and connects them with other PING users online to allow opportunity for collaboration toward a more sustainable world. PING does this by tracking each time you throw an item in either its waste or recycling compartment and reports this activity online as well as communicating directly with the users through its own illuminating lights. Future iterations of PING will also include a way for the bin to measure weight of the trash, how often the bin gets filled up, and will be able to remind users of trash day so they’ll remember to put the trash out. All this data collected will connect to much larger ideas online. For instance, knowing how much paper people recycle can help us calculate how many trees each individual is saving, etc. – allowing each person to feel a bit of accountability and reward for their recycling efforts and help them know that they do in fact play an important part. View a demo video:

    http://vimeo.com/moogaloop.swf?clip_id=2546377&server=vimeo.com&show_title=1&show_byline=1&show_portrait=0&color=&fullscreen=1
    PING. What will it say about you? from Katrina Bekessy on Vimeo.

    PING was created with Arduino and Processing. Source code can be found here:
    Download PING_ArduinoCode
    Download PING_uploadDataToSite

    PING was created by Katrina Bekessy.
    Katrina would love to hear any thoughts/opinions/feedback you might have about this project. If you’d like to learn more about it or share your thoughts, please contact Katrina at kmbekessy[at]gmail[dotcom].

     
    • blackout 10:03 pm on September 1, 2010 Permalink | Reply

      Useeeeeeeeeellllllesss !

  • Yury Gitman 4:35 pm on December 16, 2008 Permalink | Reply  

    Cedric the Catertainer! 

    Cedric The Catertainer: A Taunting Cat Toy

    Img_8002

    Do your cats get bored with their toys after only a few minutes? Do they miss you when you aren’t at home? Cedric the Catertainer is the new cat toy for the lonely, bored, and fickle cat. He demands to be played with. If your cat hasn’t been playing with him for a while he will start to taunt your cat, making fun and intriguing sounds. If your cat gets too close, Cedric will start to shake in fear and his eyes will light up. Add a little catnip to his fur and your cat will go crazy. Best. Cat Toy. Ever.

    http://vimeo.com/moogaloop.swf?clip_id=2542704&server=vimeo.com&show_title=1&show_byline=1&show_portrait=0&color=&fullscreen=1
    Catertainer Cat Test from Mouse & the Billionaire on Vimeo.

     
  • Yury Gitman 12:46 pm on December 16, 2008 Permalink | Reply  

    vMind! 

    vMind: The customizable vitamin reminder

    Do you often forget to take your vitamins? We all know they are good
    for you but its so easy to forget! Using both light and customizable
    sound, vMind will encourage and remind you to take your daily vitamins.

    Vmindphoto

    vMind uses both light and sound to ensure you remember your daily vitamin. You can customize vMind with your own encouraging message, favorite song,  or silly phrase! When you pick up your vitamin bottle you will hear your own personal recording and the light will turn bright green. As you set the bottle down the light will fade from green to red over a 24 hour period. The next day, when its red, you will remember that you need to take your vitamins!

    http://vimeo.com/moogaloop.swf?clip_id=2543405&server=vimeo.com&show_title=1&show_byline=1&show_portrait=0&color=&fullscreen=1
    vMind final from Jessica Floeh on Vimeo.

    Project by: Jessica Floeh (flobotic@gmail.com)

     
  • Yury Gitman 5:30 pm on December 12, 2008 Permalink | Reply  

    Catertainer: Behind the Scenes 

    The circuit inside the Catertainer has been miniaturized. Check it out!

    Img_7998

    It doesn’t get much more compact than that. There’s a switch to turn the bad boy on, and a button the side of the container to trigger the sound clips for exhibition purposes. Next step… fur!

    Read below for the final code

    (More …)

     
  • Yury Gitman 8:18 pm on December 8, 2008 Permalink | Reply  

    *** Making Toys 5, Public Presentation/Demos *** 

    Withprojects2

    The Parsons "Making Interactive Toys" MFA Class is having public demonstration/presentations of their projects.
    This class explores playful experience-design with interaction and wireless techniques.  They’ve made "smart" objects the engages users playfully, or into play itself. Their prototypes are documented in this blog.

    Date:
    Dec 16th / 6:30pm-8:30

    Formal Critique is 6:30-7:30pm,   General Playtesting 7:30-8:30pm

    Time:
    Formal presentation and critique will be at 6:30-7:30pm. Each student will present their work. 
    General free-from play-testing anyone attending is 7:30-8:30pm

    Location:
    2 W 13th St., 10th Floor   [Main Lab, Far Corner]
    New York, NY 10011
    http://cdt.parsons.edu/

    Open to Public. Come and play.

    ****************************************************************************

    Toyclass5

    ****************************************************************************

     
    • Subalekha 9:58 am on December 9, 2008 Permalink | Reply

      :-O wher was i??

  • Yury Gitman 4:49 pm on December 8, 2008 Permalink | Reply  

    Bichito: Week 03 

    http://vimeo.com/moogaloop.swf?clip_id=2434340&server=vimeo.com&show_title=1&show_byline=1&show_portrait=0&color=ff0179&fullscreen=1
    RFID Test 06 from Jennifer Dopazo on Vimeo.

    (More …)

     
  • Yury Gitman 7:52 pm on December 7, 2008 Permalink | Reply  

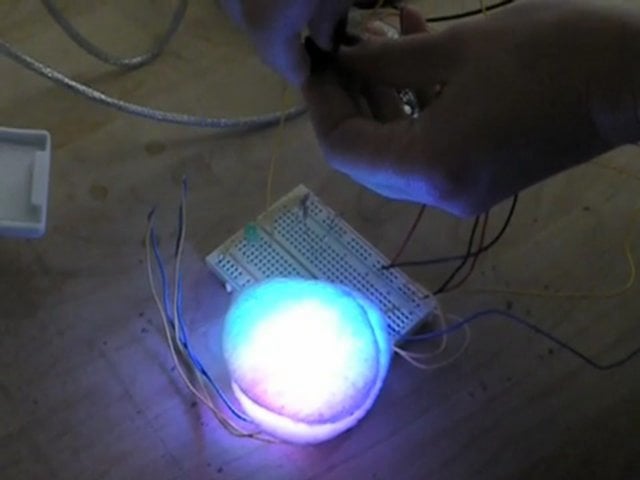
    Lets get it on Lamp. (bringin the heat…all night long!) 

    So I got the code and circuitry to all work correctly for my "Let’s Get It On" Lamp.  I am so excited to get it working on the reals.

    Yet, i’m still havin some issues with the pants circuitry.  Sometimes the fly signal works, others it doesn’t.

    *Side note: there pants have enough batteries in them to melt through the crotch.  This concerns me a bit and it could probably be wired in a more optimal way, with less batteries, but I need a break from this.  FYI: Not for actual wearing!

    Here’s some vid and pics of my progress. 🙂

    http://vimeo.com/moogaloop.swf?clip_id=2458647&server=vimeo.com&show_title=1&show_byline=1&show_portrait=0&color=&fullscreen=1
    lamp_circuit from Lynn WasHere on Vimeo.

    /////————————————————-CODE—————————————————–/////
    /*
    * BlinkColorFader — Example of how to select color & brightness
    *                    with two pots
    *
    * For more info on how to use pots and analog inputs see:
    http://www.arduino.cc/en/Tutorial/AnalogInput
    *
    * BlinkM connections to Arduino
    * PWR – — gnd — black — Gnd
    * PWR + — +5V — red   — 5V
    * I2C d — SDA — green — Analog In 4
    * I2C c — SCK — blue  — Analog In 5
    *
    * Note: This sketch sends to the I2C "broadcast" address of 0,
    *       so all BlinkMs on the I2C bus will respond.
    */

    #include "Wire.h"
    #include "BlinkM_funcs.h"

    //address for BlinkM
    #define blinkm_addr 0x00

    // INPUT: Potentiometer should be connected to 5V and GND
    int potPin = 0; // Potentiometer output connected to analog pin 0
    #define potPin 0          // analog in pins from zipper signal to control LED fade color: white to red
    #define ARRAY_SIZE 5     //this is the array size
    int potNums[ARRAY_SIZE];  //this reads AND stores 10 numbers from the potentiometer input.
    int pot_val;              //potentiometer value from zipper position on jeans

    // OUTPUT: Use digital pins 9-11, the Pulse-width Modulation (PWM) pins
    // LED’s cathodes should be connected to digital GND
    int pPin = 7;    //PLAY, conncected to pin8

    // Program variables
    int currentPlace = 0;                    //this is the total value
    int placeHolder = 0;                     //placehoder for each spot in the array
    int ave = 0;                             //average pot input numbers (normalize/smooth the input signal)

    //SETUP
    void setup()
    {
      BlinkM_beginWithPower();
      BlinkM_stopScript(blinkm_addr);  // turn off startup script
      Serial.begin(9600);              // …set up the serial ouput in 0004 format

      for (int i = 0; ARRAY_SIZE < 5; i++)
      {
        potNums[i] = 0;                       //fills all values in the array to 0
      }
      pinMode(pPin, OUTPUT);
    }

    // MAIN
    void loop()
    {
      currentPlace -= potNums[placeHolder];       //subtract the last reading from array
      potNums[placeHolder] = analogRead(potPin);  // read the potentiometer value at the input pin
      currentPlace += potNums[placeHolder];       //add to the array
      placeHolder++;                              //add 1 to the placeHolder each loop

      if(placeHolder >= ARRAY_SIZE)
      {
        placeHolder = 0;                         //if the placeHolder goes thru the whole array,
      }                                          //then loop back to the 1st spot in the array

      ave = currentPlace/ARRAY_SIZE;             //calc the average
      //Serial.println(ave);                     // send it to the computer (as ASCII digits)

      pot_val = analogRead(potPin);              // read the hue pot
      //Serial.println(pot_val);

    //——————————————-LED LIGHT——————————————

        //light should fade from white when zipper is up to red when zipper is down                                                          
      BlinkM_fadeToRGB( blinkm_addr, 255, int(pot_val/3.5), int(pot_val/3.5));  // adjust the green and blue to decrease with pot values

    //——————————————-MUSIC——————————————

      if (ave > 600)                    // Upper third of potentiometer"s range (600)
      {
        digitalWrite(pPin, HIGH);       //keep digital pin open if zipper is near top
      }


      else if (ave >= 200 && ave <= 500) // Middle third of potentiometer’s range (100 – 150)
      {
        digitalWrite(pPin, HIGH);      //keep digital pin open if zipper is in middle
      }

      else if (ave < 100)  // Lowest third of the potentiometer’s range (50 – 100)/turn on music here (< 100)
      {
        digitalWrite(pPin, LOW);      //put digital pin to GROUND if zipper is at bottom
      }

    //—————-DEBUG—————————————————–

      Serial.print("potVal(ave):");
      Serial.println(ave);

      delay(50);  // wait a bit because we don’t need to go fast
    }

     
  • Yury Gitman 1:08 am on December 4, 2008 Permalink | Reply  

    13 Meiwa Denki and Nonsense Toy Work shop 

    I just be reminded of Meiwa Denki.  Maybe you all already knew them. But they are so awesome that I think I have to post here for you guys, just for reference.

    Meiwa Denki’s products

    MeiwaDenki’s website

    They made a lot of instruments and toys( like knockman family toys) … and also some funny design tools.

    I guess the fallowing design from their Nonsense Toy Work shop is very useful for us in this particular time…(you can jump to the demonstration part if you don’t know Japanese) 😀

     
  • Yury Gitman 2:26 am on December 3, 2008 Permalink | Reply  

    antisocial cat_prototype 006 code iteration 

    So, yeah, I figured out what the problems were and finally made the servo work as the way I want! Hooray!
    When the toy detects me (using sensor), it would turn its head and stay at that position until it detects me again and turns its head.

    http://vimeo.com/moogaloop.swf?clip_id=2414067&server=vimeo.com&show_title=1&show_byline=1&show_portrait=0&color=&fullscreen=1
    prototype 006 code iteration from maze on Vimeo.

    And here is the code:

    ———————————————————–

    #include <Servo.h>

    Servo myservo; //create servo object to control a servo
    int sensor = 0;  // analog pin used to connect the sensor
    int motorPin=11;
    int val;    // variable to read the value from the analog pin
    boolean status=0; //status of detecting
    int counter=0;

    void setup()
    {
      myservo.attach(11);
      myservo.setMaximumPulse(2200);
     
      Serial.begin(9600);           // set up Serial library at 9600 bps
      pinMode(sensor, INPUT);
      //pinMode(relay, OUTPUT);
      pinMode(motorPin, OUTPUT);
      myservo.setMaximumPulse(2000);
      myservo.setMinimumPulse(700);

      Serial.print("Ready\n");
    }//end of setup

    int getSensor() {
      val = analogRead(sensor);            // reads the value of the potentiometer (value between 0 and 1023)
      val = map(val, 0, 1023, 0, 179);     // scale it to use it with the servo (value between 0 and 180)

      val=max(val,5);
      val=min(val,180);

      return val;
    } //end of getSensor

    void myRefresh(int delayTime){
      for(int i=0; i < delayTime/20; i++){ //delay is the total ms delay we want, 20 is the delay per iteration of the loop 
          Servo::refresh(); 
          delay(20);
      }
    }

    int move0(){
      Serial.print("servo position 0\n");
      myservo.write(0);
      //Servo::refresh();
      myRefresh(100);
    }//end of move0

    int move90(){
      Serial.print("servo position 90\n");
      myservo.write(90);
      //Servo::refresh();
      myRefresh(100);
    }//end of move90

    int move180(){
      Serial.print("servo position 180\n");
      myservo.write(180);
      //Servo::refresh();
      myRefresh(100);
    }//end of move180

    void loop()
    {
        val=getSensor();
        Serial.println(val);
       
       
        if (val>20){
          if(status==0){
             move180();
             myRefresh(1000);                           // waits for the servo to get there
             counter++;
          }

          else if(status==1){
            move0();
            myRefresh(1000);
            counter++;
          }//end of else

        }//end of if
       
        if(counter%2!=0){
          status=1;
        }else{
        status=0;
        }

        //myservo.write(getSensor());
        //Serial.println(getSensor());
        //delay(15);

      Servo::refresh();
    }

    —————————————————————————–

    I defined a function myRefresh() to make sure the servo would be refreshed every 20ms.
    Then I added 3 moving functions with different angles.
    The tricky part was that how to make servo stop and turn to reverse direction when the sensor detects someone again. By using 2 variables counter and status, I made servo turn to position 180 when the counter is even and turn to position 0 when it is odd.

    In this week, I’ll try to put the prototype that I have so far into the body of my plush prototype.
    The focus of the testing this week will be:
    – redesign the character for prototyping (make it big enough to put all my electronics)
    – building/ sewing the plush toy
    – make the toy’s head move! Think about materials, the skeleton, connections… etc.

     
  • Yury Gitman 1:00 am on December 3, 2008 Permalink | Reply  

    12 Quack! 

    After a long fight with win bound chip and arduino and bubbles…, I finally heard it quack!

    http://vimeo.com/moogaloop.swf?clip_id=2413709&server=vimeo.com&show_title=1&show_byline=1&show_portrait=0&color=&fullscreen=1
    Quack! from Hsiang Ju Hung on Vimeo.

    Here’s the code:
    // Input settings
    int analogPin = 3;   // ir sensor connected to analog pin 3
    int val = 0;         // variable to store the read value

    // Digital pin settings
    int aOut = 9;   // Play pin connected to digital pin 9

    // Variables
    int aVal = 0;   // Variables to store the input from the ir sensor

    int DEBUG = 1; // Set to 1 to turn on debugging output

    int average[100]; // Averaging Code setting
    byte counter = 0;

    void setup()
    {
      pinMode(aOut, OUTPUT);   // sets the pin as output

      if (DEBUG) {

        Serial.begin(9600);     // Open serial communication for reporting
      }
    }

    //Main program
    void loop(){
      val = analogRead(analogPin);

      //Averaging Code start
      average[counter] =  val;
      byte c;
      int total = 0;
      for(c = 0;c<100;c++){
        total += average[c];
      }
      int averaged = total / 100;
      Serial.println(averaged);
      counter = (counter + 1) % 100; //Averaging Code. modified from Dave Millis example

      if(val < 300){       
        analogWrite(aOut, 0);
        delay(1500);
        analogWrite(aOut, 255);
        delay(100);
      }
      else{                  
        analogWrite(aOut, 255);
      }
        if (DEBUG) {      // if we want to read the output
        DEBUG+=1;      
        if(DEBUG>100){  //print every hunderd loops
          DEBUG = 1;    // reset the counter
      Serial.print(val);
        }}
    }

    And here is the new win bound recorder which is smaller, more solid, and works as well as the old one. It sounds actually better because  I got a bigger speaker for it.
    Dscn0743

     
c
Compose new post
j
Next post/Next comment
k
Previous post/Previous comment
r
Reply
e
Edit
o
Show/Hide comments
t
Go to top
l
Go to login
h
Show/Hide help
shift + esc
Cancel