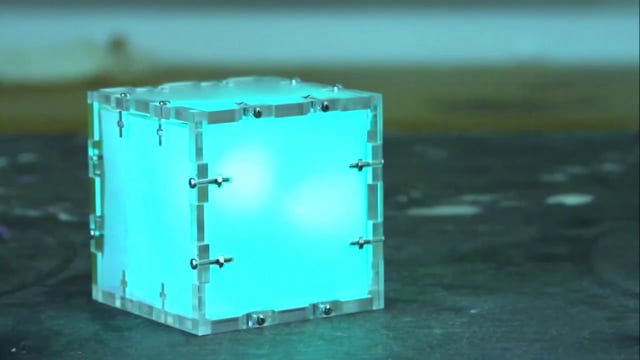
The Status Box – Final
Updates from giang063 Toggle Comment Threads | Keyboard Shortcuts
-
giang063
-
giang063
Final Project – Proposals
1. Smart Bop Bag
a) Role
An interactive souvenir. Something to keep in a shelf and play with kids — but not really a toy.
b) Behavior
This bop bag would behave like a regular one, with a twist: it would go up and down by itself, sensing the user presence.
c) Look and feel
Like a regular bop bag, with a smiling face and minimal visuals.2. Mood Box
a) Role
A box that displays the user mood and status — busy, available etc. Particularly useful for work and D12-like environments. One could tell by looking at the box if a person is focused on work or just checking Facebook, for instance.
b) Behavior
3 tilt sensors detect the changes in the x, y and z axys. By doing so, it is possible to track which is the “current” face. That triggers a different color animation of an RGB LED inside of the box.
c) Look and Feel
A regular cube, made out of semi opaque acrylic.3. Battleship Game
a) Role
A battleship game for one user.
b) Behavior
Two potentiometers control the x and y position of the target. A push button shoots. 3 different feedbacks: red explosion (success); green waves (water); yellow line (missed, but there’s a target either on the same line or the same column).
c) Look and Feel
Like a classic wooden board game, except for the LEDs and knobs.4. Wacky Building
a) Role
An interactive souvenir. Seemingly static, it will surprisingly respond to the user presence!
b) Behavior
3 sensors may trigger the interaction: sound, lightness and tilt. By turning the ambient lights off, the window-LEDs will start to turn on. Shaking the building triggers an alert sound and animation. Loud sounds trigger a song (played using the buzzer) and an antenna animation (servo).
c) Look and Feel
Like an old wooden toy, with minimal visual and shapes.
giang063
Wildcat Thaumatrope
Idea
Make a thaumatrope using Arduino and a DC motor.
Prototypes
a) I began by checking if the speed rotation was enough to make it possible:
b) Then I tested a 3-faced version. But it didn’t work.
c) I decided to test one that would animate the image, instead of just mixing it. It didn’t work out as I planned, though:
d) So I stick to the idea of mixing two images. I draw this cat in an iPad, transfer it to paper and then to the final boards.
giang063
Physical Display for Weather Data
Idea
A physical display for weather data.
How it works
The push buttons send a number from 0 to 3 to a Node.js application. The app connects to the Weather Underground API, requesting data from one of the four different cities — depending on the button pressed.
The data is sent to an html page and also back to arduino. The temperature is then mapped to an angle, which is assigned to the servo motor.
The scale has a very short range on purpose. The intention was to highlight the difference between the Brazilian cities and New York.
giang063
Simão Says
Final video!
A Simon Says-like game, but with a knob instead of buttons. The user has to repeat the sequence of angles, pretty much like a locker.
Thanks Laura Salaberry, Renata Miwa and Alessandra Kalko!
Soundtrack: instrumental version of “Amor de Chocolate“, by Naldo.
Design process here.
P.S.: “Simão” is the portuguese name for Simon. The name of the toy in Brazil is actually “Genius”.
giang063
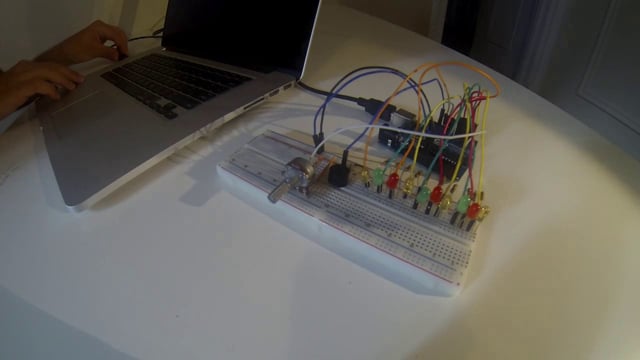
Simon Says Game
The hardest part was definitely starting to think about the enclosure. I had no idea from where to start. I didn’t know any material possibilities, and a I struggle with that for a long time. Until last week I didn’t know for sure if I would use a found box or build my own enclosure.
Soldering and assembling was hard as well. I’ve never done this before, so I asked a lot of friends for help. I didn’t have all the tools I needed — tape, hot glue — and, in the end, I wasn’t satisfied with the result. I may have damaged my potentiometer along the process, too.
The code was the easiest part. Though I’ve had some challenges along the way, like setting a timer instead of using delay, it wasn’t that difficult.
Understanding the circuit was also pretty easy. I think that we have a good basis of code and basic circuits in this class.
Turns out that building the enclosure wasn’t as hard as I thought. I’m glad I pushed myself into that. It led me to learn more about building physical things, as well as some practical stuff, like using the laser cutter.
Besides, that was first time I went to a physical store to search for electronic supplies. So, another surprise was that I liked it and it was very helpful. I ended up finding a red/green LED that fitted perfect in my project. Before that, I didn’t even know that it existed.
giang063
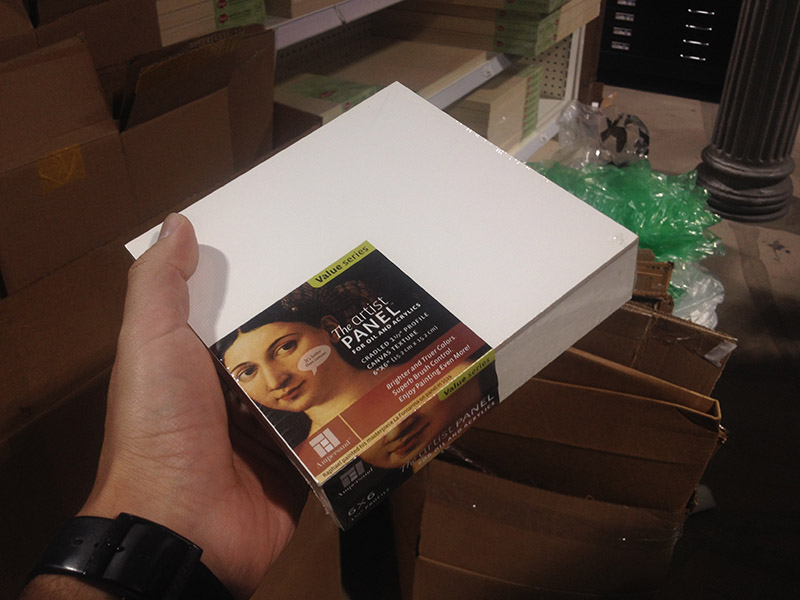
Simon Says Style Game – Proposals
1. Ideas Based on Found Enclosures
1.a. Artist Panel Box
Based on panels found in an Art Supply Store.
LEDs are hidden under the translucent paper. User can only see their colors.
1.b. Pencil Organizer
Buttons attached around the cylinder. LEDs inside, upside-down. User can only see the inner light while holding it.
1.c. Tupperware
Arduino and LEDs attached to tupperware’s lid.
2. “Blue Sky” Ideas
2.a. Pyramidal Simon
Made out of folded cardboard. Each face has an LED and a push button.
2.b. Locker-like Simon
Inspired by the Simon Says dynamics, but not exactly the same. LEDs turn on in an angular sequence, just like in a locker. User has to repeat the same angular sequence.
2.c. Keyboard-like Simon
Self-explanatory. Slightly different from Simon’s original dynamics, though. Multiple buttons can be triggered at the same time.
giang063
Musical Instrument
Idea
Make a real music instrument. Actions should change notes and time. I find pre-programmed musical loops frustrating for playing. Typical Lanier’s “locked-in” designs, maybe?
Push button should change some playing “mode”.
Original assignment: https://makingtoys.net/2013/09/27/1-read-and-do-exercises-pages-85-103/
Prototype 1
I first put a potentiometer to control the notes. They are playing a C Major scale, based on the frequencies I’ve found here.
Prototype 2
I added pauses between the notes so that they can articulate and I would have a tempo.
Prototype 3
I added a photo resistor to control the note value, i.e., duration. It feels more like a change in tempo, but it works.
Prototype 4
I added a push button to switch modes:
- In the first mode, potentiometer controls notes and photo resistor changes time;
- In the second mode, photo resistor controls notes and potentiometer changes time.
The second mode feels more intuitive to play.
Notes
The push button may need some adjustments to change modes properly. It may not be the best solution for a switch function.
Update
I added the bounce library and now it works perfectly!
giang063
World Maker Faire – 3 Favorite Projects
The Periodic Calendar
This is a different type of calendar. Its inventor, Joey Sellers, calls it a “perpetual” one. In fact, it can be used for any year from the 21st to the 24th century.
I liked this project because it was totally unexpected. I was very surprised to see a 2D printed visualization in Maker Faire. Besides, its solution is really ingenious.
If you want to know more about how it works, check the periodic calendar website. The project is very well documented there.
Cubelets
Beautiful and easy-to-use cubes that, once plugged in, can trigger different actions and behave like robots. Created by Modular Robotics.
For each robot, you need at least one battery cubelet. Than you can add a sensor cube — temperature, light, distance — and an action cube — drive, rotate, speaker etc.
There was a lot of projects in Maker Faire about building simplified frameworks for electronics, like Little Bits, for instance. But I have the impression that even when they don’t require any programming skill most of them are still to complex for a child to play with.
Cubelets was astonishingly simple. I just had to plug the cubes and it immediately worked. For a toy, I think that this is important. Once you have fun with it, then you can start to engage in building more complex stuff.
Scale
An art installation made of several obsolete gadgets. As far as I could understand, the only interaction is stepping on the scale. That triggers some apparently random behaviours in the semi-broken devices. It was created by Leo Kang, Taezoo Park and Steven Jackson.
I was first attracted to this piece by its aesthetics. The devices give a vintage look to the scene, even though most of them are probably not older than 2 decades. The lighting creates a great dramatic effect, too. In spite of its simple interaction, I think that this installation creates a strong emotional connection to the user.
giang063
My name is Gabriel. I am a visual designer interested in data visualization and interaction design. I have worked with web, but for the most part of my career so far, I worked for magazines. My website: http://gianordoli.com/
I took some Arduino classes before and I had a hard time coming up with ideas for physical projects. I think I am still stuck in a 2D way of thinking, that’s why I am taking this class.
My favorite toy from childhood is this puppet/monster: http://www.trash80s.com.br/2009/12/ta-lembrado-bogs-da-estrela/
There were 2 versions of them: the small one does nothing, it’s a regular hand puppet. The big one moves its eyes if you press a button from its inside. Like this: http://www.youtube.com/watch?v=KLQI5d_lymQ
P.S.: there is a problem with the picture upload in the blog.
giang063
Hello, world
Reply