Updates from gracegotlost Toggle Comment Threads | Keyboard Shortcuts

  • gracegotlost 6:44 am on December 22, 2013 Permalink | Reply  

    Final Project _ Smart Clock _ Grace Tingshan Gou 

     
  • gracegotlost 6:41 pm on December 1, 2013 Permalink | Reply  

    Final Proposals _ Tingshan Gou 

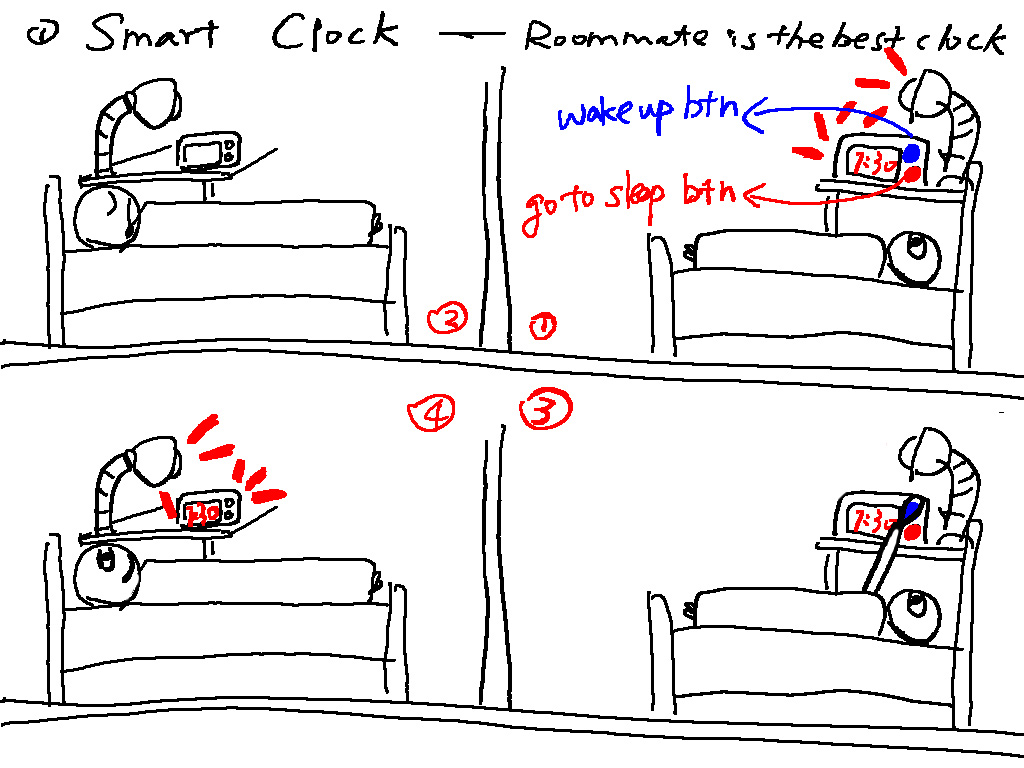
    1. Smart Clock

    I always have hard time waking up and getting up. So I want to make a smart clock controlled by my roommate downstairs. She gets up around 7:30am and goes to work everyday, so if she presses the buttons every time she gets up, hopefully I will get up. Psychologically, if you know there is a person getting up and working hard early, you will be pushed to do so. There would be additional functions besides Light&Sound.

    1 1-look&feel

    2. Auto Dress

    A cool dress should look like this:

    22-look&feel


    3. Self – assembled device

    I always want to see the transformer – style on Arduino controlled devices.

    33-look&feel

     
  • gracegotlost 10:09 pm on November 18, 2013 Permalink | Reply  

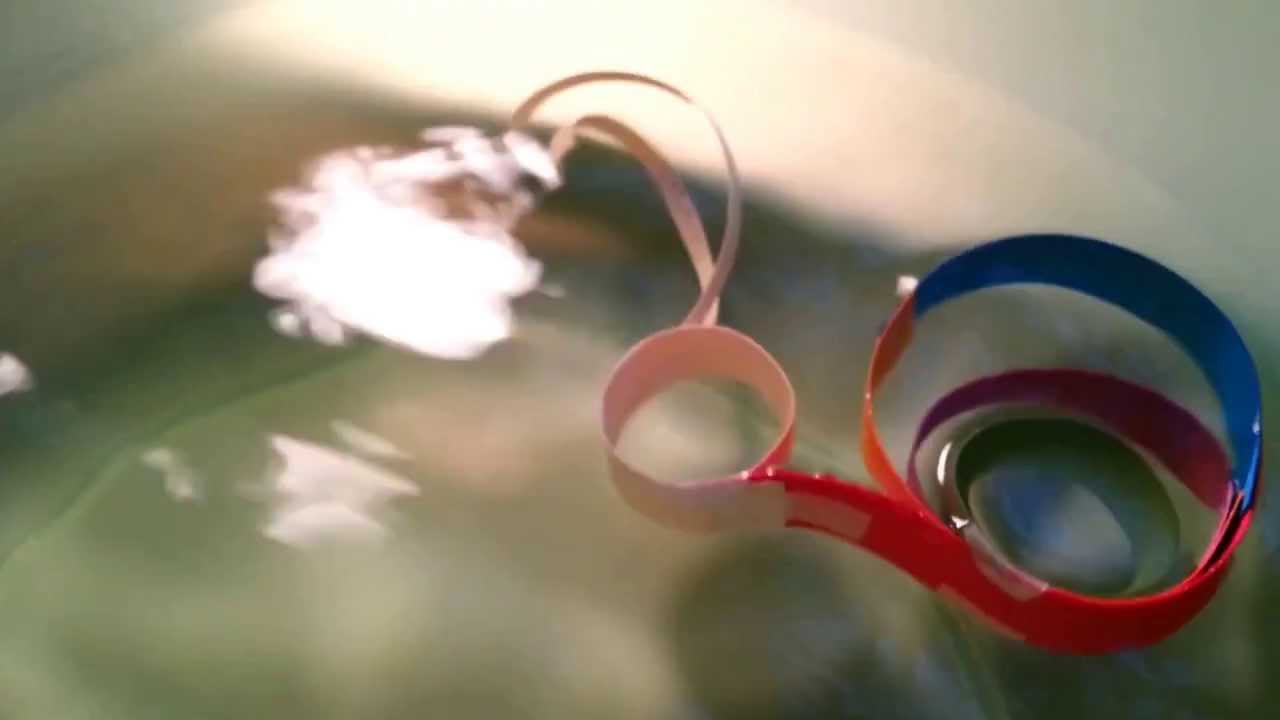
    Journey of Drowning Snail _ Tingshan Gou 


    An experiment of Technology & Nature with Servo.

     
  • gracegotlost 7:02 pm on November 18, 2013 Permalink | Reply  

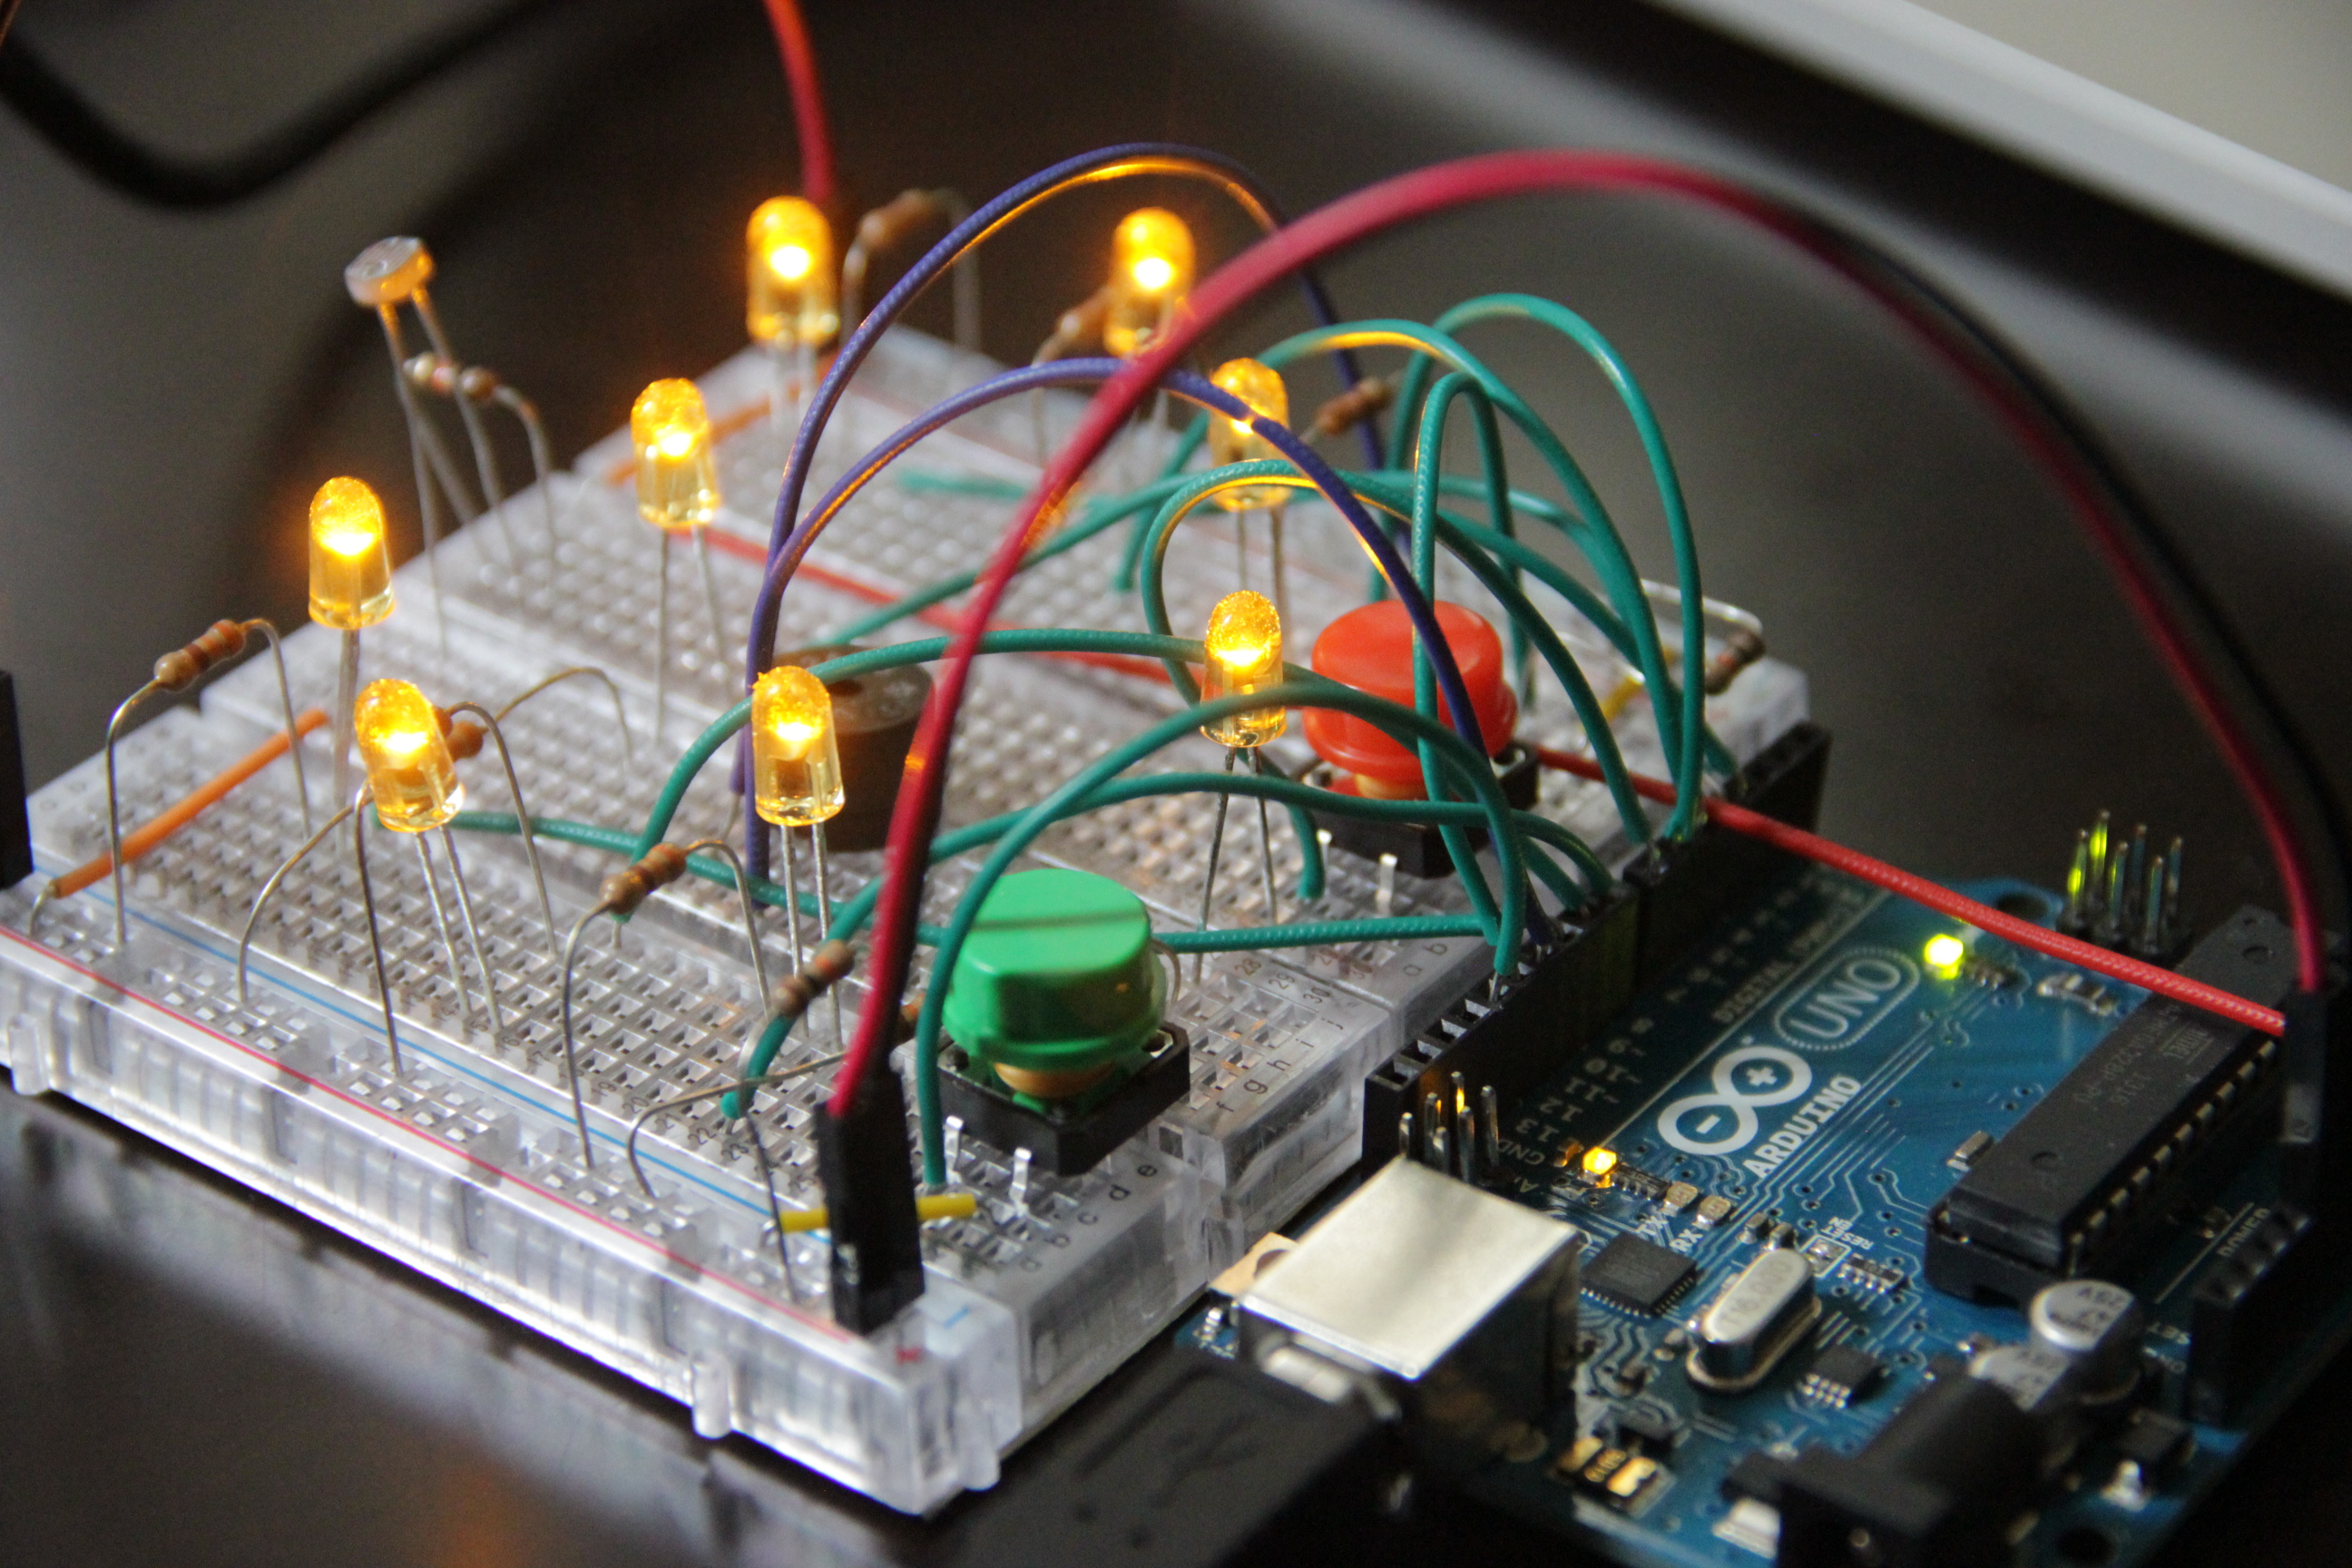
    Simon Says _ Tingshan Gou 

    _MG_2316 copy copy

    This is Edition 1:

    Sorry about the lame editing:(

    This is Edition 2:

    Special thanks to Elena Yang Wang and Siwen Li! Thank all my friends who helped me with this project!

     
  • gracegotlost 3:12 am on November 7, 2013 Permalink | Reply  

    simonSays Free Writing _ Tingshan Gou 

    1.What did you find difficult about building your project?

    a. Find the threshold value which defines the status of ON and OFF for photo resistor. The perfect value should be like this: the photo resistor works once I touch it but when I jump between these photo resistors it won’t accidentally trigger any resistors in between.

    b. How to make it interesting for two players. I used to make the rules like this: one player creates and the other one follows. But I found this might be boring for the first player since s/he only needs to remember a sequence. So I improved the rules like this: each player has to both follow and create at one time. This makes both of them highly participate by focusing on what each other creates and remembering former sequence. It would be more challenging and fun.

    c. Distance between each photo resistor. I tried several times to adjust the distance between each sensor, because either closer or further would decrease the experience when people play it.

    d. Improve experience. Currently there are only four photo resistors, which means when one player stands at one side and the other stands at the other side, one of them will cover LED when s/he touches the sensor. So there has to be a way to make it more convenient for people to play.

    e. How to make an enclosure. I want it to look really cool but I’m still figuring it out:(

    2.What did you find easy about building your project?

    a. The coding part is not so hard compared to the debugging process.

    b. Building circuit is easy once you have the whole view in your mind.

    3. What surprises you found while building your project?

    a. I felt really surprised and happy that people like to play the two players mode, at least they didn’t think it’s boring.

    b. I’m surprised that laser cutting is really interesting. I kept asking myself why I didn’t go there earlier.

     
  • gracegotlost 9:18 pm on October 21, 2013 Permalink | Reply  

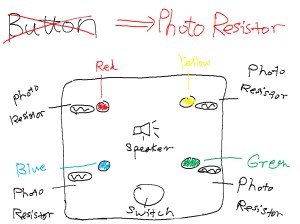
    Simon Says: 3 Sketches & 3 Enclosures _ Tingshan Gou 

    1. 3 Sketches
    a. Replace buttons for photo resistors to enhance user experience

    1

    b. Two players compete each other by taking turns to say and play using one Arduino

    2

    c. Four players compete each other by taking turns to say and play using four Arduinos

    3

    2. 3 Enclosures
    a. Leap Motion Container

    IMG_5402

    b. Pen Container

    IMG_5404

    c. Paper folding box

    IMG_5405

     
  • gracegotlost 6:28 pm on October 15, 2013 Permalink | Reply  

    RGB Light Effects_Tingshan Gou 

     
  • gracegotlost 4:31 pm on October 4, 2013 Permalink | Reply  

    Light&Sensor&Sound: Electronic Heart_Tingshan Gou 

    My idea is to create a visual/audio representation of Love. The sound was created based on the Initial Letter of me and my bf, which is GTS&YJL on the piano keyboard. The Green button represents when we are happy, while the Red button represents when we fight. I put the speaker in the middle of the heart, which looks like the heart can speak itself. I found it really interesting to arrange the wires, resistors, and other components like this. Apart from its function, the circuit is like a piece of work itself, quiet and humble, waiting for someone to push either of its color button, eager to tell its stories. In prototype 1, the button can not stay ON state itself once I moved my hand, so I have to hold the button and cover the sensor to change the mode. But in prototype 2 as I uploaded below, I used a variable to record the previous state of the button and changed the state only if the previous state is OFF and current state is ON. I also recreated the breadboard, cut off the +/- part of each board and combine them into one. Hope this won’t cause trouble to my later work >_<

    IMG_5400

    Below is the video:

     
  • gracegotlost 3:48 am on September 28, 2013 Permalink | Reply  

    Maker Faire 2013_Tingshan Gou 

    1. What inspires you? by Peter Ruprecht

    This work includes two parts: one is a video hang on the wall, telling the story of the author, the other one is a blackboard around it with a title said: What inspires you? Although this piece of work doesn’t have high – tech visual effect, I think it deeply interacts with people, who may watch the video to not. Further, people who draw on the board later would got inspired from people who draw earlier. In a world there full of technologies and mouse-keyboard interactions, drawing on board might be a harbor for people to get over a “shock”.
    IMG_5187

    2.Printed on Makerbot Replicator 3D printer by Jolly Roger Labs: Brian Davis, Ed Kalen

    The first one is a bubble tank for etching printed circuit boards, which hasn’t finished yet, and the second one is a modular robot controlled by Arduino. It was designed using OpenSCAD software. This is the first 3D printing projects I saw, and that’s why I got impressed by the convenience of how one can make prototypes quickly and precisely. I particularly like the board the creator made for the display of his entire process, it’s a piece of artwork itself.
    IMG_5225 copy

    3.Cosmic Ray Detector by a generous anonymous gift

    The last one is a cosmic ray detector. It is a cloud chamber that contains a layer of supersaturated alcohol vapor. Since the vapor is supersaturated it will easily condense into liquid form. When an electrically charged particle comes along, it ionizes the vapor, tearing away the electrons in some of the atoms along its path. This leaves these atoms positively charged. Other nearby atoms are attracted to the charged atoms. This is enough to start the condensation process. So you see little droplets of alcohol forming tiny clouds along the paths the particles too throughout the chamber. I didn’t really like it at first sight. but after seeing the introduction of these tiny white lines and dots, I was shocked. The cosmic ray detector may be familiar with some people, but for me, I never thought of these invisible rays can be seen and “feel”. What impressed me more is how the “rays” have been created.
    Other interesting things I found:

    1. Willings for 3D printer

    IMG_5272

    2. All in one machine for self-taking photo and printing

    IMG_5175

    3. The future needs fixing by Sugru – Self-setting rubber for fix, modify, and adapt

    IMG_5243 copy
     
  • gracegotlost 3:00 am on September 14, 2013 Permalink | Reply  

    Bio Tingshan Gou 

    Hello, round pegs&square holes,

    It’s really nice to meet you, probably again. It’s embarrassing to mention my computer science background, because my coding skill just sucks as my design skill does. Somebody may ask: then why did you add one more unfamiliar area to burden yourself? I’d say: That’s why I’m here! I believe working on three nightmare areas at the same time will lead to an unexpected result! Hopefully it is a good one… There is another reason: Carla and Ricardo, my instructors during Bootcamp, said Yury is awesome!!! with their eyes shining stars.

    So here I am.

    Since I can’t upload the image, here is the link with my childhood toy included:

    I loved it! Lots of it! I loved to rearrange them and made them fight with each other by tearing them apart. See? I had a gift to be a tinker since I was born!

     
c
Compose new post
j
Next post/Next comment
k
Previous post/Previous comment
r
Reply
e
Edit
o
Show/Hide comments
t
Go to top
l
Go to login
h
Show/Hide help
shift + esc
Cancel