Updates from josefayala Toggle Comment Threads | Keyboard Shortcuts

  • josefayala 10:02 pm on December 18, 2011 Permalink | Reply  

    Josef Ayala-Tell Tale Heart Box Iteration 2 and 3. Final Pieces (Hat Piece/Tell Tale Heart). 

    Iteration 2:
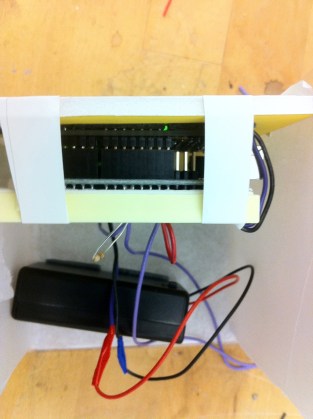
    So, I made a second iteration of the “Tell Tale Heart” box, but it really wasn’t anything to write home about. It essentially utilized the same components of its black Styrofoam counterpart (the list can be found below the picture). That said, the difference is that I made the enclosure by hand from spare pieces of balsa wood. I drew the floorboards on it, and hot glued them together to make the box you see. In this iteration I also drew a figure and cut him out by hand using an X-acto blade. Afterwards, I attempted to make a smooth popping transition for the solenoid by using sand paper to round out the edges (or in some instances remove tight pieces of balsa wood left over from the cutting). Overall, I was not happy with the end product as the figure moved sluggishly and would even get caught in the floor it was attempting to pop out of. In the end, this box was destroyed before I could even video tape it. Needless to say it needed a lot of work.

    Project 1 (Tell Tale Heart Box-3rd and Last Iteration):
    Description: The Tell Tale Heart Box was my rendition of a scene from Edgar Allen Poe’s short story. It essentially uses the pulse sensor to generate your heart beat and apply it to a solenoid that pushes the floor board up and down (simulating a live pulse and recreating the paranoia felt by the story’s protagonist that in turn causes him to turn himself in to the authorities stopping by his home). In this iteration, I decided to go a for a smaller prototype by starting with a draw bought from the container store (to break myself out of the habit of making 8 by 8 boxes). The box was altered in the sense that it has balsa wood pieces glued to the bottom of it to raise it a few centimeters off the ground or table. The reason for this is because the solenoid was too tall for the enclosure. To compensate, I had a hole laser cut in one part of the box that was big enough to fit the retracted coil when the solenoid was pumping/pulling. Aside from that this circuit had not changed much. Another great aesthetic difference was that the floor boards were not laser etched in balsa wood and cut for the purpose of fitting into the new drawer enclosure. Another box was cut out of this with the laser cutter and glued to the top of the solenoid so that it could be pushed upward simulating a heart beat under the floor board.

    Heart Box uses:
    -Pulse Sensor (glued on the backside and ready for use on the back side of the box).
    -Solenoid (glued in the center of the box for vertical stance with a floor board glued to the pin).
    -3 9V batteries (2 for the solenoid/1 for the Arduino board)

    • Bread Board/Arduino Uno/Jumper Cables etc.

    Feedback: Feedback was well received for this product. I was told to explore the options of sound and other effects to make it more realistic. It was also suggested that I could get the solenoid to act in real time with Pulse Sensor. How? Mystery to me, but I’m interested in finding out more. I imagine there is some sort of way to set up the solenoid with a faster reaction.

    CODE CAN BE FOUND IN MY PREVIOUS POST HERE.

    Project 2 (Wake-Box:Final Iteration):

    How do you improve on a classic?
    Description: This project is comprised of an Arduino UNO board, an LoL Shield, and a tilt sensor. Using the tilt sensor when it is attached to a baseball cap should reflect when I am asleep. My head hanging down should show that the tilt sensor is ON and beginning the scrolling text which says “WAKE ME UP AT 96TH STREET”. When someone sees this they will ideally wake me up and when I lift my head the tilt sensor would tilt OFF and stop creating the Scrolling Text. The premise for this project is that it would be used in the train station during my evening commute to help me NOT miss my stop at 96th street..

    This iteration saw a better implementation for my enclosure. Previously the paper set up on my project was a bit ratty looking with patches and holes missing. I also managed to tape the screen one face of the box (using 1lb resistant removable gel tiles). I was always proud of this project and found it was a good exploration into the use of PComp in an Instruction Set For Strangers format. It was also a great way to see if people would actually wake me up. It should be noted that this project is not meant for retail but rather some sort of performance art.

    CODE CAN BE FOUND IN MY PREVIOUS POST HERE.

     
  • josefayala 3:25 pm on December 7, 2011 Permalink | Reply
    Tags:   

    Josef Ayala-Tell Tale Heart Box (Pulse Sensor Project) 

    Description: The Tell Tale Heart Box was my small diorama rendition of an intense scene from Edgar Allen Poe’s short story. It essentially uses the pulse sensor to generate your heart beat and apply it to a solenoid that pushes the floor board up and down (simulating a live pulse and recreating the paranoia felt by the story’s protagonist that in turn causes him to turn himself in to the authorities stopping by his home).

    Heart Box uses:
    -Pulse Sensor (glued on the backside and ready for use on the back side of the box).
    -Solenoid (glued in the center of the box for vertical stance with a floor board glued to the pin).
    -3 9V batteries (2 for the solenoid/1 for the Arduino board)

    • Bread Board/Arduino Uno/Jumper Cables etc.

    more photos coming…

     
    NOTE: I lucked out with this project because the pulse sensor code runs off of one pin to begin with. I simply hooked the solenoid to that pin and had it working from the beginning. That said, the vast majority of this code is the work of Yury Gitman and Joel Murphy and has nothing to do with me.

    -Josef

    /*
    This program reads data from the Pulse Sensor.
    Serial output is designed to mate with Processing sketch “P_PulseSensor_xx” series
    Serial Protocol initiates datastring with coded ascii character, ends each message with carriage return
    We named the variable that holds the heart rate (BPM) after the group Quantified Self.
    They backed our Kickstarter campaing at the $600 level and having a variable named after them is one of their rewards.
    Go Count Yourself!!! http://quantifiedself.com/

    by Joel Murphy & Yury Gitman in Brooklyn, Summer 2011.
    */

    // VARIABLES
    unsigned long time; // Holds current time for pulse rate calculation
    unsigned long lastTime; // Used for calculating time between beats
    int Sensor; // Holds current analog Sensor Reading
    int lastSensor; // Used to find waveform direction
    int Peak; // Holds value of peak in waveform
    int Trough; // Holds value of trough in waveform
    int beats[10]; // Array to collect time between beats for calculating BPM
    int beatCounter = 0; // Used to hold position in beats array
    int QuantifiedSelf; // Used to hold the heart rate value (BPM)
    int drop; // Holds the amplitude of waveform

    int fadeRate = 10; // when arduino finds a heartbeat, it will fade an LED on pin 11 (PWM)
    int Fade = 0; // Fade variable will set PWM

    boolean falling = false; // used to keep track of waveform direction

    // PINS
    int LED = 13; // pin 13 – solenoid
    int dimLED = 11; // LED on pin 11 fades with each pulse
    int PulseSensor = 5; // Pulse Sensor purple wire connected to analog pin 5

    void setup()
    {
    pinMode(LED, OUTPUT); // set the LED pins as outputs
    pinMode(dimLED, OUTPUT);
    Serial.begin(115200); // start the hardware serial block and set the baud rate
    lastTime = millis(); // initialize lastTime variable
    }
    void loop()
    {
    Sensor = analogRead(PulseSensor); // take a reading
    Serial.print(“s”); // send raw analog data to Processing sketch (or other)
    Serial.println(Sensor); // ‘s’ = Raw Sensor Data
    // USE WITH LED ON PIN 11 FOR FADE EFFECT
    Fade -= fadeRate; // Fade variable set to 255 when heart beat is found
    Fade = constrain(Fade,0,255); // these lines fade the LED
    analogWrite(dimLED,Fade);

    // KEEP TRACK OF THE DIRECTION OF THE WAVEFORM
    if (falling == false){ // if the sensor values are rising
    if (Sensor lastSensor){ // otherwise, if current reading is bigger, values are still rising
    Peak = Sensor; // record the next potential peak
    lastSensor = Sensor; // keep track of rising signal
    }
    }
    if (falling == true){ // if the sensor values are falling
    if (Sensor > lastSensor){ // if current reading is bigger than last reading
    falling = false; // a trough has been reached
    Serial.print(“T”); // send trough value to Processing sketch (or other)
    Serial.println(Trough); // ‘T’ = Trough in waveform
    drop = Peak – Trough; // difference = signal amplitude
    Peak = 0; // setting Peak to 0 here helps get rid of noise
    // THIS IF STATEMENT IS HOW THE HEARTBEAT IS FOUND IN PULSE SENSOR WAVEFORM
    if (drop > 4 && drop <60){ // ignore noise in signal. adjust as needed
    timeBeat(); // go work out the BPM
    Serial.print("d"); // send the amplitude to Processing Sketch (or other)
    Serial.println(drop); // 'd' = amplitude of waveform
    digitalWrite(LED,HIGH); // start pin 13 LED blink
    Fade = 255; // set fading LED to high brightness

    }
    }else if (Sensor < lastSensor){ // otherwise, if current reading is smaller weʻre still falling
    Trough = Sensor; // record the next potential trough
    lastSensor = Sensor; // keep track of falling signal
    }
    }
    delay(20); // break for 20mS. Processing frame-rate = 100.

    }// END VOID LOOP

    void timeBeat(){
    time = millis(); // take note of the current time
    beats[beatCounter] = time – lastTime; // record miliseconds since the last pulse in beats array
    lastTime = time; // stay up to date!
    beatCounter ++; // move array pointer to next position in array
    if (beatCounter == 10){ // if we've taken 10 readings, it's time to derive heart rate
    QuantifiedSelf = getBPM(); // go derive the heart rate
    Serial.print("q"); // send the heart rate to Processing sketch (or other)
    Serial.println(QuantifiedSelf); // 'q' = heart rate
    beatCounter = 0;
    }
    }// END OF timeBeat FUNCTION

    // This function will return a value for heart rate (Beats Per Minute)
    int getBPM(){
    int dummy; // used in sorting
    int mean; // used in averaging
    boolean done = false; // clear sorting flag
    // this simple sorting routine will arrange values in the beat array from lowest to highest
    while(done != true){
    done = true;
    for (int j=0; j beats[j + 1]){ // sorting numbers here
    dummy = beats[j + 1];
    beats [j+1] = beats[j] ;
    beats[j] = dummy;
    done = false;
    }
    }
    }
    // this FOR loop selects the longer beat time values to avoid incorrect heart rate readings
    for(int k=1; k<9; k++){ // exclude lowest and highest values from averaging
    mean += beats[k]; // add beat times together
    }
    mean /=8; // averaging
    mean = 60000/mean; // devide 60 seconds by average pulse length
    return mean; // return beats per minute
    }// END OF getBPM function

     
  • josefayala 1:12 am on November 26, 2011 Permalink | Reply  

    Josef Ayala-Wake Box 

    This project is comprised of an Arduino UNO board, an LoL Shield, and a tilt sensor. Using the tilt sensor when it is attached to a baseball cap should reflect when I am asleep. My head hanging down should show that the tilt sensor is ON and beginning the scrolling text which says “WAKE ME UP YO”. When someone sees this they will ideally wake me up and when I lift my head the tilt sensor would tilt OFF and stop creating the Scrolling Text. The premise for this project is that it would be used in the train station during my evening commute to help me NOT miss my stop in Harlem. 


    <code>

    const int buttonPin = A4;     // the number of the pushbutton pin
    int buttonState = 0;         // variable for reading the pushbutton status

    #include “Charliplexing.h”
    #include “Font.h”
    #include “WProgram.h”

    // Technically the number of columns of LEDs minus one
    #define SCREEN_WIDTH 13

    // Scroll delay: lower values result in faster scrolling
    #define SCROLL_DELAY 80

    /* How long to wait after the last letter before
    going back to the beginning and repeating */
    #define REPEAT_DELAY 500

    int textLength, totalPixels;
    char text[]=”WAKE ME UP YO”;

    void setup() {
    // initialize the pushbutton pin as an input:
    pinMode(buttonPin, INPUT);
    LedSign::Init();
    getLength(text, &textLength, &totalPixels);
    }

    void loop(){
    // read the state of the pushbutton value:
    buttonState = digitalRead(buttonPin);

    // check if the pushbutton is pressed.
    // if it is, the buttonState is HIGH:
    if (buttonState == LOW) {
    int x=0;
    for(int j=SCREEN_WIDTH; j>-totalPixels-SCREEN_WIDTH; j–) {
    x=j;
    LedSign::Clear();
    for(int i=0; i<textLength; i++) {

    if (x>=SCREEN_WIDTH)
    break;
    }
    delay(SCROLL_DELAY);
    }
    delay(REPEAT_DELAY);

    }
    else {

    }
    }

    void getLength(char* charArray, int* lengthPtr, int* pixelPtr) {
    /* Finds the length of a string in terms of characters
    and pixels and assigns them to the variable at
    addresses lengthPtr and pixelPtr, respectively. */

    int charCount = 0, pixelCount = 0;
    char * charPtr = charArray;

    // Count chars until newline or null character reached
    while (*charPtr != ” && *charPtr != ‘\n’) {
    charPtr++;
    charCount++;

    /* Increment pixelCount by the number of pixels
    the current character takes up horizontally. */
    pixelCount += Font::Draw(*charPtr,-SCREEN_WIDTH,0);
    }

    *pixelPtr = pixelCount;
    *lengthPtr = charCount;
    }

    </code>

     
  • josefayala 8:00 pm on November 5, 2011 Permalink | Reply
    Tags: Jack-O-Lantern, Pumpkin, Tilt Sensor   

    Josef Ayala-Wake-O-Lantern! 

    Description: This pumpkin was a simple exercise in implementing a circuit inside of an enclosure. It’s immediate purpose is to act as a sort of alarm, or sound and light signal for anyone aware of its use. The overall interaction of this pumpkin comes from changing its vertically. When the pumpkin is upright it’s quiet and when it is placed upside down it emits a sound. It’s interaction is based on both visual (seeing me sleep) and hearing the alarm (flipping the pumpkin over).

    Wake-O-Lantern uses:
    -Tilt Sensor (laced with cardboard to prevent short circuit).
    -Blue/Red LED (laced with cardboard to prevent short circuit).
    -8 Ohm Speaker (for positioning purposes, it was hot glued).

    PComp Pumpkin-Midterm-A from Josef Ayala on Vimeo.

    Interaction video can be seen here: http://vimeo.com/31656339

    (Sorry, still waiting for the upload!)


    <code>
    // constants won’t change. They’re used here to
    // set pin numbers:

    const int buttonPin = 4;     // the number of the pushbutton pin
    const int ledPin5 = 5;      // the number of the LED pin
    const int ledPin9 = 9;
    const int speaker = 8;
    int timer = 100;

    // variables will change:
    int buttonState = 0;         // variable for reading the pushbutton status

    void setup() {
    // initialize the LED pin as an output:
    pinMode(ledPin5, OUTPUT);
    pinMode(ledPin9, OUTPUT);
    pinMode(speaker, OUTPUT);

    // initialize the pushbutton pin as an input:
    pinMode(buttonPin, INPUT);
    }

    void loop(){
    // read the state of the pushbutton value:
    buttonState = digitalRead(buttonPin);

    // check if the pushbutton is pressed.
    // if it is, the buttonState is HIGH:
    if (buttonState == LOW) {
    // turn LED off:
    delay (1000);
    digitalWrite(ledPin5, HIGH);
    digitalWrite(ledPin9, LOW);
    tone(speaker,1000);
    delay(2000);
    noTone(speaker);
    delay(1000);
    }
    else {
    // turn LED off:
    delay (1000);
    digitalWrite(ledPin9, HIGH);
    digitalWrite(ledPin5, LOW);

    }
    }
    <code/>

     
  • josefayala 5:56 am on September 23, 2011 Permalink | Reply
    Tags: 3D printing, , DoItYourself, , New York, New York City, New York Hall of Science, Open source   

    3 Things I Liked At Maker Faire by Josef Ayala 

    Going to Maker Faire this year made me realize how much I REGRET not going to Maker Faire last year in 2010. I had such a really good time all under the impression that I would look at it all and yawn. I will eat those words now, and most likely be at Maker Faire in 2012!!!!! It was not only great to see how people’s minds work but also how everyone attacked their tasks and executed assembly in a very unique way but also good to see a really nice and well rounded community for this sort of event. It was peculiar, interesting, entertaining and nerdy all rolled into one. It was also quite scary to see 8 year olds speaking to me using terms such as “open-source”. When I was 8, “open-source”  didn’t exist and I wasn’t playing around with sensors (See sling shot photograph from my first post)! The world might just have a bright future after all.


    That said, here are some of my favorite exhibits from Maker Faire: VIDEOS COMING SOON!!!!

    1) GetLoFi – Contact Mics:

    These guys were great, I am heavily into anything related to the sound field. Even though, people might have thought that this was a very simplistic setup and effect, I was still greatly surprised by the ingenuity and talent that goes into something like this. After all that they still managed to pull off a very nice aesthetic for these extremely awesome mics. I plan to try to build one for myself in the future. :

    The microphones are “piezoelectric” which essentially means is that they respond by in large to pressure. Piezo electricity contains the ability of some materials to produce a voltage when subjected to pressure—to convert vibrations into an electrical signal.

    2) Drum Machine/Synth TV Set:

    Again, music oriented Arduino projects win me over. I liked this set up because it incorporated what I believe was an Arduino set up to the television set which triggered an Animation on the adjacent television screen. The drum machine had a similar set up which incorporated what I believe was a light sensor which detected the absence of light and triggered different drum sounds based on how you marked up the projector screen disc. It was a fun set up and I got to play Fur Elise and The Entertainer.


    3) 3-D Printing:

    This never ceases to amaze me. It is growing on me more as I am now learning about “parametric design” for products in my Thesis section but overall, it’s nice to see how things are made and processed. Below I believe are examples of algorithmic product development.


    honorable mentions:

    aren’t these helmets cool !?


  • josefayala 4:28 pm on September 16, 2011 Permalink | Reply
    Tags:   

    Hi 

    I’m Josef (by the way)

    A)   BS/MS

    B)   I am interested in this class because I would like to create in depth and technical projects. More importantly, I would like to immerse myself in the culture that surrounds Physical Computing to get a feel for what people are making and what problems people are trying to solve  within their respective fields.

    C)

     
c
Compose new post
j
Next post/Next comment
k
Previous post/Previous comment
r
Reply
e
Edit
o
Show/Hide comments
t
Go to top
l
Go to login
h
Show/Hide help
shift + esc
Cancel