Updates from mónica arias. Toggle Comment Threads | Keyboard Shortcuts

  • mónica arias. 5:09 am on December 20, 2011 Permalink | Reply  

    mr. rosie: v01 & v02. 

    v01.

    When we were given the pulse sensor assignment, the first thing that came to mind were ROBOTS! Humans create them, they give them life, they give them a “pulse” in a way. So I decided to create a little robot that came to life when you give him your pulse. I named him Mr. Rosie, inspired by Rosie, the robot-maid from The Jetsons.

    Here are some pictures of the first iteration. He moved his hat and light up with every pulse it sensed.

    (More …)

     
  • mónica arias. 4:40 am on December 20, 2011 Permalink | Reply  

    lucy, the good karma night lamp. 

    Lucy, the magic-6-cube evolved into Lucy, the good karma night lamp. She wants to make people happy since the moment they wake up. So she turned into a night lamp that sleeps next to you and lights up your life in the darkness. When you wake up, you wake her up, and ask her if you’ll have a good day today. She then asks you to tilt her for your answer… and VOILA! You get your good karma with deep thoughts like “WORD”, “HELL YEAH”, and “BET ON IT”.

    (More …)

     
  • mónica arias. 9:50 pm on November 27, 2011 Permalink | Reply  

    lucy, the magic-6-cube. 

    Lucifer was intended to be a Magic-8-Ball, but she was born different. She was born a Magic-6-Cube. On top of that, she has struggled with her name all her life, so to fight it off, she decided she would make people love her by always answering positively. This means, of course, that sometimes people might ask the wrong question, and a positive answer might not be that good for them. But Lucy (as she prefers to be called) is happy whenever she can make one person’s day brighter!

    /*
      Requires LoL Shield library, at least V0.2Beta
    
     http://code.google.com/p/lolshield/downloads/list
    
     And the Font.cpp from LoL_Shield-100915.zip on ikkei's page:
    
     http://web.mac.com/kxm_ikkei/Site/LoL.html
    
     Based on original TEXT SAMPLE CODE for LOL Shield for Arduino
     Copyright 2009/2010 Benjamin Sonntag <benjamin@sonntag.fr> http://benjamin.sonntag.fr/
    
     (This version edited by Walfas)
     */
    
    #include "Charliplexing.h"
    #include "Font.h"
    #include "WProgram.h"
    
    // Technically the number of columns of LEDs minus one
    #define SCREEN_WIDTH 13
    
    // Scroll delay: lower values result in faster scrolling
    #define SCROLL_DELAY 80
    
    /* How long to wait after the last letter before
     going back to the beginning and repeating */
    #define REPEAT_DELAY 500
    
    // SMILEY FACE
    byte line = 0;       //Row counter
    char buffer[10];
    int value;
    
    // BUTTON
    int buttonPin = A5;     // the number of the pushbutton pin
    int lightPin = A0;
    int ledPin = A2;
    
    int val = 0;
    int buttonState = 0;         // variable for reading the pushbutton status
    
    int textLength, totalPixels;
    
    char text[9];
    
    int r=0;
    
    void setup() {
      Serial.begin(9600);
      LedSign::Init();
      pinMode(ledPin, OUTPUT);
      pinMode(buttonPin, INPUT);
      pinMode(lightPin, INPUT);
    
    }
    
    void loop() {
        buttonState = digitalRead(buttonPin);
        val = analogRead(lightPin);  // Read the value (amount of light) from photocell
        Serial.println(val);           // Print out the value to the serial port
    //
        smiley();
    
     if(val <= 330){
    digitalWrite(ledPin, HIGH);
     }
     else{
      digitalWrite(ledPin, LOW);
     }
    
      // BUTTON
    
      if (buttonState == HIGH) {
        r = int(random(4));
    
        if(r==0){
          text[0] = 'H';
          text[1] = 'E';
          text[2] = 'L';
          text[3] = 'L';
          text[4] = ' ';
          text[5] = 'Y';
          text[6] = 'E';
          text[7] = 'A';
          text[8] = 'H';
    
        }
        else if(r==1) {
          text[0] = 'B';
          text[1] = 'E';
          text[2] = 'T';
          text[3] = ' ';
          text[4] = 'O';
          text[5] = 'N';
          text[6] = ' ';
          text[7] = 'I';
          text[8] = 'T';
    
        }
         else if(r==2) {
          text[0] = 'A';
          text[1] = 'S';
          text[2] = 'K';
          text[3] = ' ';
          text[4] = 'A';
          text[5] = 'G';
          text[6] = 'A';
          text[7] = 'I';
          text[8] = 'N';
        }
    
          else if(r==3) {
          text[0] = 'W';
          text[1] = 'O';
          text[2] = 'R';
          text[3] = 'D';
          text[4] = ' ';
          text[5] = ' ';
          text[6] = ' ';
          text[7] = ' ';
          text[8] = ' ';
        }
    
        getLength(text, &textLength, &totalPixels);
        int x=0;
        for(int j=SCREEN_WIDTH; j>-totalPixels-SCREEN_WIDTH; j--) {
          x=j;
          LedSign::Clear();
          for(int i=0; i<textLength; i++) {
            x += Font::Draw(text[i],x,0);
            if (x>=SCREEN_WIDTH)
              break;
          }
          delay(SCROLL_DELAY);
        }
        delay(REPEAT_DELAY);
      }
    
    }
    
    // FUNCTION
    void smiley(){
    	delay(400);
    	DisplayBitMap(0);
    	DisplayBitMap(1560);
    	DisplayBitMap(3900);
    	DisplayBitMap(1560);
    	DisplayBitMap(0);
    	DisplayBitMap(1008);
    	DisplayBitMap(480);
    	DisplayBitMap(192);
    	DisplayBitMap(0);
    	delay(400);
    	DisplayBitMap(1560);
    	DisplayBitMap(3900);
    	DisplayBitMap(1560);
    	DisplayBitMap(0);
    	DisplayBitMap(4092);
    	DisplayBitMap(2040);
    	DisplayBitMap(1008);
    	DisplayBitMap(480);
    	DisplayBitMap(0);
    	delay(400);
    	DisplayBitMap(0);
    	DisplayBitMap(1560);
    	DisplayBitMap(3900);
    	DisplayBitMap(1560);
    	DisplayBitMap(0);
    	DisplayBitMap(2040);
    	DisplayBitMap(1008);
    	DisplayBitMap(480);
    	DisplayBitMap(0);
    	delay(400);
    	DisplayBitMap(0);
    	DisplayBitMap(0);
    	DisplayBitMap(1560);
    	DisplayBitMap(3900);
    	DisplayBitMap(1560);
    	DisplayBitMap(0);
    	DisplayBitMap(1008);
    	DisplayBitMap(480);
    	DisplayBitMap(192);
    }
    
    // FUNCTION
    void DisplayBitMap(int lineint)
    {
      //int data[9] = {95, 247, 123, 511, 255, 1, 5, 31, 15};
    
      //for(line = 0; line < 9; line++) {
      for (byte led=0; led<14; ++led) {
        if (lineint & (1<<led)) {
          LedSign::Set(led, line, 1);
        } else {
          LedSign::Set(led, line, 0);
        }
      }
    
      line++;
      if(line >= 9) line = 0;
    }
    
    // FUNCTION
    
    void getLength(char* charArray, int* lengthPtr, int* pixelPtr) {
      /* Finds the length of a string in terms of characters
       and pixels and assigns them to the variable at
       addresses lengthPtr and pixelPtr, respectively. */
    
      int charCount = 0, pixelCount = 0;
      char * charPtr = charArray;
    
      // Count chars until newline or null character reached
      while (*charPtr != '\0' && *charPtr != '\n') {
        charPtr++;
        charCount++;
    
        /* Increment pixelCount by the number of pixels
         the current character takes up horizontally. */
        pixelCount += Font::Draw(*charPtr,-SCREEN_WIDTH,0);
      }
    
      *pixelPtr = pixelCount;
      *lengthPtr = charCount;
    }


  • mónica arias. 5:58 pm on November 11, 2011 Permalink | Reply  

    LoL shield: scrolling text code. 

    /*
      Requires LoL Shield library, at least V0.2Beta
    
    http://code.google.com/p/lolshield/downloads/list
    
      And the Font.cpp from LoL_Shield-100915.zip on ikkei's page:
    
    http://web.mac.com/kxm_ikkei/Site/LoL.html
    
      Based on original TEXT SAMPLE CODE for LOL Shield for Arduino
      Copyright 2009/2010 Benjamin Sonntag <benjamin@sonntag.fr> http://benjamin.sonntag.fr/
    
      (This version edited by Walfas)
    */
    
    #include "Charliplexing.h"
    #include "Font.h"
    #include "WProgram.h"
    
    // Technically the number of columns of LEDs minus one
    #define SCREEN_WIDTH 13
    
    // Scroll delay: lower values result in faster scrolling
    #define SCROLL_DELAY 80
    
    /* How long to wait after the last letter before
        going back to the beginning and repeating */
    #define REPEAT_DELAY 500
    
    int textLength, totalPixels;
    char text[]="HI CLASS WE MADE IT THIS IS OUR LOL SHIELD PRESENTATION";
    
    void setup() {
      LedSign::Init();
      getLength(text, &textLength, &totalPixels);
    }
    
    void loop() {
      int x=0;
      for(int j=SCREEN_WIDTH; j>-totalPixels-SCREEN_WIDTH; j--) {
        x=j;
        LedSign::Clear();
        for(int i=0; i<textLength; i++) {
          x += Font::Draw(text[i],x,0);
          if (x>=SCREEN_WIDTH)
            break;
        }
        delay(SCROLL_DELAY);
      }
      delay(REPEAT_DELAY);
    }
    
    void getLength(char* charArray, int* lengthPtr, int* pixelPtr) {
      /* Finds the length of a string in terms of characters
         and pixels and assigns them to the variable at
         addresses lengthPtr and pixelPtr, respectively. */
    
      int charCount = 0, pixelCount = 0;
      char * charPtr = charArray;
    
      // Count chars until newline or null character reached
      while (*charPtr != '\0' && *charPtr != '\n') {
        charPtr++;
        charCount++;
    
        /* Increment pixelCount by the number of pixels
           the current character takes up horizontally. */
        pixelCount += Font::Draw(*charPtr,-SCREEN_WIDTH,0);
      }
    
      *pixelPtr = pixelCount;
      *lengthPtr = charCount;
    }
    
     
  • mónica arias. 12:02 pm on November 4, 2011 Permalink | Reply  

    the mac-o-lantern is alive! 

    The mac-o-lantern thinks it has a little Pentium heart <3. So to light up your pumpkin you need to treat it just like a computer. When you’re not using it, it’s in sleep mode, fading in and out (breathing). To wake it up  you need to push its right patch, and a white light will turn on (simulating when it’s on). Then it has a little mouse. When you move it over the switch, it will connect to the internet (dial-up connection tones). Then, you need to click the button on its left patch, and it will download the Halloween software. A beeping sound indicates when the download is done. When it finishes downloading… you can now turn off the lights and the pumpkin will light on, and it will be ready to light up the night!

    This slideshow requires JavaScript.

    The connections:

    And here’s my baby code:

    
    // DECLARE BREATHE
     int ledBreathe = 6;
     int buttonPin = 3; // the number of the pushbutton pin
     int buttonState = 0; // variable for reading the pushbutton status
     int brightness = 0; // how bright the LED is
     int fadeAmount = 5; // how many points to fade the LED by
    
    // DECLARE REED + SPEAKER SWITCH
     int reedPin = 2; // the number of the reed switch pin
     int reedState = 0; // variable for reading the reed status
     int speaker = 8;
    
    // DECLARE BUTTON CLICK
     int buttonStateD = 0; // variable for reading the pushbutton status
     int buttonPinD = 13; // the number of the pushbutton pin
     int ledGreen1 = 4; // the number of the LED pin
     int ledGreen2 = 5; // the number of the LED pin
     int ledGreen3 = 12; // the number of the LED pin
     int ledGreen4 = 7; // the number of the LED pin
    
    // DECLARE LIGHT SENSOR
     int analogPin = 0;
     int ledFire1 = 10;
     int ledFire2 = 9;
     int ledFire3 = 11;
     int val = 0;
    
    // -------------------------------------------------------------
     // -------------------------------------------------------------
    
    void setup(){
     Serial.begin(9600);
     // BREATHE
     pinMode(ledBreathe, OUTPUT);
     pinMode(buttonPin, INPUT);
    
    // REED SWITCH
     pinMode(speaker, OUTPUT);
     pinMode(reedPin, INPUT);
    
    // BUTTON CLICK
     pinMode(ledGreen1, OUTPUT);
     pinMode(ledGreen2, OUTPUT);
     pinMode(ledGreen3, OUTPUT);
     pinMode(ledGreen4, OUTPUT);
     // initialize the pushbutton pin as an input:
     pinMode(buttonPinD, INPUT);
    
    // LIGHT SENSOR
     pinMode(ledFire1, OUTPUT);
     pinMode(ledFire2, OUTPUT);
     pinMode(ledFire3, OUTPUT);
    
    }
    
    // -------------------------------------------------------------
     // -------------------------------------------------------------
    
    void loop(){
    
    // LIGHT SENSOR
     val = analogRead(analogPin); // Read the value (amount of light) from photocell
     Serial.println(val);
     click();
     breathe();
     sound();
    
    if(val
    
    digitalWrite(ledGreen1, LOW);
     digitalWrite(ledGreen2, LOW);
     digitalWrite(ledGreen3, LOW);
     digitalWrite(ledGreen4, LOW);
     analogWrite(ledFire1, random(120)+135);
     analogWrite(ledFire2, random(120)+135);
     analogWrite(ledFire3, random(120)+135);
     delay(random(100));
     Serial.println("high");
     }
    
    else{
    
    analogWrite(ledFire1, LOW);
     analogWrite(ledFire2, LOW);
     analogWrite(ledFire3, LOW);
     Serial.println("low");
     }
    
    }
    
    /* -------------------------------------------------------------
     ALL THE MAC-O-LANTERN FUNCTIONS
     ------------------------------------------------------------- */
    
    // BREATHE FUNCTION
     void breathe(){
     buttonState = digitalRead(buttonPin);
    
    if (buttonState == LOW){
     analogWrite(ledBreathe, brightness);
     brightness = brightness + fadeAmount;
     if (brightness == 0 || brightness == 255) {
     fadeAmount = -fadeAmount ;
     }
     delay(30);
     }
    
    if (buttonState == HIGH) {
     digitalWrite(ledBreathe, HIGH);
     delay(5000);
    
    }
     }
    
    // -------------------------------------------------------------
    
    // CLICK FUNCTION
     void click(){
    
    buttonStateD = digitalRead(buttonPinD);
    
    if (buttonStateD == HIGH) {
    
    digitalWrite(ledGreen1, HIGH);
     delay(1000);
     digitalWrite(ledGreen2, HIGH);
     delay(2000);
     digitalWrite(ledGreen3, HIGH);
     delay(3000);
     digitalWrite(ledGreen4, HIGH);
     delay(1000);
     digitalWrite(ledGreen1, LOW);
     digitalWrite(ledGreen2, LOW);
     digitalWrite(ledGreen3, LOW);
     digitalWrite(ledGreen4, LOW);
     delay(500);
     digitalWrite(ledGreen1, HIGH);
     digitalWrite(ledGreen2, HIGH);
     digitalWrite(ledGreen3, HIGH);
     digitalWrite(ledGreen4, HIGH);
     delay(500);
     digitalWrite(ledGreen1, LOW);
     digitalWrite(ledGreen2, LOW);
     digitalWrite(ledGreen3, LOW);
     digitalWrite(ledGreen4, LOW);
     delay(500);
     digitalWrite(ledGreen1, HIGH);
     digitalWrite(ledGreen2, HIGH);
     digitalWrite(ledGreen3, HIGH);
     digitalWrite(ledGreen4, HIGH);
    
    tone(speaker, 2000);
     delay(100);
     noTone(speaker);
     delay(100);
     tone(speaker, 3000);
     delay(100);
     noTone(speaker);
     delay(100);
    
    }
     else{
    
    noTone(speaker);
     }
     }
    
    // -------------------------------------------------------------
    
    // REED PLUS SPEAKER FUNCTION
    
    void sound(){
     reedState = digitalRead(reedPin);
     if (reedState == HIGH) {
     tone(speaker, 200);
     delay(2000);
     tone(speaker, 500);
     delay(2000);
     tone(speaker, 800);
     delay(2000);
     tone(speaker, 1100);
     delay(4000);
     tone(speaker, 1600);
     delay(500);
    
    }
     else{
    
    noTone(speaker);
     }
     }
    
    // -------------------------------------------------------------


  • mónica arias. 4:22 pm on October 28, 2011 Permalink | Reply  

    the mac-o-lantern. 

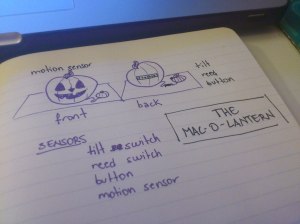
    The mac-o-lantern thinks it has a little core duo heart <3. Hence, it acts just like a computer. It doesn’t have a button to turn it on, so you just need to give it a little shake, and a white light will turn on (simulating an apple computer when it turns on). Then it has a little mouse. When you move it around, it will find the spot and connect to the internet. Then, you need to click the button on the mouse, and it will download the Halloween software. When it finishes downloading… THEN the pumpkin will light on, and it will be ready to light up the night. After it’s on, when people walk in front of it, it flickers its eyes, trying to lure them with its affordance… just like a real apple computer would do.

    This was my inspiration:

    rough sketch of the mac-o-lantern.

    I really wanted to add sound to the project, but all the instructions for the Twig Sound Recorder were so confusing. I thought sound would really add up to the concept (with the sounds of turning on, connecting to the internet, finishing downloading the software), so it was difficult bringing it down to just lights. The code in general was also a bit tricky, since there’s a lot of if’s and a lot of led’s. HOWEVER, the tricky/difficult parts are also the most interesting ones! But the best part overall was coming up with a concept that both makes sense, and makes me happy.

     
  • mónica arias. 7:43 pm on September 30, 2011 Permalink | Reply  

    maker faire extravaganza. 

    Sashimi Tabernacle Choir
    by Richard Carter and John Schroeter (+30 volunteers).

    “What can be more annoying than an animated singing fish? Try 250 of them bolted to a Volvo and singing Opera”. It features 2 soloists, a conductor (The Lobster Formerly Known as Larry), and 6 different choral groups, performing everything from Opera to Pop to Punk Rock. The car has over 300 pounds of batteries, a computer, 31 custom circuit boards, and 5 miles of control system wire. They took something awful, and amplified it. At the end, even though a little annoying, it was a very entertaining show for everyone at the faire, and could not be ignored even if you wanted it. Talk about impact!

    Blu – Education and Hobby Robotics Kit
    by Photon Robotics.

    Blu is a series of programmable robotics system for education, hobby, and research use. It features an Arduino controller, and they’re easy to program. The ones in the small exhibition included 3 models: the Sensing Touch used a simple touch sensor to detect walls and obstacles, triggering the (car like) robot to turn around. Sensing Light uses a pair photocells to tell Blu to turn right or left. Sensing Distance was a bit more complicated, having a rangefinder and a servo gripper. The cool thing about these is they are targeted mostly for kids. Meaning they’re that simple to assemble, and it really gives them a sense of what electronics are, directing them into the geek field.

    Notify Me Now
    by Andrew Katz.

    It’s basically a monitoring system for your house/room. It’s an open source sensor used to notify the computer user of the current status of the sensor. Like the creator said “like when you don’t want your little brother in your room, and you want to know when his there, the sensor will tell you”. He’s 12… 12 years-old!!!! I loved this kid. According to his chart, he already programs using C++, Java, Processing, and Arduino. Hell, he’s even taken classes at MIT. Cute and innocent, the project prototype was well built and fully functional. This is the kind of things that inspire me to make art and design more accesible to kids, because this is evidence of what it can result in.

     
  • mónica arias. 4:32 pm on September 16, 2011 Permalink | Reply  

    hello world! 

    Hey, I’m Mónica. I’m a second year MFA D+T candidate, and I come from an Advertising/Graphic Design background. I studied the equivalent of Visual Communications in Dominican Republic (yes, I’m one of the girls with an accent). In my first semester, during my CCLab class I was introduced to Arduino and physical computing. Since I was learning, I tried to incorporate it to projects across my classes. I LOVED IT. I’ve always been a sucker for wires and electronics, so this felt natural to do. For a year now, most of my projects have involved PComp, just knowing the basics. Now I finally decided to signed up for this class and take it one step further.

    And here you can see my favorite childhood toy: Tamagotchi (I think). I was a very hyperactive kid, so I was always playing with something different every week, BUT this is the one I remember having the most fun and spending hours feeding my little baby dinosaur, so it must have had some impact on me.

     
c
Compose new post
j
Next post/Next comment
k
Previous post/Previous comment
r
Reply
e
Edit
o
Show/Hide comments
t
Go to top
l
Go to login
h
Show/Hide help
shift + esc
Cancel