Updates from November, 2012 Toggle Comment Threads | Keyboard Shortcuts
-
itsjennkaye
-
Franci Castelli
Assignment 11/16
So here is the code and the video.. it doesnt work perfectly with the LED but couldnt figure out why.


-
trytobegood
Sensor Toys
I had to use if statements to make the switch wires work, then I used switch statements for each of the interactions.
Code after the jump.
-
lizbethc
Switch case sound performance toy…work in progress
So, I am completely confused by the wires to switch states…..What I have now grabs each case and will use the speaker and the LED in the exact state its in when I press a number….
 and here’s the code:
int speakerPin= 7;
int ledPin = 3;
int sensorPin = 5;
int potPin = 0;int sensorVal;
int potVal;
int LEDbrightness;
int toneChange;
int sensorTime;void setup()
{
pinMode(ledPin, OUTPUT);
Serial.begin(9600);
}void loop() {
if ( Serial.available()) // Check to see if at least one character is available
{
char ch = Serial.read();
switch(ch) {
case ‘1’://1st State controls LED dim level with the POT, and Speaker with the the PhotoCell
sensorVal = analogRead(sensorPin);
potVal = analogRead(potPin);LEDbrightness = map(potVal, 0, 1023, 0, 255);
analogWrite(ledPin, LEDbrightness);
analogWrite(ledPin, (potVal/4));
tone(speakerPin, sensorVal*4);// Serial.print(sensorVal);
// Serial.print(” “);
// Serial.println(potVal);delay(20);
break;
case ‘2’:
//*2nd State controls LED dim level with Photocell, and Speaker Tone with POTsensorVal = analogRead(sensorPin);
potVal = analogRead(potPin);
// sensorVal = 1023 – sensorVal;
LEDbrightness = map(sensorVal, 0, 1023, 0, 255);
analogWrite(ledPin, LEDbrightness);toneChange =map(potVal, 0, 1023, 0, 255);
tone(speakerPin, toneChange);Serial.print(sensorVal);
Serial.print(” “);
Serial.println(potVal);delay(20);
break;
case ‘3’:
//*3rd State controls LED blink-rate with the POT, Speaker Tone with POT, and Delay Rate (for both) with PhotoCellsensorTime = ((sensorVal)/10);
Serial.println(“sensor reading = “);
Serial.println(sensorVal); // the raw analog reading
Serial.println(” “);
Serial.println(“TIME reading = “);
Serial.print(sensorTime);//Serial.print(” “);
// Serial.println(potVal);sensorVal = analogRead(sensorPin);
potVal = analogRead(potPin);LEDbrightness = map(potVal, 0, 1023, 0, 255);
analogWrite(ledPin, LEDbrightness);
// toneChange =map(potVal, 0, 1023, 0, 255);
// tone(speakerPin, toneChange);
//
// Serial.print(sensorVal);
// Serial.print(” “);
// Serial.println(potVal);
//
// delay(sensorTime);
delay(sensorTime);
digitalWrite(ledPin, LOW);
delay(sensorTime);break;
case ‘4’:// *4rd State controls LED blink-rate with the PhotoCell, and Speaker tone with PhotoCell.
sensorTime = ((sensorVal)/10);
sensorVal = analogRead(sensorPin);analogWrite(ledPin, (potVal/4));
tone(speakerPin, sensorVal*4);digitalWrite(ledPin,HIGH);
delay(sensorTime);
digitalWrite(ledPin, LOW);
delay(sensorTime);
break;default :
Serial.print(ch);
Serial.println(” was received but not expected”);
break;}//switch
} //serial available
} //void loop
int RCtime(int RCpin) {
int reading=0; //startwith0
// set the pin to an output and pull to LOW (ground)
pinMode(RCpin, OUTPUT);
digitalWrite(RCpin, LOW);
// Now set the pin to an input and…
pinMode(RCpin, INPUT);
while (digitalRead(RCpin) == LOW) { // count how long it takes to rise up to HIGH
reading++; // increment to keep track of time
if (reading == 30000) {
// if we got this far, the resistance is so high // its likely that nothing is connected!
break; // leave the loop
} }
// OK either we maxed out at 30000 or hopefully got a reading, return the count
return reading; } -
tiamtaheri
[assignment_11/16]
Here is the case statement code I wrote, unfortunately I get an error, when I try to upload. But all the 4 states work, if I put them in separate sketches:
int potentiomerPin=0;
int photocellPin=1;
int photocellReading;
int ledPin=10;
int ledBrightness;
int speakerPin=12;
int speakerFrequency;
int delayPeriod;
void setup() {
Serial.begin(9600);
pinMode(ledPin, OUTPUT);
}
void loop(){
if(Serial.available()) {
char ch=Serial.read();
switch(ch);
}case ‘1’:
number1();
break;
case ‘2’:
number2();
break;case ‘3’:
number3();
break;case’4′:
number4();
break;default:
Serial.print(ch);
Serial.println(” was received but not expected”);
break;}
}}
void number1 () {
int potsensorValue=analogRead(A0);
photocellReading=analogRead(A1);
Serial.print(“Potentiometervalue: “);
Serial.println(potsensorValue);Serial.print(“Photocellvalue: “);
Serial.println(photocellReading);delay(1);
ledBrightness=map(potsensorValue,0,1023,0,255);
analogWrite(ledPin, ledBrightness);
speakerFrequency=map(photocellReading, 0,1023,0,255);
tone(speakerPin,speakerFrequency*10);
delay(50);
noTone(speakerPin);
delay(50);
}void number2 () {
int potsensorValue=analogRead(A0);
photocellReading=analogRead(A1);
Serial.print(“Potentiometervalue: “);
Serial.println(potsensorValue);Serial.print(“Photocellvalue: “);
Serial.println(photocellReading);delay(1);
photocellReading=1023-photocellReading;
ledBrightness=map(photocellReading,0,1023,0,255);
analogWrite(ledPin, ledBrightness);
speakerFrequency=map(potsensorValue, 0,1023,0,255);
tone(speakerPin,speakerFrequency*10);
delay(50);
noTone(speakerPin);
delay(50);
}void number3(){
int potsensorValue=analogRead(A0);
photocellReading=analogRead(A1);
Serial.print(“Potentiometervalue: “);
Serial.println(potsensorValue);Serial.print(“Photocellvalue: “);
Serial.println(photocellReading);delay(1);
delayPeriod=map(photocellReading,0,1023,0,255);ledBrightness=map(potsensorValue,0,1023,0,255);
digitalWrite(ledPin, HIGH);
delay(ledBrightness);
digitalWrite(ledPin,LOW);
delay(ledBrightness);speakerFrequency=map(potsensorValue, 0,1023,0,255);
tone(speakerPin,speakerFrequency*10);
delay(delayPeriod);
noTone(speakerPin);
delay(delayPeriod);}
void number4 () {
int potsensorValue=analogRead(A0);
photocellReading=analogRead(A1);
Serial.print(“Potentiometervalue: “);
Serial.println(potsensorValue);Serial.print(“Photocellvalue: “);
Serial.println(photocellReading);delay(1);
delayPeriod=map(photocellReading,0,1023,0,255);ledBrightness=map(potsensorValue,0,1023,0,255);
digitalWrite(ledPin, HIGH);
delay(delayPeriod);
digitalWrite(ledPin,LOW);
delay(delayPeriod);speakerFrequency=map(potsensorValue, 0,1023,0,255);
tone(speakerPin,speakerFrequency*10);
delay(ledBrightness);
noTone(speakerPin);
delay(ledBrightness);
} -
YiNing
Assignment: sound/LED controls
code here:
int state; void setup(){ pinMode(9, OUTPUT); pinMode(2, OUTPUT); pinMode(12, INPUT); state = 1; Serial.begin(9600); } void loop(){ int pot = analogRead(A3); int photo = analogRead(A1); int potLight = map(pot, 0, 1024, 0, 255); int photoLight = map(photo, 0, 1024, 0, 255); int photoSpeaker = map(photo, 0, 1024, 500, 80); int potSpeaker = map(pot, 0, 1024, 80, 500); int potDelay = map(pot, 0, 1024, 0, 500); int photoDelay = map(photo, 0, 1024, 0, 500); boolean btnRead = debouncefunction(12); if(btnRead == true){ btnRead = 0; delay(200); state += 1; if(state > 4){ state = 1; } } if(state == 1){ //state one pot->LED, photosensor->speaker analogWrite(9, potLight); tone(2, photoSpeaker); } if(state == 2){ //photoell->LED, pot->speaker analogWrite(9, photoLight); tone(2, potSpeaker); } if(state == 3){ // photocell->LED/speaker, pot->speaker tone and led blink rate tone(2, potSpeaker); delay(photoDelay); noTone(2); delay(photoDelay); analogWrite(9, photoLight); delay(potDelay); analogWrite(9, 0); delay(potDelay); } if(state == 4){ analogWrite(9, photoLight); delay(photoDelay); analogWrite(9, 0); tone(2, potSpeaker); delay(photoDelay); } Serial.println(state); } int debouncedelay = 500; boolean debouncefunction(int pin){ boolean state; boolean previousState; previousState = digitalRead(pin); for(int counter =0; counter > debouncedelay; counter++){ delay(1); state = digitalRead(pin); //readpin if(state != previousState) {counter = 0; previousState = state; } } return state; } -
Amp
-
Franci Castelli
Simon says
I forgot that I forgot to upload on friday after it got exported to youtube, apologies.
-
carolkozak
Zen Ribbit
Updated video: Here
-
Amp
SimonBot!!!!
I’m so proud of my first d+t prototype! It’s not much but I have learnt a lot through each process. My simonBot makes terrible sound when you loose and also shake it’s head…it’s eyes blink in rhythm along with it’s heart that blinks color leds pattern. Thanks Yury for teaching us awesome trick about…
Here’s a link
I also want to share my “Flower Flipper.” I made this for cc lab class with arduino as well.
-
JeannetteSubero
-
JeannetteSubero
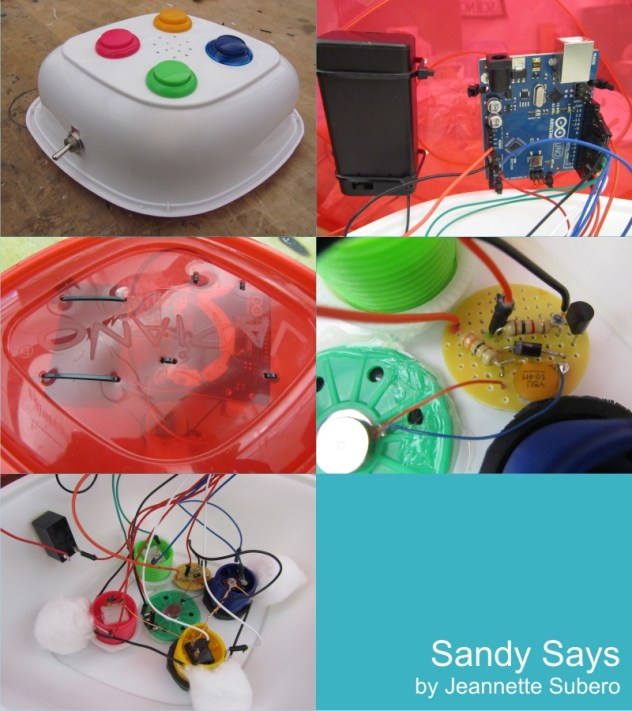
Sandy Says
My Simon Game’s enclosure broke during the hurricane, and since most stores were closed, I had to improvise 🙂
People liked the vibration buzzer when they lost!
It was a really fun project. I really liked soldering the board for the vibration buzzer. -
itsjennkaye
Jenn Kaye’s Simon-ish Game
Voila! Play tested and all.
(and 2 “regular” videos documenting a successful game in and game loss)
Win:
<p><a href=”http://vimeo.com/53632459″>Simon: Win</a> from <a href=”http://vimeo.com/user8129509″>Jennifer Kaye</a> on <a href=”http://vimeo.com”>Vimeo</a>.</p>Loose:
<p><a href=”http://vimeo.com/53632337″>Simon: Lose</a> from <a href=”http://vimeo.com/user8129509″>Jennifer Kaye</a> on <a href=”http://vimeo.com”>Vimeo</a>.</p> -
sussesj
Simon Says In action
Here the video af my simons says game in action:
Also find more information about my process here:
-
salome
-
jianxyi
Mine:
-
-
lizbethc
Simon Says
Here is my Simon Says game!!

<p><aAND THE CODE:::
//buttons
const int greenSwitch = 10; //green
const int blueSwitch = 8;//blue
const int redSwitch = 4;//red
const int yellowSwitch = 6;//yellow//leds
const int greenLED = 9;
const int blueLED = 7;
const int redLED = 3;
const int yellowLED = 5;//values
//const int greenValue=1; // declare values for colors for buttons
//const int blueValue=2;
//const int redValue=3;
//const int yellowValue=4;const int redValue = 1; // declare values for colors for buttons
const int yellowValue = 2;
const int blueValue = 3;
const int greenValue = 4;const int speakerPin = 2;
int playerSays=0;//value to hold user imput
int playerStep=0;//user step counter;boolean simonDone;
int simonSays[99]={
};// array that holds simon’s sequence, allows for 99 steps
int nextStep = 0; //var that counts how many steps in simon’s current sequence, used to move up in steps
int simonSpeed = 500;void setup () {
Serial.begin(9600);
//Serial.println(“Try to Guest the Contents of simonArray, try a number between 1-4!”);pinMode(greenLED, OUTPUT);
pinMode(blueLED, OUTPUT);
pinMode(redLED, OUTPUT);
pinMode(yellowLED, OUTPUT);
pinMode(speakerPin, OUTPUT);pinMode(greenSwitch, INPUT_PULLUP); //set pull-up resistors on Buttons, So closing the switch will bring Pin to Ground.
pinMode(blueSwitch, INPUT_PULLUP);
pinMode(redSwitch, INPUT_PULLUP);
pinMode(yellowSwitch, INPUT_PULLUP);randomSeed(analogRead(0)); //seed makes more random
}
void loop () {
if (simonDone ==false) { //did simon play sequence yet? bool is false by default
simonSays[nextStep] = random (1,5);
// Serial.println(“simonDone ==false”);
Serial.print(“nextStep: “); ///just to see whats happening
Serial.println(nextStep);
Serial.print(“simonSays: “);// Serial.print(“simonSpeed: ” ); // Show how the new time feature works
// Serial.println(simonSpeed); // Show how the new time feature works// Serial.print(“simonSays: “);
for(int i=0; i <=nextStep; i++) {
Serial.print(simonSays[i]); //to see count
Serial.print(",");
delay(simonSpeed);//controls speed that simonSays somethingToneAndLight(simonSays[i]);
}//simonSpeed=(simonSpeed-(nextStep*5)); //THis speeds up simon on each turn by formula (500-(nextStep*5)
//Change the multiplier (5 here) to make game faster or slower
//multiplier=MAJOR factor in how hard game issimonSpeed=max(simonSpeed, 200);//max() assigns simonTime to the larger of simonTime or 200 in this case
//Sets Simon's top speed. Also important in making game interesting yet winablesimonDone=true; //ok, simon done, set to true
//Serial.println(" ");
nextStep++; //add another to simon's sequence
playerStep=0; //make user step from first step
}if (simonDone==true) {
if (playerStep =nextStep) {
simonDone=false; //user completeed successfully, give simon next turn
// nextStep++; //add another step to simons sequence
}}
}if(color == 1) // 1 = Red
{
digitalWrite( redLED,HIGH);
tone(speakerPin,1000);
delay(simonSpeed);
digitalWrite( redLED,LOW);
noTone(speakerPin);
}if(color == 2)
{
digitalWrite( yellowLED,HIGH);
tone(speakerPin,2000);
delay(simonSpeed);
digitalWrite( yellowLED,LOW);
noTone(speakerPin);
}if(color == 3)
{
digitalWrite( blueLED,HIGH);
tone(speakerPin,3000);
delay(simonSpeed);
digitalWrite( blueLED,LOW);
noTone(speakerPin);
}if(color == 4)
{
digitalWrite( greenLED,HIGH);
tone(speakerPin,4000);
delay(simonSpeed);
digitalWrite( greenLED,LOW);
noTone(speakerPin);
}
}
void youLose() {
//LOSE SOUND #4*****// tone(speakerPin,200);
// delay(400);
// tone(speakerPin,100);
// delay(600);
// tone(speakerPin,50);
// delay(1500); ///play with dealy “ratio”
// noTone(speakerPin);for (int y=200; y>80; y-=50){
tone(speakerPin, y);
delay(150); ///play with dealy “ratio”
tone(speakerPin , (y-30));
delay(100);
noTone(speakerPin);
delay(50);}
nextStep = 0;
playerStep = 0;
simonSpeed = 400;
simonDone = false;delay(1500);
restartSeq();delay(1500);
}
///DONT USE YET
void restartSeq(){
tone(speakerPin,600);//800
delay(100);
digitalWrite(redLED,HIGH);
digitalWrite(yellowLED,HIGH);
digitalWrite(blueLED,HIGH);
digitalWrite(greenLED,HIGH);
tone(speakerPin,700);//850
delay(100);digitalWrite(redLED,LOW);
tone(speakerPin,900);
delay(400);digitalWrite(yellowLED,LOW);
tone(speakerPin,1000);
delay(300);digitalWrite(blueLED,LOW);
tone(speakerPin,2000);
delay(250);digitalWrite(greenLED,LOW);
tone(speakerPin,3000);
delay(200);noTone(speakerPin);
}
-
Yury Gitman
analogRead & analogWrite Assignment for next class
Do:
1) http://arduino.cc/en/Tutorial/AnalogReadSerial [POT]
2) Photocells – Adafruit Learning System
3) 2.16 from Arduino CookBook (on Switch Statements)
Read:
1) analogRead http://www.arduino.cc/en/Reference/AnalogRead
2) http://www.arduino.cc/en/Reference/AnalogWrite
Assignment:
Build a Sound Performance Toy. The Interface should be one POT, one LED, one Speaker, and one Photocell. There should be four case statements, and two jumper wire. If jumper wire are in or out, there are 4 possible states.
*1st State controls LED dim level with the POT, and Speaker with the the PhotoCell
*2nd State controls LED dim level with Photocell, and Speaker Tone with POT
*3rd State controls LED blink-rate with the POT, Speaker Tone with POT, and Delay Rate (for both) with PhotoCell
*4rd State controls LED blink-rate with the PhotoCell, and Speaker tone with PhotoCell.
Use with Case Statements to switch between 4 states.
Upload Code and Video of Circuit before Class.
Use Code and Pics for Hints: https://docs.google.com/folder/d/0B5C5Fh-HOLYFenF2UmthZWJ1QVk/edit
-
Franci Castelli
the tutorial page for AnalogReadSerial doesn’t exist anymore..
-
-
trytobegood


Reply