Updates from November, 2012 Toggle Comment Threads | Keyboard Shortcuts

  • Unknown's avatar

    carolkozak 9:04 pm on November 16, 2012 Permalink | Reply  

    Sound Performance Toy 

    video: Here

    Code is Collapsed Here:

    <pre>int speakerPin= 7;
    int ledPin = 5;
    int photoPin = A5;
    int potPin = A0;
    int var;
    int potDelay;
    int photoDelay;
    int photoVal;  //analogRead of the photocell //set by
    int potVal;  //analogRead of the potentiometer
    
    int newphotoVal;
    
    int toneVal;  //set by photo, pot, pot, photo (case 1 -4)
    
    int switch1 = 11; //red cord
    int switch2 = 12; //orange cord
    
    int newSwitch1;
    int newSwitch2;
    
    void setup()
      {
        pinMode(ledPin, OUTPUT);
        Serial.begin(9600);
    
      }
    
    void loop()
      {
        newSwitch1 = digitalRead(switch1);
    
        newSwitch2 = digitalRead(switch2);
    
        photoVal = analogRead(photoPin);
        potVal = analogRead(potPin);
    
        potDelay = map(potVal, 0, 1023, 0, 250);
        photoDelay =  map(photoVal, 0, 1023, 0, 250);
    
        //1st case
        if (newSwitch1 == 1 && newSwitch2 == 1)
      {
       var = 1;
      }
        //2nd case
        if (newSwitch1 ==0 && newSwitch2 == 1)
        {
         var = 2;
        }
    
        if(newSwitch1 == 1 && newSwitch2 == 0)
        {
         var = 3;
        }
    
        if(newSwitch1 == 0 && newSwitch2 == 0)
        {
          var = 4;
        }
    
      switch(var)
      {
        case 1:
        potToLEDphotoToSpeaker(); //case 1
        break;
    
        case 2:
        photoToLEDpotToSpeaker(); //case 2
        break;
    
        case 3:
        potToLEDblinkAndSpeaker();
        break;
    
        case 4:
        photoToLEDblinkAndSpeaker();
        break;
    
      }
      }
    
    void photoToLEDblinkAndSpeaker()
    {
      //case 4
    analogWrite(ledPin, HIGH); //analogWrite(pin, value)
    delay(photoDelay);
    analogWrite(ledPin,LOW);
    delay(photoDelay);
    
    tone(speakerPin, photoVal*2); //instead of *4
    delay(photoDelay);
    noTone(speakerPin);
    }
    
    void photoToLEDpotToSpeaker()
    {
    //case 2
        analogWrite(ledPin, (photoVal/4));
        tone(speakerPin, potVal*4);
        delay(20);
    }
    
    void potToLEDblinkAndSpeaker()
    {
      //case 3
    analogWrite(ledPin, HIGH); //analogWrite(pin, value)
    delay(potDelay);
    analogWrite(ledPin,LOW);
    delay(potDelay);
    
    tone(speakerPin, potVal*4);
    delay(potDelay);
    noTone(speakerPin);
    }
    
    void potToLEDphotoToSpeaker()
    {
      //case 1
      //pot to LED and photo to speaker
        analogWrite(ledPin, (potVal/4));
        tone(speakerPin, photoVal);
        delay(20);
    }


  • Unknown's avatar

    itsjennkaye 7:54 pm on November 16, 2012 Permalink | Reply  

    Arduino Sound & Light Tool 

    Download the code here ›

     
  • Unknown's avatar

    Franci Castelli 7:39 pm on November 16, 2012 Permalink | Reply  

    Assignment 11/16 

    So here is the code and the video.. it doesnt work perfectly with the LED but couldnt figure out why.


  • Unknown's avatar

    trytobegood 7:13 pm on November 16, 2012 Permalink | Reply  

    Sensor Toys 

    I had to use if statements to make the switch wires work, then I used switch statements for each of the interactions.

    Code after the jump.

    (More …)

     
  • Unknown's avatar

    tiamtaheri 6:22 pm on November 16, 2012 Permalink | Reply  

    [assignment_11/16] 

    Here is the case statement code I wrote, unfortunately I get an error, when I try to upload. But all the 4 states work, if I put them in separate sketches:

    int potentiomerPin=0;
    int photocellPin=1;
    int photocellReading;
    int ledPin=10;
    int ledBrightness;
    int speakerPin=12;
    int speakerFrequency;
    int delayPeriod;
    void setup() {
    Serial.begin(9600);
    pinMode(ledPin, OUTPUT);
    }
    void loop(){
    if(Serial.available()) {
    char ch=Serial.read();
    switch(ch);
    }

    case ‘1’:
    number1();
    break;
    case ‘2’:
    number2();
    break;

    case ‘3’:
    number3();
    break;

    case’4′:
    number4();
    break;

    default:
    Serial.print(ch);
    Serial.println(” was received but not expected”);
    break;

    }
    }

    }

    void number1 () {
    int potsensorValue=analogRead(A0);
    photocellReading=analogRead(A1);
    Serial.print(“Potentiometervalue: “);
    Serial.println(potsensorValue);

    Serial.print(“Photocellvalue: “);
    Serial.println(photocellReading);

    delay(1);

    ledBrightness=map(potsensorValue,0,1023,0,255);
    analogWrite(ledPin, ledBrightness);
    speakerFrequency=map(photocellReading, 0,1023,0,255);
    tone(speakerPin,speakerFrequency*10);
    delay(50);
    noTone(speakerPin);
    delay(50);
    }

    void number2 () {
    int potsensorValue=analogRead(A0);
    photocellReading=analogRead(A1);
    Serial.print(“Potentiometervalue: “);
    Serial.println(potsensorValue);

    Serial.print(“Photocellvalue: “);
    Serial.println(photocellReading);

    delay(1);
    photocellReading=1023-photocellReading;
    ledBrightness=map(photocellReading,0,1023,0,255);
    analogWrite(ledPin, ledBrightness);
    speakerFrequency=map(potsensorValue, 0,1023,0,255);
    tone(speakerPin,speakerFrequency*10);
    delay(50);
    noTone(speakerPin);
    delay(50);
    }

    void number3(){
    int potsensorValue=analogRead(A0);
    photocellReading=analogRead(A1);
    Serial.print(“Potentiometervalue: “);
    Serial.println(potsensorValue);

    Serial.print(“Photocellvalue: “);
    Serial.println(photocellReading);

    delay(1);
    delayPeriod=map(photocellReading,0,1023,0,255);

    ledBrightness=map(potsensorValue,0,1023,0,255);
    digitalWrite(ledPin, HIGH);
    delay(ledBrightness);
    digitalWrite(ledPin,LOW);
    delay(ledBrightness);

    speakerFrequency=map(potsensorValue, 0,1023,0,255);
    tone(speakerPin,speakerFrequency*10);
    delay(delayPeriod);
    noTone(speakerPin);
    delay(delayPeriod);

    }

    void number4 () {
    int potsensorValue=analogRead(A0);
    photocellReading=analogRead(A1);
    Serial.print(“Potentiometervalue: “);
    Serial.println(potsensorValue);

    Serial.print(“Photocellvalue: “);
    Serial.println(photocellReading);

    delay(1);
    delayPeriod=map(photocellReading,0,1023,0,255);

    ledBrightness=map(potsensorValue,0,1023,0,255);
    digitalWrite(ledPin, HIGH);
    delay(delayPeriod);
    digitalWrite(ledPin,LOW);
    delay(delayPeriod);

    speakerFrequency=map(potsensorValue, 0,1023,0,255);
    tone(speakerPin,speakerFrequency*10);
    delay(ledBrightness);
    noTone(speakerPin);
    delay(ledBrightness);
    }


  • Unknown's avatar

    itsjennkaye 3:57 pm on November 9, 2012 Permalink | Reply  

    Jenn Kaye’s Simon-ish Game 

    Voila! Play tested and all.


    (and 2 “regular” videos documenting a successful game in and game loss)

    Win:

    <p><a href=”http://vimeo.com/53632459″>Simon: Win</a> from <a href=”http://vimeo.com/user8129509″>Jennifer Kaye</a> on <a href=”http://vimeo.com”>Vimeo</a&gt;.</p>


    Loose:

    <p><a href=”http://vimeo.com/53632337″>Simon: Lose</a> from <a href=”http://vimeo.com/user8129509″>Jennifer Kaye</a> on <a href=”http://vimeo.com”>Vimeo</a&gt;.</p>

     
  • Unknown's avatar

    salome 11:48 am on November 9, 2012 Permalink | Reply  

    simonSays 

     
  • Unknown's avatar

    lizbethc 7:47 am on November 9, 2012 Permalink | Reply  

    Simon Says 

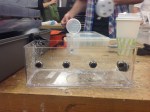
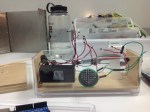
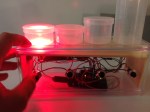
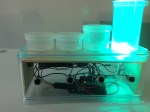
    Here is my Simon Says game!!


    <p><a

    AND THE CODE:::

    //buttons
    const int greenSwitch = 10; //green
    const int blueSwitch = 8;//blue
    const int redSwitch = 4;//red
    const int yellowSwitch = 6;//yellow

    //leds
    const int greenLED = 9;
    const int blueLED = 7;
    const int redLED = 3;
    const int yellowLED = 5;

    //values
    //const int greenValue=1; // declare values for colors for buttons
    //const int blueValue=2;
    //const int redValue=3;
    //const int yellowValue=4;

    const int redValue = 1; // declare values for colors for buttons
    const int yellowValue = 2;
    const int blueValue = 3;
    const int greenValue = 4;

    const int speakerPin = 2;

    int playerSays=0;//value to hold user imput
    int playerStep=0;//user step counter;

    boolean simonDone;
    int simonSays[99]={
    };// array that holds simon’s sequence, allows for 99 steps
    int nextStep = 0; //var that counts how many steps in simon’s current sequence, used to move up in steps
    int simonSpeed = 500;

    void setup () {
    Serial.begin(9600);
    //Serial.println(“Try to Guest the Contents of simonArray, try a number between 1-4!”);

    pinMode(greenLED, OUTPUT);
    pinMode(blueLED, OUTPUT);
    pinMode(redLED, OUTPUT);
    pinMode(yellowLED, OUTPUT);
    pinMode(speakerPin, OUTPUT);

    pinMode(greenSwitch, INPUT_PULLUP); //set pull-up resistors on Buttons, So closing the switch will bring Pin to Ground.
    pinMode(blueSwitch, INPUT_PULLUP);
    pinMode(redSwitch, INPUT_PULLUP);
    pinMode(yellowSwitch, INPUT_PULLUP);

    randomSeed(analogRead(0)); //seed makes more random

    }

    void loop () {

    if (simonDone ==false) { //did simon play sequence yet? bool is false by default

    simonSays[nextStep] = random (1,5);

    // Serial.println(“simonDone ==false”);
    Serial.print(“nextStep: “); ///just to see whats happening
    Serial.println(nextStep);
    Serial.print(“simonSays: “);

    // Serial.print(“simonSpeed: ” ); // Show how the new time feature works
    // Serial.println(simonSpeed); // Show how the new time feature works

    // Serial.print(“simonSays: “);

    for(int i=0; i <=nextStep; i++) {
    Serial.print(simonSays[i]); //to see count
    Serial.print(",");
    delay(simonSpeed);//controls speed that simonSays something

    ToneAndLight(simonSays[i]);
    }

    //simonSpeed=(simonSpeed-(nextStep*5)); //THis speeds up simon on each turn by formula (500-(nextStep*5)
    //Change the multiplier (5 here) to make game faster or slower
    //multiplier=MAJOR factor in how hard game is

    simonSpeed=max(simonSpeed, 200);//max() assigns simonTime to the larger of simonTime or 200 in this case
    //Sets Simon's top speed. Also important in making game interesting yet winable

    simonDone=true; //ok, simon done, set to true
    //Serial.println(" ");
    nextStep++; //add another to simon's sequence
    playerStep=0; //make user step from first step
    }

    if (simonDone==true) {

    if (playerStep =nextStep) {

    simonDone=false; //user completeed successfully, give simon next turn
    // nextStep++; //add another step to simons sequence
    }

    }
    }

    if(color == 1) // 1 = Red
    {
    digitalWrite( redLED,HIGH);
    tone(speakerPin,1000);
    delay(simonSpeed);
    digitalWrite( redLED,LOW);
    noTone(speakerPin);
    }

    if(color == 2)
    {
    digitalWrite( yellowLED,HIGH);
    tone(speakerPin,2000);
    delay(simonSpeed);
    digitalWrite( yellowLED,LOW);
    noTone(speakerPin);
    }

    if(color == 3)
    {
    digitalWrite( blueLED,HIGH);
    tone(speakerPin,3000);
    delay(simonSpeed);
    digitalWrite( blueLED,LOW);
    noTone(speakerPin);
    }

    if(color == 4)
    {
    digitalWrite( greenLED,HIGH);
    tone(speakerPin,4000);
    delay(simonSpeed);
    digitalWrite( greenLED,LOW);
    noTone(speakerPin);
    }
    }
    void youLose() {
    //LOSE SOUND #4*****

    // tone(speakerPin,200);
    // delay(400);
    // tone(speakerPin,100);
    // delay(600);
    // tone(speakerPin,50);
    // delay(1500); ///play with dealy “ratio”
    // noTone(speakerPin);

    for (int y=200; y>80; y-=50){

    tone(speakerPin, y);
    delay(150); ///play with dealy “ratio”
    tone(speakerPin , (y-30));
    delay(100);
    noTone(speakerPin);
    delay(50);

    }

    nextStep = 0;
    playerStep = 0;
    simonSpeed = 400;
    simonDone = false;

    delay(1500);
    restartSeq();

    delay(1500);

    }

    ///DONT USE YET

    void restartSeq(){

    tone(speakerPin,600);//800
    delay(100);
    digitalWrite(redLED,HIGH);
    digitalWrite(yellowLED,HIGH);
    digitalWrite(blueLED,HIGH);
    digitalWrite(greenLED,HIGH);
    tone(speakerPin,700);//850
    delay(100);

    digitalWrite(redLED,LOW);
    tone(speakerPin,900);
    delay(400);

    digitalWrite(yellowLED,LOW);
    tone(speakerPin,1000);
    delay(300);

    digitalWrite(blueLED,LOW);
    tone(speakerPin,2000);
    delay(250);

    digitalWrite(greenLED,LOW);
    tone(speakerPin,3000);
    delay(200);

    noTone(speakerPin);

    }

     
  • Unknown's avatar

    Yury Gitman 4:04 am on November 9, 2012 Permalink | Reply  

    analogRead & analogWrite Assignment for next class 

    Do:

    1)  http://arduino.cc/en/Tutorial/AnalogReadSerial  [POT]

    2) Photocells – Adafruit Learning System

    3)  2.16 from Arduino CookBook (on Switch Statements)

    Read:

    1) analogRead  http://www.arduino.cc/en/Reference/AnalogRead

    2) http://www.arduino.cc/en/Reference/AnalogWrite

    Assignment:

    Build a Sound Performance Toy.  The Interface should be one POT, one LED, one Speaker, and one Photocell.  There should be four case statements, and two jumper wire.  If jumper wire are in or out, there are 4 possible states.

    *1st State controls LED dim level with the POT, and Speaker with the the PhotoCell

    *2nd State controls LED dim level with Photocell, and Speaker Tone with POT

    *3rd State controls LED blink-rate with the POT,  Speaker Tone with POT, and Delay Rate (for both) with PhotoCell

    *4rd State controls LED blink-rate with the PhotoCell, and Speaker tone with PhotoCell.

    Use with Case Statements to switch between 4 states.

    Upload Code and Video of Circuit before Class.

    Use Code and Pics for Hints: https://docs.google.com/folder/d/0B5C5Fh-HOLYFenF2UmthZWJ1QVk/edit

     
  • Unknown's avatar

    trytobegood 3:15 am on November 9, 2012 Permalink | Reply  

    Simon Says Documentation 

     
  • Unknown's avatar

    Yury Gitman 8:08 pm on October 28, 2012 Permalink | Reply  

    Simon Say Style Game, Midterm, Deliverables 

    Hi All,

    As discussed in class.  We are finishing off the Simon Says project this week.
    For the next class you will present your “Simon Says Style Project”, along with a video of it.

    The video should be 60-120 seconds long.  It should show 3 users using/playing with the project.  It should show interaction with your project start to finish. We should see how the interaction starts, how interaction is sustained, and how it ends.   The video should have two tiles, one with the projects name, one with your name.  Feel free to add more if you like, but those are the most basic requirements.  Try to have fun with the video and capture the essences of you work.

    Note:  The video should be on the blog before class starts. If you are new to video, it’s acceptable to shoot this with a simple camera.  Use as much natural light as possible with low-end camera to get good results on video.  Many of you know Final Cut already, so if you do, that may be the fastest tool for you. But it’s totally fine to edit with YouTube’s editing tools.  YouTube does allow for title effects.  Post your final video on Vimeo or YouTube and Embed into your post.

    Send any thoughts or questions you may have before then.

     
  • Unknown's avatar

    trytobegood 9:11 pm on October 19, 2012 Permalink | Reply  

    My Simon Code 

    I added a 5th button to reset the game.

    (More …)

     
  • Unknown's avatar

    itsjennkaye 5:45 pm on October 19, 2012 Permalink | Reply  

    Simon Code Progress 

    This week I worked on getting the Simon code to respond to a user’s input. I started from the example files that Yury provided and modified the code to work with my breadboard set-up and play the “you lose” tone if the canned user input was wrong. I also worked on getting the Arduino to read the button input (HIGH or LOW) as values of user input that could be compared to Simon’s array.

    The tactic I tried for evaluating the user input was to store the data as an array and check that array against Simon’s. After doing some research I found a discussion on a Processing forum that provided code for reading and storing bytes of data from an Arduino.

    I was able to incorporate this code into my sketch. I could open the serial monitor, input a few numbers, and have the code write those numbers back to me. I then attempted to get button output to behave the same way, but was unsuccessful.

    Here’s my code:

    Download 1 ›
    Download 2 ›

     
  • Unknown's avatar

    tiamtaheri 5:40 pm on October 19, 2012 Permalink | Reply  

    [simon says] 

    //Button Pins

    const int redButt = 11; // declare pins for buttons
    const int yellButt = 10;
    const int blueButt = 9;
    const int greenButt = 8;

    //LED Pins
    const int redLED = 2; // declare pins for LED’s
    const int yellLED = 3;
    const int blueLED = 4;
    const int greenLED = 5;
    // Color Code we Use for R,Y,B,G and 1,2,3,4 repectfully
    const int redValue = 1; // declare values for colors for buttons
    const int yellValue = 2;
    const int blueValue = 3;
    const int greenValue = 4;

    const int speakerPin = 7 ; //declare your speaker pin

    boolean simonDone;
    int simonSays[99] ={
    };
    int nextStep = 0 ;
    int userStep=0;

    int simonSpeed = 300;
    void setup()
    {
    pinMode(redLED, OUTPUT); //Set Pin Mode
    pinMode(yellLED, OUTPUT);
    pinMode(blueLED, OUTPUT);
    pinMode(greenLED, OUTPUT);
    pinMode(speakerPin, OUTPUT); // set speaker to output
    Serial.begin(9600);
    randomSeed(analogRead(0));
    }

    void loop ()
    {
    if (simonDone == false)
    {
    simonSays[nextStep] = random(1,5) ;

    // Serial.print(“nextStep: ” );
    // Serial.println(nextStep);

    // Serial.print(“simonSpeed: ” ); // Show how the new time feature works
    // Serial.println(simonSpeed); // Show how the new time feature works

    // Serial.print(“simonSays: “);

    for (int i =0; i <= nextStep ; i++)
    {
    Serial.print(simonSays[i]);
    Serial.print(” , “);
    delay(simonSpeed); // controls speed that simonSays something

    playToneAndLight(simonSays[i]);

    }

    simonSpeed= (simonSpeed – (nextStep*5)); // This seeds up Simon on each turn by forumla (500-(nextStep*5).
    // Change the multiplier (5 in this case) to make game faster or slower
    // The multiplier is MAJOR factor in how hard the game is.
    // This sets Simon’s TOP SPEED. Also important in making game interesting yet winable.
    simonSpeed = max(simonSpeed, 200); //this maxes out simon speed at 200 ms
    simonDone = true;
    //Serial.println(” “);
    }
    if (simonDone == true)
    {

    if(digitalRead (redButt)==LOW) {
    playToneAndLight (1);
    userCheck(1);
    }

    else if(digitalRead (yellButt)==LOW){
    playToneAndLight (2);
    userCheck(2);
    }

    else if(digitalRead (blueButt) ==LOW) {
    playToneAndLight (3);
    userCheck(3);
    }

    else if( digitalRead(greenButt) == LOW) {
    playToneAndLight(4);
    userCheck(4);
    }

     
    // nothing happening here yet
    // delay(1000);

    // Serial.println(“User got it right, add a new step and give Simon a Turn”);

    // // user completed successfully, give simon the next turn
    // // add one more step to simon’s sequence
    }
    }
    void userCheck (int x) {
    Serial.println(“–starting values–“);
    Serial.print(“value checking against “);
    Serial.print(simonSays[userStep]);
    Serial.print(” “);
    Serial.print(“value user “);
    Serial.println(x);
    Serial.println(” user “);
    Serial.println(userStep);
    Serial.println(” simon “);
    Serial.println(nextStep);
    Serial.println(“—-“);

    if(x==simonSays[userStep]) {

    Serial.println(“User right”);
    if(userStep == nextStep) {
    simonDone = false;
    nextStep++;
    userStep=0;
    }
    else {
    userStep++;
    }
    }
    else {
    tone(7, random(100,3000), 100);
    digitalWrite(2,HIGH);
    digitalWrite(3,HIGH);
    digitalWrite(4,HIGH);
    digitalWrite(5,HIGH);
    delay(100);
    digitalWrite(2,LOW);
    digitalWrite(3,LOW);
    digitalWrite(4,LOW);
    digitalWrite(5,LOW);
    delay(100);
    tone(7, random(100,3000), 100);
    digitalWrite(2,HIGH);
    digitalWrite(3,HIGH);
    digitalWrite(4,HIGH);
    digitalWrite(5,HIGH);
    delay(100);
    digitalWrite(2,LOW);
    digitalWrite(3,LOW);
    digitalWrite(4,LOW);
    digitalWrite(5,LOW);
    delay(100);
    tone(7, random(100,3000), 100);
    digitalWrite(2,HIGH);
    digitalWrite(3,HIGH);
    digitalWrite(4,HIGH);
    digitalWrite(5,HIGH);
    delay(100);
    digitalWrite(2,LOW);
    digitalWrite(3,LOW);
    digitalWrite(4,LOW);
    digitalWrite(5,LOW);
    delay(100);
    nextStep=0;
    userStep=0;
    simonDone = false;
    Serial.println(“Failure”);
    }
    Serial.println(“–outputnext–“);
    Serial.println(userStep);
    Serial.println(nextStep);
    Serial.println(“—-“);
    }


  • Unknown's avatar

    kristenkersh 6:34 pm on October 18, 2012 Permalink | Reply  

    Simon Says : Design, iterations, testing and code 


    —————First Sketches—————-

    Idea 1: 

    Here is the first idea. I know there are only 3 cylinders and their needs to be four. Each tube would be filled with water. Below the tube in a dry area is a LED light that illuminates the enclosed water. These tubes are situated within a clear box. Half way down the box is slightly froster. Here will be 4 buttons associated with the color and sound. In this area in the box the lights, speakers, and other hardware is all hidden.

    Idea 2:

    Pcomp Notes (3)

    Idea 3:

    A large clear box with original size light bulbs as seen below.

    Shopping at the container store:

    Container store


    ——————–Iteration # 1————————

    Construction:

    User tester 1 “it’s too fast!”

    User tester 2 “its too hard!”


    ———————————Iteration #2———————————

    Changes Made / Final iteration:

    • made a start sound
    • slowed down the pattern and the sound
    • less levels


    Code: 

    first Simon simon code Startsoundcode

     
  • Unknown's avatar

    Yury Gitman 12:25 pm on October 14, 2012 Permalink | Reply  

    Simon Says, Starter Code and Assignment 

    Here is some Code to get you started with Simon Says.  There are 3 steps in the code. It helps setup the Simon “brain” part of the game.

    https://docs.google.com/open?id=0B5C5Fh-HOLYFVndRRHdkOW1CdHc

    For the assignment, program Arduino to listen for user imput and compare it to what Simon says.  The out come should trigger a lose sound, or tell Simon to say something next.   Work in groups of 2.

     
  • Unknown's avatar

    trytobegood 4:04 pm on October 12, 2012 Permalink | Reply  

    Game sounds 

    I’m still missing 2 sounds!

    Download my code


  • Unknown's avatar

    carolkozak 1:13 pm on October 12, 2012 Permalink | Reply  

    Simon 1 

    Three Ideas

     
c
Compose new post
j
Next post/Next comment
k
Previous post/Previous comment
r
Reply
e
Edit
o
Show/Hide comments
t
Go to top
l
Go to login
h
Show/Hide help
shift + esc
Cancel