Recent Updates Page 71 Toggle Comment Threads | Keyboard Shortcuts

  • Unknown's avatar

    Yury Gitman 3:09 am on March 6, 2009 Permalink | Reply  

    DreamLight® • User Testing 

    User Scenarios:

    1.  Subject:  George. 5 years old.

    George has a huge problem. He is afraid of the dark.  The only way he can fall asleep at night is by sleeping in his parents' bed, or by leaving the light on in his room. Sleeping with his parents is downright embarrassing, and a burden for his parents. Leaving the light on wastes electricity and is a bad habit in general. The perfect solution is DreamLight. Now when he has friends sleepover at his house, George just needs to turn on DreamLight, and his friends don't think twice about this cool object that secretly helps George fall asleep.

    2. Subject: Zeno. 21 years old.

    Zeno is a senior in college. He loves to throw parties  at his house.  Unfortunately, his landlords don't take very good care of the estate, and only 2 lights still function in the entire house.  The bathroom and the kitchen.  This is unfortunate because ladies love to dance under groovy lights. Zeno is also broke, and can't afford anything too expensive.  Enter DreamLight.  Zeno sticks a couple DreamLights in his livingroom, and blam he's got a legit club bangin in his house.  A DreamLight in his bedroom has made the cluttered, un-decorated mess look much more appealing. Thanks DreamLight!

    3.  Subject: Jimbo. 45 years old.

    Jimbo owns a bar / club in the Lower East Side.  Customers have been complaining that the hallways are too dark, as are a couple of the corners of various rooms in the club.  Furthermore, each table in the bar has a tea candle for lighting, but by the end of the night the candles are completely gone. This has become expensive. DREAMLIGHT! for just $10, Jimbo can have lights at each table that last at least 5 years, and are multicolored! the ambience would improve 10-fold, and his customers now feel safe walking to the bathroom! Well done, Jimbo!


    Testing Data:

    Testers were directed to this page where they were shown 1 video and one schematic:
    Schematic
    the only information they were given was this:

    NiteLite® is a product to be used in any darkened room. Simply turn
    NiteLite® on, and enjoy the vibrant colors radiating from the base of
    the product and then watch in awe at the projection of colors on your
    ceiling or wall!
    Learn about additive color synthesis, as Red, Blue and Green light mix
    to make White, and every color in between!

    then they were asked these questions:

    1. What are your initial reactions to NiteLite®? Are you interested in using this product? ••2. Do you want to have any control, or do you desire any physical
    interaction with the product (ie, pressing buttons to alter the light)? ••3. What do you think could/should change about the NiteLite®’s physical design? Size? Shape? ••4. What room of your domicile would you put NiteLite® in? ••5. What sorts of activities do you think you would partake in, while in a room with NiteLite® turned on? ••6. Is there any functionality you would want NiteLite® to have? Features? ••7. Any other comments? ••8. Would you consider purchasing this product, and how much would you pay?

    I will now summarize the most useful, insightful, and worthy responses.  For full responses, visit HERE, and check the comments.

    (1.) Most people found the product interesting enough to at least try it out; the initial aesthetic and concept of a projection and learning about color synthesis was interesting as well.

    (2.) Here, responses were split. One great idea was just to have one single pot, with which you could move through all colors, and then the object would run by itself as well. About 60% of users thought it was better as a simple object, just turn on and watch. One called it a "lie back" product.

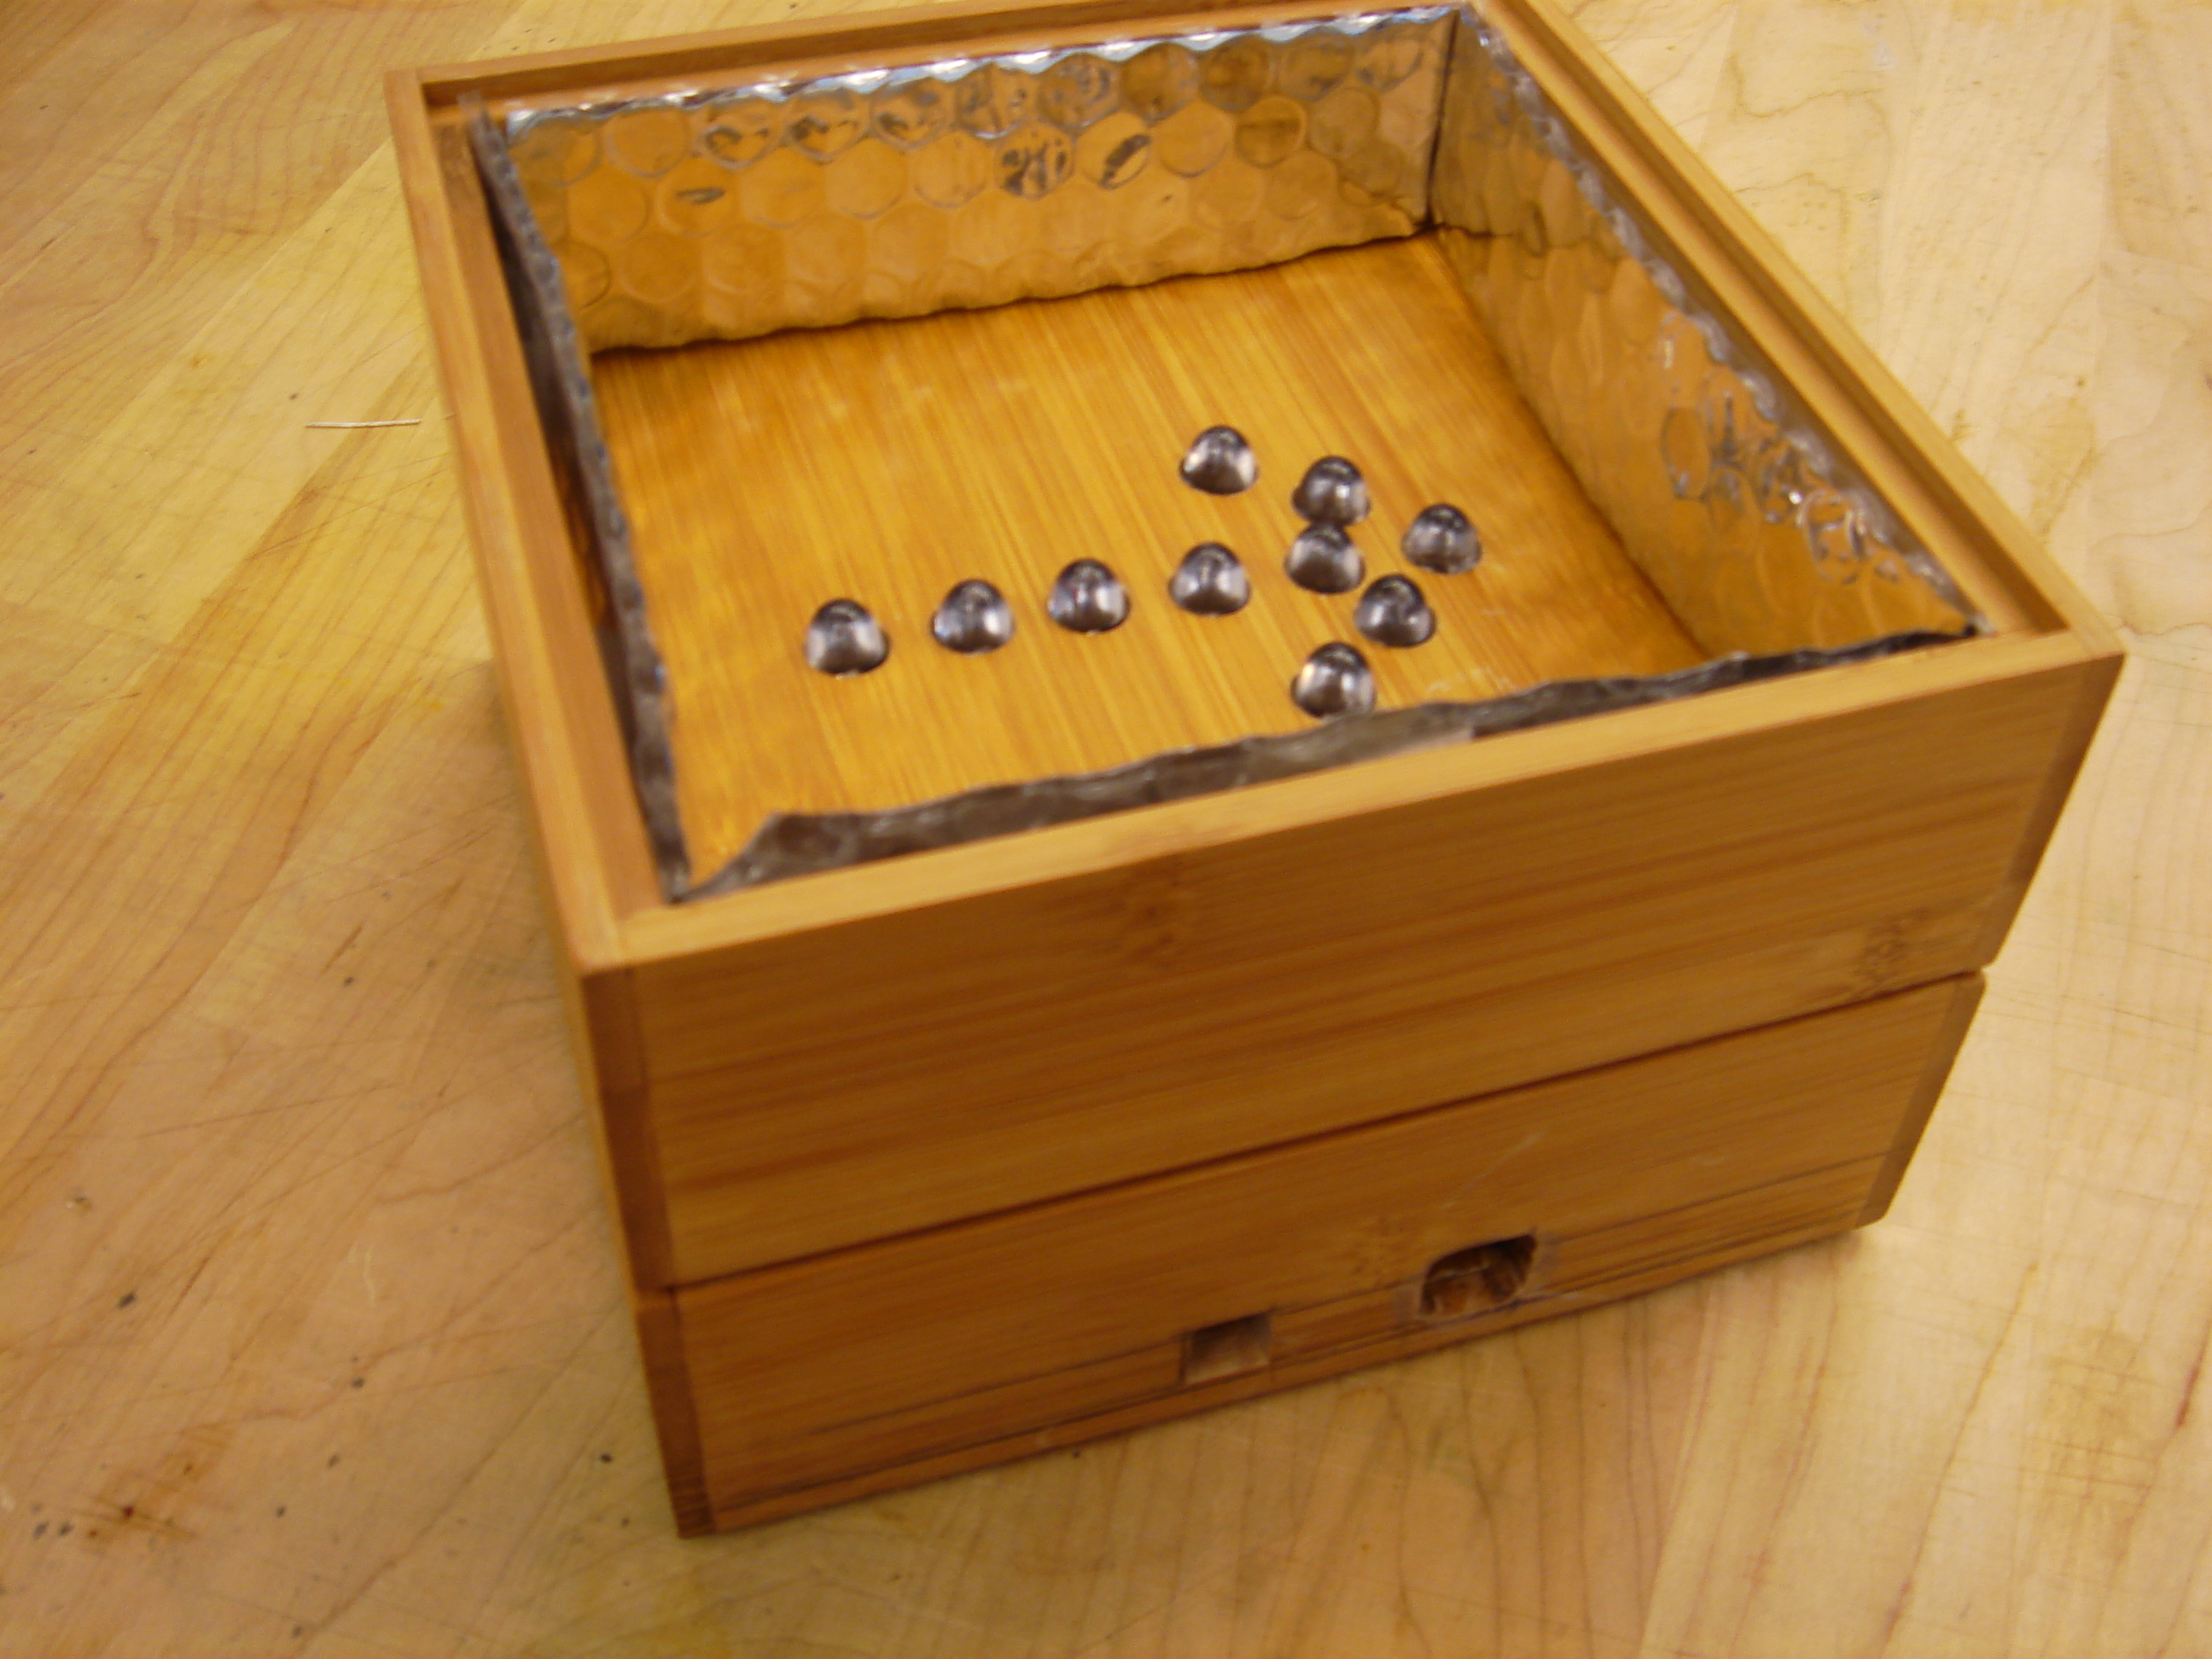
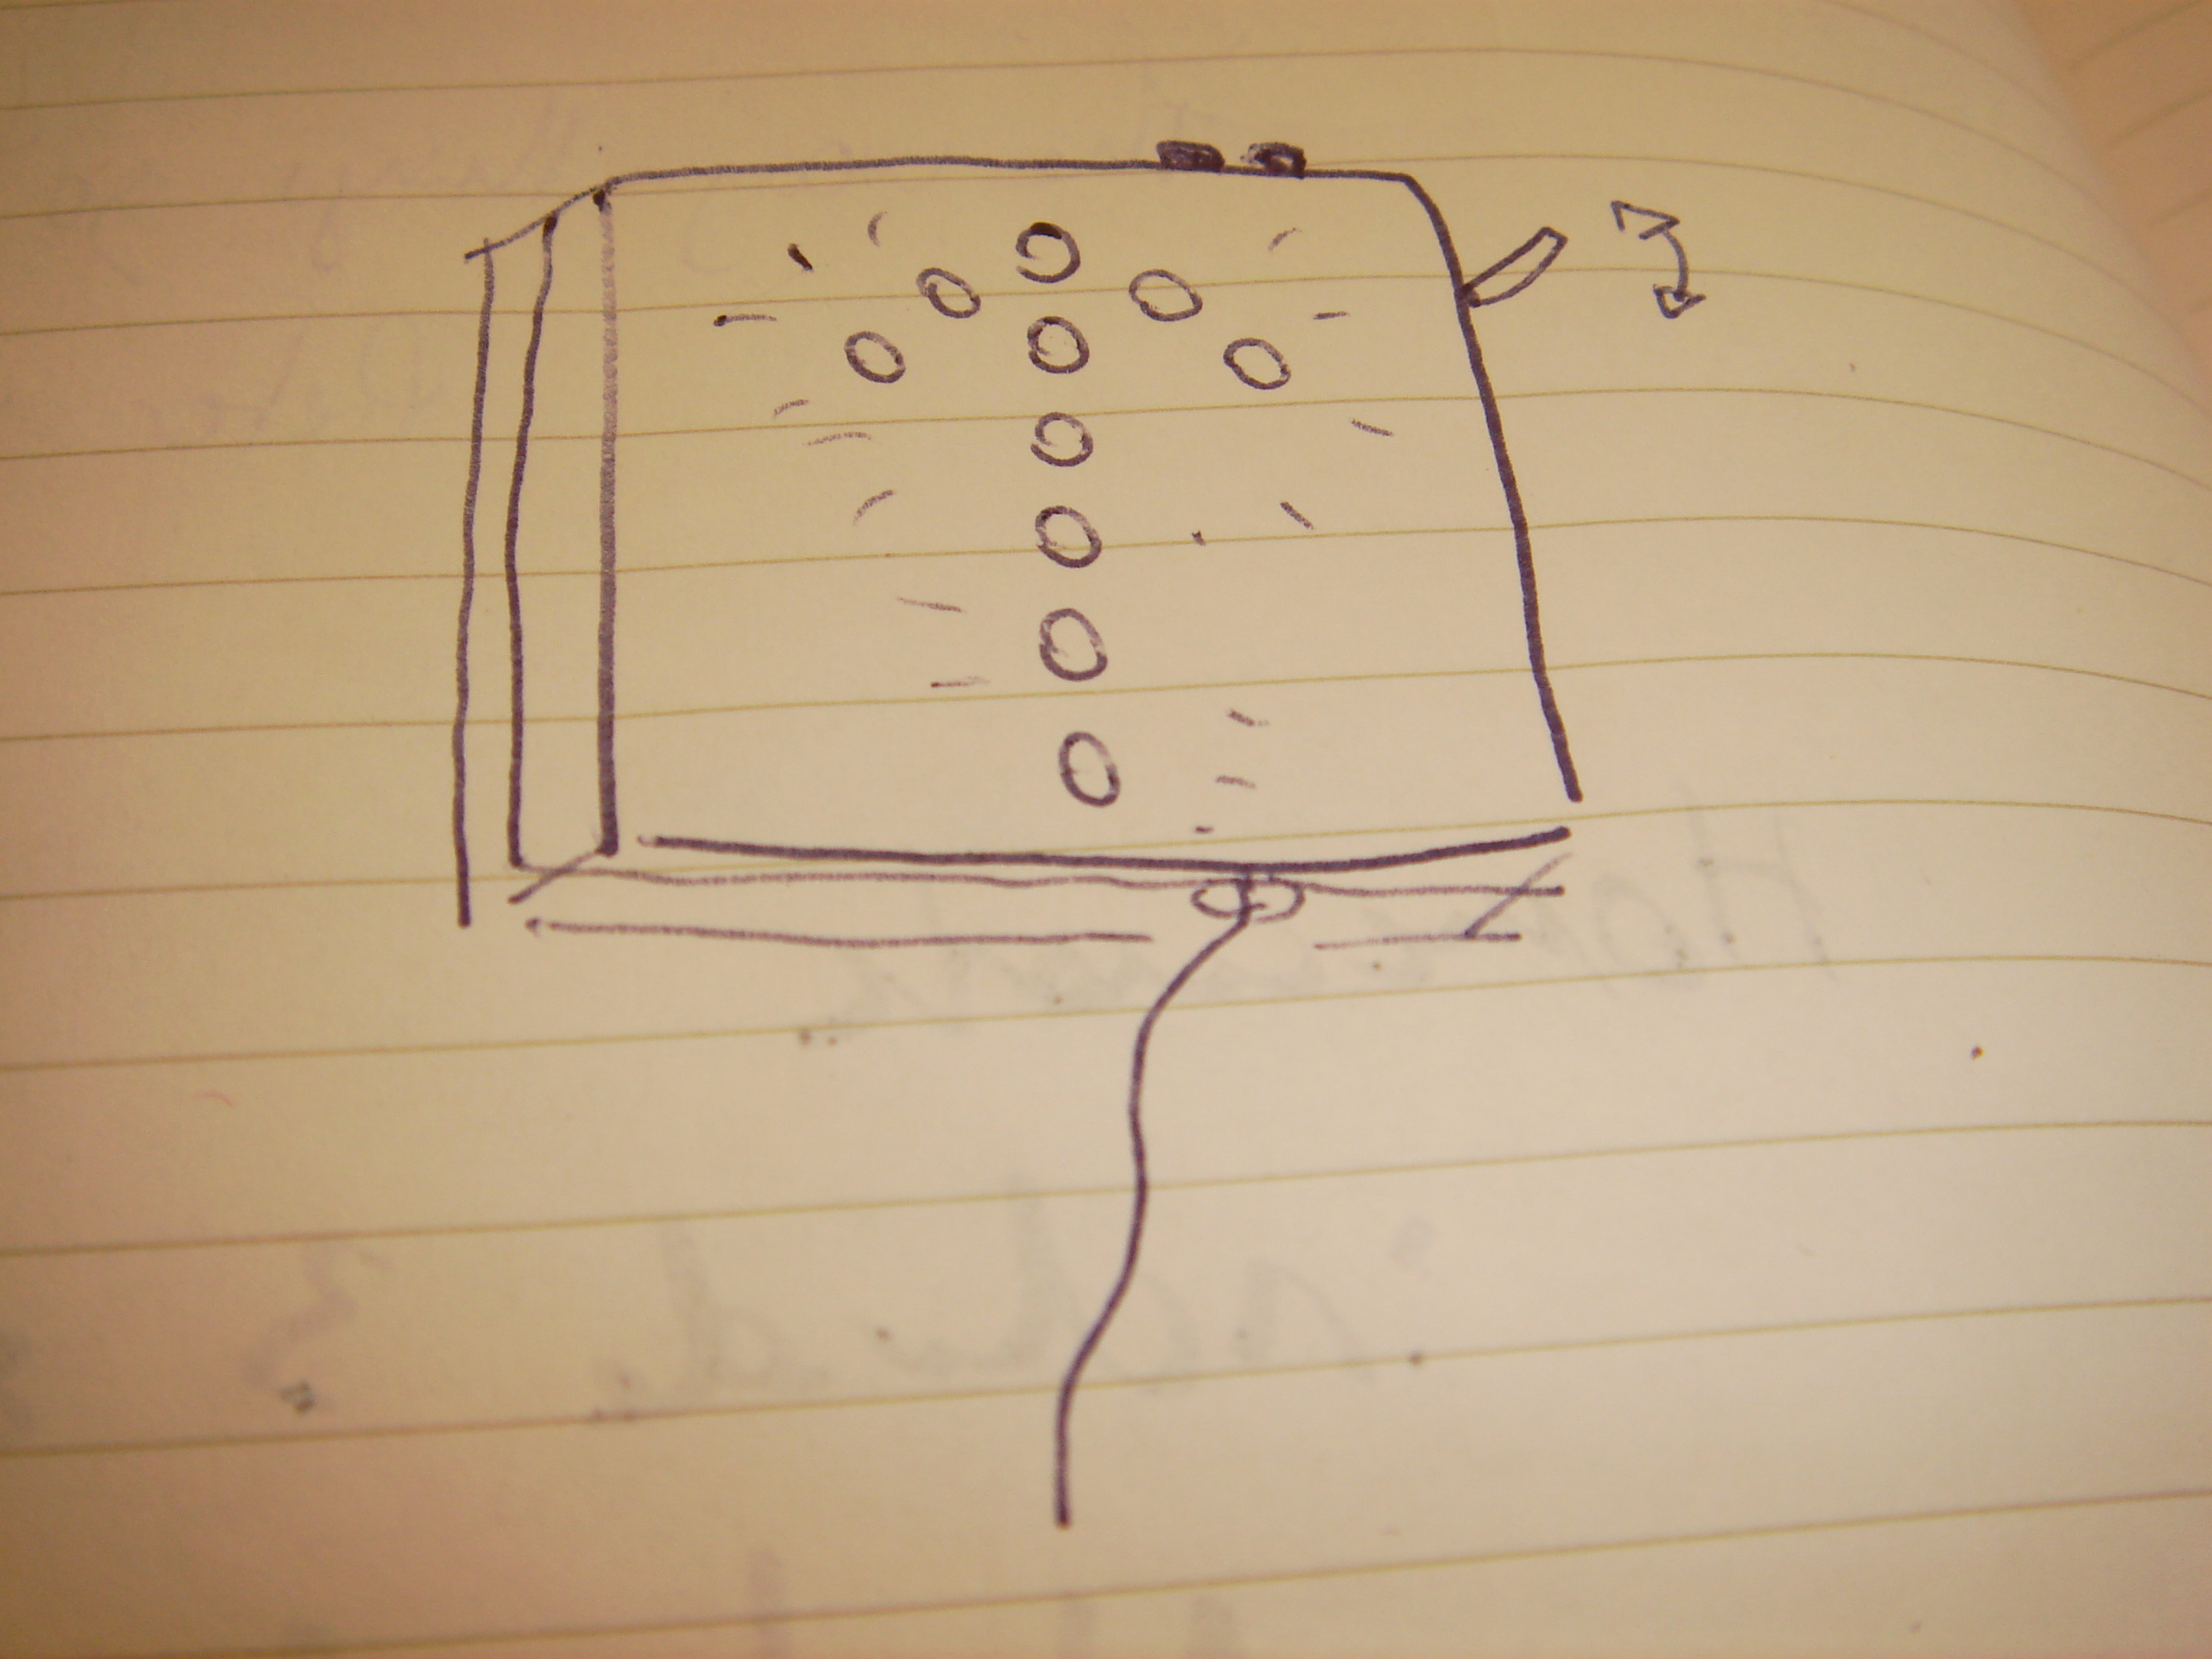
    (3.) Almost all responses said it should be smaller. The smaller the better, and also the more portable the better. Another said that the brightness of the box itself was distracting. One user made an image:

    Alicia_user
    This was implying that perhaps the colors wont mix correctly if the ceiling is too low.  The implication is that mirrors would be used inside the box to deflect the light.  I am inspired by the idea of using mirrors, but I don't believe that different ceiling heights would destroy the color mixing effect.

    (4.) By far, users wrote their bedrooms would be the place for this product. One mentioned a child's bedroom, which is one of my user scenarios. Living rooms were also mentioned.

    (5.) This question elicited many "colorful" remarks, ranging from dancing to partying with drugs to being intimate with partners to listening to music, and of course falling asleep. All of these are enjoyable activities, i'm glad no one replied "be bored alone".

    (6.) The best idea I received here was to make a built in timer, so that once someone falls asleep, DreamLight will also go to sleep.  Someone mentioned making the object sensitive to sound, however that would require a sensor, and for now I want this to be as simple a design as possible.

    (7.) The name. Many people thought "NiteLite" was far too literal, and I agree. I have come to three possibilities:  DreamLight, MoodScape, or MindScape.  I will user test these in the next round. Also, a comparison to lava lamps was made here, although this concept is clearly very different from lava lamps. A company called Mathmos was also mentioned, and I see some similarity to their aesthetic: http://www.innovatoys.com/p/TUMBLFZ

    (8.) Most people said they would consider purchasing the product and the prices ranged from $5 – $40. 

    Overall, I am going to DEFINITELY

        • include a timer in the code, for automatic shutdown

        • make the encasing of the object as small as possible, much more diffusion to make the box itself much less bright than it currently is

        • make the sequences have as little repetition as possible

    and i am going to RESEARCH

        • a new name

        •  using mirrors inside the product

        •  installing a knob for users to interact with if they want – 

     
  • Unknown's avatar

    Yury Gitman 11:07 am on March 5, 2009 Permalink | Reply  

    Assignment due for March 6th 

    1)
    Illustrate 2-3 users. Give them a name and a description. Explain why, what, and how they use your artifact and design.  Explain what role it plays in their life. Post this to the blog.

    2)
    Show your prototypes (Look&Feel, and etc…) and user scenarios to others (preferably your ideal users) and get user feedback. Do 4-5 hours of this user-testing and user-feedback.  Record and blog the results.

    3)
    Make any changes or additions to any of your prototypes or sketches, so as to better communicate the concept embedded in the prototype to your users. 

    Reading Podcast:
    Audio: Role of Anthropologist
    Tom Kelly: http://ecorner.stanford.edu/authorMaterialInfo.html?mid=2054

     
  • Unknown's avatar

    Yury Gitman 2:55 pm on March 3, 2009 Permalink | Reply  

    Prototypes: Role, Look & Feel, and Implementation 

    Role

    PROTOTYPE 1: This prototype is an organic looking light that I hope replicates the aesthetic of the ocean. The user will turn the LEDs on and off using a switch. The passage of time in this prototype will be seen by the display of lights and the patterns they make.
    The organic looking quality could be achieved by using different types of fabric in the construction of the shell. Varying the exterior of the shell will give a different effect depending on where the light is shining though.

    PROTOTYPE 2: This prototype is more organic looking and could either sit on a table or be hung from the ceiling. I feel that my second prototype better fits my intentions of an organic looking light. This prototype uses a turn knob which could be better suited for the user in having control over the passage of time – turn the knob to the right and the lights go faster, turn them to the left and they slow down. I was also interested in the possibility of recording the ocean and having the waves grow louder as the lights blink faster.
    This prototype looks similar to a jelly-fish. The "legs" would be made out of different colored string and ribbon. I see this prototype being built using fabric as well.

    As far as the implementation is concerned, it really depends on where this piece will be placed. If hung from the ceiling, the LEDs would be contained within the capsule by something like a toilet-paper roll – they would need to be completely self contained. If placed on a desk or dresser, the LEDs would be placed under the capsule and will not need to be completely self contained. As far as the implementation is concerned, the second prototype would be easier to accomplish.

    LookAndFeelImplementation1Implementation2 

     
  • Unknown's avatar

    Yury Gitman 2:54 pm on March 3, 2009 Permalink | Reply  

    Myriam – 7 prototypes 

    Prototypes7

    Concept
    To bring a sense of time with design pieces that imitate life, human actions.

    Design 1
    The Dying arrow

    role:

    Arrow1
    Design to be displayed on a wall.
    look + feel:
    Wooden box, with mirrors on the sides to reflect the Leds. All the Leds are red.
    The design is easy to carry and hang by the user, and it can be opened to change a component in case of. The size is 6X6 inches, so that it discrete enough on the wall when it is not ON. It is like a frame, a painting hang on the wall. The size is small to recall a holly icon, and intrigue the viewer.
    Because it is always hang on one's wall, it needs to look appealing when it is on and off. The buttons added will be the same colors than the piece: silver and red.
    DSC00029

    implementation:
    In the box is a breadboad and an arduino board. There are holes in the box for a fast programing and to plug the power in.

    This code plays 3 different animations with the Leds: 
    The dying arrow that turns off the Leds one after the other at different rythms;
    The cross that turns off Leds 7 and 9 to make a cross shape in the box;
    Light, that on the opposite of the dying arrow, gives birth to the arrow by turning on all the Leds, one after the other.
    Design 2
    Modern Candles
    Candles
    Candles3

    The candles could have a shaped of religious candles as we know them, or be at the end of their life, all melt down together to create a new form.

    look+feel
    The piece is made of white wax, or parafine and Leds. The technology will be mixed with the rich traditional material to create a new shape, evoking life and evolution

    Picture 1  Picture 2
    Picture 3


    As Matthew Barney's pieces form the Cremaster cylce, the mixed media and was are to give birth in our world to a parallel world. The material are awkard and appealing. 


    implementation:
    This code make the Leds fade on and off very quickly, giving an aspect of trembling candles, to create emotion and life to the candles.
     
  • Unknown's avatar

    Yury Gitman 2:17 pm on March 3, 2009 Permalink | Reply  

    Se7en Prototypes 

    I thought about the roles, look & feel and implementation models for 3 different concepts, which are described below:

    1. Ambient Light

    Ambient

    a. Role

    An ambient light that changes color to indicate the time of day and can be programmed to setup reminders.

    Scenario: Lawrence is a 24 year old gamer/game tester and hacker who lives in a basement apartment. Most of his time is spent in this dimly lit space play testing first person shooter games. He's also part of a guild on EverQuest and the guild has a specific time when they perform raids.

    Lawrence rarely keeps a track of time and would like to have a device that informs him about the time of day, in case he needs to make a quick round for groceries, etc., without the need to look at the time every so often. He also needs a way to remind him when he needs to login to the Everquest server on time, which doesn't involved setting alarms on his iPhone which he can't hear while playing a game with headphones on.

    Application: Ambient light is the tool for Lawrence! He can easily tell the time of day by the color of 'ambient light'. He can also program 'ambient light' to setup reminders for when he needs to log on to EverQuest or other activities. He can do all of this without being distracted from playing his game.

    b. Look & Feel

    Ambient light is dome shaped about 4 inches in diameter and about 6 inches tall. The bottom is ribbed with a black rubber finish. It has an on/off button, a USB connection and a power outlet. The dome is shiny black metallic finish and is made of plexi glass, with 3 rows of stylized 'holes' from which diffused light shines through. There are 3 columns of these holes evenly spaced across the dome.

    The color of the light changes over the course of the day – green for morning, orange for afternoon, blue for evening and a dimmer blue for night.

    c. Implementation

    The bottom houses the Arduino which provides the USB and power connections. It also includes a small on/off pushbutton switch. From the bottom to top there is a skeleton with 6 LED's attached – 1 on either side assembled in 3 rows. The green LED's are at the top, followed by the green and the blue. The unit comes with many different programs that can be used to play different patterns by connecting it to your computer and writing to the Arduino. It also comes with a interface which can be used for configuring reminders by hooking it up to a computer.

    2. Coaster

    Coaster

    a. Role

    A coaster that can be use to place your drink on.

    Scenario: Clayton is a 27 year old guy who owns a bar in Willamsburg. He has expensive wooden tables which are getting destroyed because people don't use coasters to put their drinks on the table. This is probably owed to the fact that no one can find the coasters in a dimly lit environment or they're not motivated enough to use them.

    Application: Coaster is the product of choice for Clayton. They are enticing enough for people to use them and visible because they have an ambient glow.

    b. Look & Feel

    Coaster is a round and coaster sized, about 6 inches in diameter and about an inch tall. The bottom is a ribbed plexiglass while the top is flat plexiglass on which people can place their drinks. A soft glow emanates from the plexiglass which is red when 'coaster' is in use and green when not in use. These can be placed upon the tables or installed within the tables.

    c. Implementation

    The bottom of 'coaster' houses an Arduino, a tri-color LED and a battery pack within a second encasement. The side sports a tiny rocker switch to turn 'coaster' on/off. The top of the LED peeps out of the top of the encasement so it can light up the entire thing. 

    The flat plexiglass piece is mounted on springs above the secondary encasement. The top of the secondary encasement has a small switch which is triggered when a drink is placed on the flat plexi piece, which goes down due to the pressure.The switch triggers the change in color of the light which slowly fades to red. The opposite happens when the glass is removed.

    3. Mood light

    Moodlight

    a. Role

    Mood Light is a portable mood light which can set the mood for any activity.

    Scenario: Josh is a 23 old guy engaged in tons of activities. He loves to use all kinds of gadgets and gizmos to enhance social situations, especially ones that he can carry around. Josh wishes he could carry around his lava lamp to set the mood when he's hanging out at a friends place. He also wishes his lava lamp could double up as a disco light which can be used to lively up his house parties.

    Application: Mood Light is the perfect toy for Josh! It allows him to set the mood of his social activity by playing different patterns for different situations. It's also small enough so he can take it with him wherever he goes.

    b. Look & Feel

    Mood Light is made up of two components – the top and the dock. The top and the dock can be detached which makes it more portable.

    The top is diffused plexiglass about 5 inches tall, 1 inch deep and 3 inches wide. The dock is also plexiglass but painted black with a matte finish. The dock is about 2 inches tall, 1.5 inches deep and 3.5 inches wide.

    The side has a power outlet and USB connection while the front is equipped with numerous tiny switches including an on/off and toggle switches for playing different patterns.

    c. Implementation

    The dock houses the Arduino on one side, 4 switches on the other and possibly a battery pack on the bottom. On the top there is space for the 'top' to fit in snug and male ports which connect to the LED's.

    The top houses 6 LED's, 2 of each color – red, green, blue – on the bottom.

    Different combination of the 3 toggle switches yeild different patterns which the user can reprogram when they get bored.

    The LED's can possibly be mounted on a removable cartridge which can be swapped LED's in different arrangements and colors to yeild interesting results.

     
  • Unknown's avatar

    Yury Gitman 2:17 pm on March 3, 2009 Permalink | Reply  

    :::Prototypes::: Role, look and feel and implementation 

    ::Role1::

    The prototype is a chandelier inspired by the shapes of crystal formation in nature. The chandelier has yellow (amber) and white lights to provide a warm light that is enough to be able to see in the room, but that is not to bright. The idea is to mimic the kind and brightness of  real candle chandelier.

    ::Role2::

    This prototype creates a light fixtures that resembles a little colony of miniature creatures. According to the time of day the colony changes the color that it emits.

    ::Role 3::

    A children lamp that it tells a story with a simple animation.

    ::Look and Feel1::

    Chandelier made out of velum paper in a shape of crystals. Amber and white lights glow inside to reveal the intricate patterns of a doily fold up in the inside of the paper structure. As the lights goes through the different layer of the doily it casts a series of shadows of different shapes that blend with one another to create complex shapes

    Ceci1

    :: Look and Feel 2::

    Little colony made out of velum paper also in shape of small geodesic domes. Pieces of papers inside with abstract shapes cut out into them

    Ceci2 

    ::look and feel 3::

    Two layers of circular paper. The layer nearest to the light source has the images of the animations. The second layer contains small vertical slits that due to persistence of vision allow a viewer to see a short animation.

    Ceci3

    :::Implementation 1:::

    The implementation part of the miniature colony project will consist of a series of yellow (amber) and white LEDs getting brighter and dimmer through the use of PWM.

     
  • Unknown's avatar

    Yury Gitman 12:28 pm on March 3, 2009 Permalink | Reply  

    Prototype Sketches 

    Here are my sketches for prototyping the Role, Look, and Feel of my project.

    I started by trying to think of as many possible roles for the  project as I could. I wish I had done this from the beginning, as I was somewhat limited by the current form factor/designs that I currently have and didn't want to get too different since the time we have left is limited. For my next iteration I will definitely start lilke this.

    The three roles I chose were clock, nightlight, and alarm system.

    Here are my sketches:
    Img001
    Img002

     
  • Unknown's avatar

    Yury Gitman 10:57 am on March 3, 2009 Permalink | Reply  

    Myriam – Fading Leds 

    I don't know yet if I want the fading to be a part of my piece, "The dying arrow", or if I want to make a new design for the fading.

    To test the effect, I used 3 jumbo white Leds.

    DSC00044

    They all fade in and out together. I created 2 different codes to humanize the Leds, give them a sense of life: 
    imitates breathing. The Leds are turned on at different progressing rythms, and they become more and more brighter.

    The Leds are trembling.

    http://vimeo.com/moogaloop.swf?clip_id=3454800&server=vimeo.com&show_title=1&show_byline=1&show_portrait=0&color=&fullscreen=1
    Trembling Leds from maryam aboukhater on Vimeo.

     
  • Unknown's avatar

    Yury Gitman 10:49 am on March 3, 2009 Permalink | Reply  

    Myriam – The dying arrow – prototypes 2-3 

    DSC00048  DSC00049

    The dying arrow is a wall decoration made of 10 red jumbo Leds.

    for my second prototype, the I found a wooden box where I drilled 10 holes in arrow shape, for the Leds to pass through. The breadboard I had was big enough to contain all the Leds in the arrow shape, so I just put it next to the whole to see test the effect. 

    DSC00009

    I did several prototypes with different wires and placements, but still, the Leds were not stable. I didn't know if it was a problem of connections or code.

    Being sure of the aesthetics of my box, I decided to stick the Leds to the holes.

    DSC00011

    When I then connected the wires to the breadboard, I figured out that during all this time, my breadboard was broken. I replaced it orderd properly the wires and my design finally got stable.
    DSC00014

    I connected a switch to turn on and off all the circuit and arduino board.  

    My prototypes is made of two boxes: the top one with the arrow, and the second one behind it where are enclosed the breadboard and the arduino board.

    DSC00035 
    DSC00032 

    In the bottom box, I drilled a hole for the main switch on the right side of the design, and a two holes for the USB and power plugs of the arduino board on the down side of the design 
    for a rapid programing and display.

    DSC00027  
    DSC00028

    I used mirrored paper all around the sides to emphasize and reflect the red light, and to add a dramatic aspect to the piece.
    When it is one, it recalls a religious mexican iconography.

    DSC00045  DSC00046
    The switch turn the circuit on and displays "the dying arrow". The Red pushbutton on the top displays a cross shape, turning off Leds 7 and 9.
    The Black pushbutton is the rebirth of the arrow. All the Leds are off and turn one to one on.

    The "dying arrow" displays all the Leds on, and they blink to off one after the other, at different speed. It imitates different single lives that end individually.

    http://vimeo.com/moogaloop.swf?clip_id=3454511&server=vimeo.com&show_title=1&show_byline=1&show_portrait=0&color=&fullscreen=1
    The dying arrow from maryam aboukhater on Vimeo

    Here is my code, but the button don't work yet.

     
  • Unknown's avatar

    Yury Gitman 10:22 am on March 3, 2009 Permalink | Reply  

    Ira – Prototypes 

    Role

    LookAndFeel

    Implementation

     
  • Unknown's avatar

    Yury Gitman 5:04 am on March 3, 2009 Permalink | Reply  

    [zodiac clock ideation] 

    6 variations of the zodiac clock Idea>>>
    1.
    Proto5 Look/Feel – Soft feel white plastic or bamboo. Mobile unit. 12~14 inches. Rotating projector.
    customize projector file at home [thanks Paola for the idea]
    Proto4
    Quick solid works mock up to show basic structure.

    Role/Audience – All prototypes show in this post are aimed at children who's mothers may like to
    -get them a night light
    -a artifact that has multiple play purpose( customize, hand puppetry, use imagination here)
    -a toy that parents and children can enjoy ( making custom cut outs)
    They would be ages 4~10 I would say.  It can be used as home decor if so wished.

    Implementation – 3D print school facilities in 2 files bc max size is under 12" sadly. buttons towards the ends with arduin tucked in the back. LED tray in the round tunnel portion which will project in desired
    angle towards the wall.

    2. Night stand lamp.
    Proto2
    Look/Feel – noted in picture.  Main thing is that it functions as both ambient lamp and ceiling clock.
    Since you stare at the ceiling at night not the wall so much.

    Role – Gives children joy to turn off lights to go to bed after a good book etc. As a practical item, it's
    dual functionality means it serves 2 purposed for the parents -  night light and lamp. One less thing to buy right?

    Implementation – chip board for main led housing and bamboo for the legs or High quality MDF or Bamboo if that's available (renewable source). See through material cloth wrapped and hot glued.

    3. Hanging ambient shade lamp – 3 mode on/off/night light clock

    Proto3

    Look/Feel -  Very much like the lamps you can find at ikea with bamboo inner structure/ribbing.  Outside wrapped in an opaque paper or cloth.

    shadow projects 360 around the globe.  More than likely mono-color.

    Role- Although this aims at the same group, I would say that this maybe used by those who like cutesy/cool/eclectic things.  The dual purpose

    here means that it serves as a global light ambient lamp for a good part of the time. It would come with a 20ft. cord so it could really go anywhere

    in a room – convenient for tight spaces- like kids rooms usually.

    Implementation -  I would probably deconstruct an ikea light and use that structure.  The LEDs would be placed in a pizza like 2-3 inch cylinder. 

    I think 4-5 HIGH flux LEDs should do a good job at soft lighting.

    4 & 5. Outlet cover night light with safety cover OR mid wall mount.DSC_3094 

    Look/Feel -  This is really a basic night light with some clockwork.  About 8 inches.  White plastic most likely.  There will be a slide cover for kids to cut out there

    own designs, or slide in color sheets they can buy.  Another possibility is this same prototype but longer as a mid wall linear clock for those who don't really care for nightlight-in-a-socket.

    Role – Kids room and Hallways.  You can tell what time it is when you wake up to use the restroom, midnight snack etc. As for the mid wall clock this really could be for any age.  It may be better to use single color so it can go anywhere in the house, not just kids room.

    Implementation – This may be a Solid Works printed file if it is wall cover.  If not I would consider using chip board and fashioning a box for this setup w/HIGH FLUX LEDs.

    6. Semi traditional wall clock

    Proto1 

    Look/Feel – flat white front & heavy weight paper.  Roughly 12 inch diameter.

    Role – Just the same as above but this clock would be more accurate to time telling since

    it will have 2 wheels.  Outer for hours and inner for minutes.  The clock

    would not read very well in the day so this is really a bedroom application.

    Role -  For the more practical minded person who may question the accuracy of

    all of the above instances.  This would be their answer.

    Implementation – This one is pretty much straight forward paper front.  The hard part will be

    fitting the arduinos in neatly, as I might need 2 units.

     
  • Unknown's avatar

    Yury Gitman 4:36 am on March 3, 2009 Permalink | Reply  

    Second Attempt Prototype 

    This time around I went ahead and used a laser cutter to cut the intricate shapes. I also added all other animals to the mix and slimmed down the model (2.5″ tall).

    Each LED has a separate bracket inside to focus the light.
    I implemented 2 buttons to fade in on special characters using PWM and added an ALL on function.
    So~ what did I learn:

    * USE HIGH FLUX LEDs, ~ wider spread but still direct light.
    * Use thin paper so there is less distortion around the edges of the cut shape
      when light passes through the hole space
    * Wire wrap is awesome but gets really tedious after about 6, is there a better
      solution?  I don’t know yet.

    PrototypeLaserCut

    code is available – send me an email – I’d like to take keep the site
    as uncluttered as possible =)

     
  • Unknown's avatar

    Yury Gitman 12:19 am on March 3, 2009 Permalink | Reply  

    Prototypes :: LiteBall • LiteHat • NiteLite 

    1.    “NiteLite” – Role:

        •  the artifact is placed in a room, next to a wall, or in the center of the room, and provides ambient light, constantly while turned on.  It serves the same purpose as a night light for children who are afraid of complete darkness, or to set a consistent ambience to a dark space.  There is no interaction whatsoever, the “Nite Lite” is turned on, and left to create soothing mixture of colors.  Because the NiteLite has a set functionality, users could purchase different colors, or the tri-color, as well as different sizes (= brightness) if they want to create different ambiences for different spaces in particular.

    2.    “NiteLite” – Look and Feel:
        •  NiteLite comes as a single cube with only one switch, either a push on or toggle that the user interfaces with.  After turning the device on, the user sits back and enjoys the visual show created by the fading of the light on or off. The light is radiating from the clear cube directly, but more interestingly the light is projected vertically on to the ceiling, or perhaps a wall if oriented horizontally. The projected light takes the form of big circles, that mix different colors of light, in various sequences. The sequences would never be the same, utilizing various random functions, so that this does not become a repetitive (= annoying) effect.                            

    Nitelite_color

    —prototype of a multi-colored ceiling projection—

    3.    “NiteLite” – Implementation
        •  translucent acrylic box has, on one face, a lens (can also be acrylic) that focuses and aims the light from the LEDs. The box houses 3 LEDs (of which colors can be combined and offered in different combinations), which are powered and run by a microcontroller (a small PIC would be fine). On/off switch can be very small, so the box does not have a front or back, only a ‘bottom’ from which no light would emanate (this is where the PIC and wiring are).  On/off can be push-button or a toggle, but it must be small and discreet.
    NiteLite

    4.    “LiteBall” – Role
            Role A. LiteBall are objects which users can carry around or place in one spot that emanate light that directly reflects the volume of sound occurring around the balls.  Users could have several balls placed around their home or room where they listen to music or just hang out.  The balls are sensitive to amplitude of sound enough such that a talking voice would be enough to watch the balls’ glow reflect peaks in volume.  Another context could be at a concert or show where people are given the balls to walk around with or attach to their clothing.  All of a sudden the crowd becomes part of the performance as the
    intensity of the balls glow increases and decreases with the amplitude of the music, or performance.
           Role B. while intensity of glow is controlled by the amplitude of sound surrounding the ball, color of the ball can be controlled/affected by the movement of the ball. Juggling the balls would yield interesting effects, but DANCING with the balls (ie, moving it along specific axis’) would yield a performative instrument.  Learning curve of what direction yields what color would be very high, audience now become even more involved in a live performance setting.

    5.     “LiteBall” – Look and Feel
            Look A.    LiteBall will have a flat side to the sphere, enough to be able to sit on a flat surface and simply be a source of spectacle for the user.   Being a static artifact for a spherical object is nice, as there are no corners, no front, no back at all.  The flat side would serve as the bottom and could contain a very small switch.  The pulsing light would emanate from the sphere evenly on all sides.
            Look B.   The material should feel like a very grip-able rubber so the user can hold on to it easily, even during intense physical exercise while holding the balls.  The effect would become glowing hands if the user moves them very quickly.  They should have some weight to them, as if someone was juggling, a nice weight is necessary for a good experience.

    Glowballs

    6.    “LiteBall” – Implementation
            Implementation A.  LiteBalls need to be made of a sphere of thick, translucent rubber. Inside, a single 360 degree tri-color LED needs to be controlled by a small microcontroller.  A microphone, which can be very small would require one or two holes on opposite sides of the sphere.  Microcontroller hears a range of amplitudes, and maps them to the PWM output for the brightness of the LED.  Automatic calibration of these ranges could happen every few minutes, so that the balls are effective in a quiet living or bedroom as well as a loud concert. The flat side of the sphere could have a recessed switch to not interfere with juggling or dancing, but still be able to sit nicely on a flat surface, not rolling around.
            Implementation B. An accelerometer must be embedded in the center of the sphere, for detection of movement.  Each of the three axis’ are mapped to R, B, and B, respectively.   Brightness of light still controlled by amplitude of sound around the ball, but color is now controlled by movement of sphere on x, y, or z axis.

    7.    “LiteHat” – Role
    • A cool hat that glows translucent colors, in patterns that the user could customize, and with LEDs placed in customizable arrangements around the headwear.  So cool, kids would be wearing it anytime they go out at night. Or, perhaps you are a weary parent and are taking your toddler or elementary aged child to an outdoor event, and it gets dark.  Keep track of your kid at night even in the dark by just putting this had on their head. They’ll think it looks cool, you the parent will always be able to see them! HUZZAH!

     
  • Unknown's avatar

    Yury Gitman 10:30 pm on March 2, 2009 Permalink | Reply  

    Passage of time v3.0 with PWM 

    I added PWM to the fifth iteration of my Passage of Time project. The switches still work as in the previous version – the rocker switch for on/off, the toggle for switching patterns and the pushbutton to add in a third pattern. The PWM support only 6 of the 12 LED’s in the time piece and the second pattern augments the fade in/out with additional non PWM LED’s.

    http://vimeo.com/moogaloop.swf?clip_id=3447352&server=vimeo.com&show_title=0&show_byline=0&show_portrait=0&color=00adef&fullscreen=1

     
  • Unknown's avatar

    Yury Gitman 5:54 pm on March 2, 2009 Permalink | Reply  

    Passage of Time 7 Prototypes 

    I have been thinking about exactly what my project would be used for and I am not exactly sure, so I decided to work on more role prototypes than implementation or look and feel.

    Role 1):  Create a soothing light in a residential/personal setting. Create an ambient light to influence its environment, but not become too distracting. Not meant to provide lighting for reading or working. User can also set several sequences to determine "mood" of the light. For example, slow/soothing cycle in a dark room to help fall asleep or a rapid light sequence to help the user stay awake.

    Role 2): Make the light and form usable. Place drinks/items on the light sources. Not interactive. The user can determine the light sequences with buttons, but placing items on the sources does not influence the pattern. Minimal interaction and soft light in a dimly lit atmosphere.

    Look and Feel (Role 2, Center Piece):

    Role_2_Coasters_Look

    A larger center is illuminated by a diffused white light. This center piece is surrounded by 6 smaller red pods that can be used to support drinks. The glasses atop the red pods will be illuminated red and the light from the led within the red pod passes through them. The 6 outer red pods are controlled by pwm and the entire pod glows red, no concentrated light.

    Implementation (Role 2):

    Role_2_Coasters_Implementation

    The containers would be spray painted white, as in previous prototypes, to diffuse the light. The artifact will have a power cord that reaches the Arduino through a hole in the center item. The outer containers would be attached to the larger center one, and would be illuminated by a single 360 degree led that passes through the center piece. The lights would share a common ground, that would not affect the light that hits the side of the white container. The user could select from pre-defined light patterns via buttons placed next to the power cord. An on/off switch would also be accessible on the outside of the container, next to the power cord.

    Role 3): User can interact with the piece via non traditional buttons, altering the patterns of the lights and which lights would affect the pattern. Another ambient light for a dim lit space, but would provide some interaction as the user could "program" the light sequence. A number of buttons could be placed on a larger circular container. A pre-determined button would be used to clear the sequences and to let the user know that they can program a new sequnce. The user could then press the desired buttons in the appropiate order they would like to be played back. This would allow the user to add some interaction to an otherwise static object.

    Look and Feel (Role 3, Memory):

    Role_3_Inter_Look

    The larger centerpiece would be lit via a single 360 degrees led and would not pass through the top. This would create a white light base, that the user could choose to have on or off. This white light base could also be programmed into the sequnce of the lights, via button presses of the "clear/reset" button. The top pods would also be lit by single 360 degree leds and the entire top could be physically clicked. The top would contain 9 red pods that could be programmed into the light sequence. The light sequnce could also be turned off and the white turned on, by programming the red center button (pressing it).

    Implementation (Role 3):

    Role_3_Inter_Imple

    To make the button physically clickable, two push buttons would support the top of each red pod, leaving a small gap between lid and base. This would allow the user to press down and the top and physically feel the button click. The led would be placed in the center via a hole in the bottom of the red pod, and the top of the center pod, to allow access to the Arduino with the wires. The lid of the center pod would be painted solid white and the sides, would be semi-opaque. This would block all white light coming out of the top of the white base and would allow white light to pass through its sides.

     
  • Unknown's avatar

    Yury Gitman 1:35 am on March 2, 2009 Permalink | Reply  

    Passage of Time with PWM + Buttons 

    Unfortunately, when pressing a button you have to wait until the
    animation sequence is complete to see the effect of the button press,
    which is driving me crazy! The only solution that I have come up with is to copy and paste that checking function code throughout the for loops. But I think that there has to be a better way, and I will find it. It's not too bad to do that for this project, but for more complex animations I feel that this way is inefficient and there must be a better solution.

    Video Time.

    http://vimeo.com/moogaloop.swf?clip_id=3430561&server=vimeo.com&show_title=1&show_byline=1&show_portrait=0&color=ff9933&fullscreen=1
    Passage of Time with PWM and Buttons from Nick Hardeman on Vimeo.

    Here is the Download Code.

     
  • Unknown's avatar

    Yury Gitman 1:29 am on March 2, 2009 Permalink | Reply  

    Passage of Time with Buttons 

    Adding buttons to the passage of time project. I have them sharing the same power source and initially had them sharing the same ground. However, this did not work because one button would trigger the other. A quick trip to the Arduino site solved that. Each has its own ground with a resistor on it. This allows the buttons to read up to about 515, since they are sharing the same power source. Pressing the buttons in different combinations yields different results, red on, red off, white on, white off and if both red and white are on, a little surprise for you.

    I forgot to show it in the video, but I have a toggle switch for the power inside the container, which is simply cutting the ground for all of the leds. This means that the Arduino still runs after the power toggle is turned off.

    Check out the vid.

    http://vimeo.com/moogaloop.swf?clip_id=3430520&server=vimeo.com&show_title=1&show_byline=1&show_portrait=0&color=ff9933&fullscreen=1
    Passage of Time with Buttons from Nick Hardeman on Vimeo.

    Here is the Download Code
    .

     
  • Unknown's avatar

    Yury Gitman 12:11 am on March 2, 2009 Permalink | Reply  

    Switches Homework (::YAY:: finally, it’s done! [thanks for your help, joe :)]) 

    Here's my code:

    int led9 = 9; 
    int led11 = 11;
    int led10 = 10;
    int pins[] = {9,11,10};
    int num_pins = 3;
    int button7 = 7;
    int button6 = 6;
    int val = 0;
    int val2 = 0;

    void setup() {
      pinMode(led9, OUTPUT); 
      pinMode(led11, OUTPUT); 
      pinMode(led10, OUTPUT);
      pinMode(button7, INPUT); 
      pinMode(button6, INPUT); 
      int i;
      for(i=0; i<num_pins; i++)
        pinMode(pins[i], OUTPUT);
      Serial.begin(9600);
      
    }
    void loop(){
        int i;
        digitalWrite(led9, HIGH);  
        val = digitalRead(button7);
        val2 = digitalRead(button6);
        Serial.println(val);
         if((val) == HIGH){
           digitalWrite(led11, HIGH);
           delay(200);
           digitalWrite(led9, LOW);
           delay(100);
           digitalWrite(led9, HIGH);
           delay(100);
           }else{
             digitalWrite(led10,LOW);
             digitalWrite(led11,LOW);
             digitalWrite(led9,HIGH);
          }
        if((val) == HIGH && (val2) == HIGH){
             digitalWrite(led9, HIGH);
             digitalWrite(led11, HIGH);
             delay(200);
             digitalWrite(led11,LOW);
             delay(200);
             digitalWrite(led10, HIGH);
          }
        if((val2) == HIGH && (val) == LOW){
          for(i = 0; i<3; i++){
            digitalWrite(pins[i], HIGH);
            delay(100);
            digitalWrite(pins[i], LOW);
            delay(100);
         }
      }
    }

    Here's my video: 

    http://vimeo.com/3429664

     
c
Compose new post
j
Next post/Next comment
k
Previous post/Previous comment
r
Reply
e
Edit
o
Show/Hide comments
t
Go to top
l
Go to login
h
Show/Hide help
shift + esc
Cancel