Simon Sketches + Tone Code
I have 3 ideas for ways to modify store-bought enclosures for my Simon Says game:
I have 3 ideas for ways to modify store-bought enclosures for my Simon Says game:
Startup:
Version 1:
int speakerPin=8;
void setup(){
pinMode(8,OUTPUT);
}
void loop (){
for( int y=0; y<3000; y+=2) {
tone(speakerPin,random(10,y));
delay(4);
}
}
Version 2 (favorite):
int speakerPin=8;
void setup(){
pinMode(8,OUTPUT);
}
void loop (){
for( int y=0; y<3000; y+=2) {
tone(speakerPin,random(0,y));
delay(4);
}
}
Version 3:
int speakerPin=8;
void setup(){
pinMode(8,OUTPUT);
}
void loop (){
for( int y=0; y<3000; y+=2) {
tone(speakerPin,random(1000,y),6);
}
}
You are wrong-sounds:
Version 1:
int melody [] = {NOTE_A1,NOTE_B0,NOTE_D2};
int noteDurations [] = {1};
void setup() {
}
void loop() {
for (int thisNote = 0; thisNote < 3; thisNote++) {
int noteDuration = 1000/noteDurations[thisNote];
tone(8, melody[thisNote],noteDuration);
int pauseBetweenNotes = noteDuration * 1.30;
delay(pauseBetweenNotes);
noTone(8);
}
}
Version 2:
int melody [] = {NOTE_F1,NOTE_CS5,NOTE_CS8 };
int noteDurations [] = {1};
void setup() {
}
void loop() {
for (int thisNote = 0; thisNote < 3; thisNote++) {
int noteDuration = 1000/noteDurations[thisNote];
tone(8, melody[thisNote],noteDuration);
int pauseBetweenNotes = noteDuration * 1.30;
delay(pauseBetweenNotes);
noTone(8);
}
}
Version 3:
int melody [] = {NOTE_GS7,NOTE_CS7,NOTE_FS4 };
int noteDurations [] = {1};
void setup() {
}
void loop() {
for (int thisNote = 0; thisNote < 3; thisNote++) {
int noteDuration = 1000/noteDurations[thisNote];
tone(8, melody[thisNote],noteDuration);
int pauseBetweenNotes = noteDuration * 1.30;
delay(pauseBetweenNotes);
noTone(8);
}
}
I went and looked around at possible enclosures for the simon game.
I found some plastic and wooden boxes, and then later thought about halloween and beer.


Here are some of my sketches:


Having trouble uploading the arduino file for sounds…?
Here are my 3 enclosure ideas:
1. for the first one I tried to keep it simple and clean. I tried to have some kind of symmetry, but with the switch and battery-pack it’s going to be tricky
2. the main idea is mimesis: some kind of distorted geometrical form that gets close to the shape of a stone
3. to embrace the nerd-ness: taking random circuits to build an enclosure for simon
I am still working on the code.


Inspiration:


In this 3-week assignment, make a “Simon Says” Style Memory Game.
Game Design Specs:
This is a memory game. A light/sound pattern is presented. The user copies that pattern. After a successful copy, the pattern gets longer. As the game progresses, the speed of the pattern presented increases. There is a conclusion of the game, Win or Lose.
Physical Specs:
ON/OFF POWER SWITCH [toggle switch]
4 LED’s
4 Momentary Switches
Battery Pack
Speaker
A physical enclosure to hold all.
Vision and Enclosure Homework:
3 Sketches, or Image Mock-up “Blue Sky Idea”, or Vision of the Physical form.
3 Photo Found or Off Shelf Enclosures That you can “Tool”
Publish Images on Blog BEFORE class, and present these 6 images in class.
Sound Design Homework:
1) Make 3 Start-up Sound and light effect
2) Make 3 “You are Correct!” sound effect.
3) Make 3 “You are Wrong, you Dummy” sound effects.
4) Make 3 “You Lose, Shame on you and your family” sound effects.
5) Make 3 “You Win the Game Cheer or Effect”.
Put these 15 (total) distinct tones into one Sketch, present them in class.
My favorite projects at Maker Faire were from T4D Lab, The Thumby War from Maker Twins, Tangible Lights, the Largest Home Brew 3D printer, the iPhone robot, Graffiti fone and the singing heads.

T4D Lab was in the sustainable area. There projects were used mostly in Sub-Saharan Africa where information travel can be a problem. They developed very simple real world solutions to problems using Arduino. One is the Mobile Soil Moisture Monitoring System. He had a simple example to use with the potted plant but he explained that they could easily be made much larger for fields. When water is scarce this is a very important device to have. They also developed a simple monitoring systems that alerts you if the temperature in a temperature-regulated box changes at all. I love how simple and practical their projects are and what a big impact they can potentially have on these populations.

Graffiti fone is from SENSORSTAR Labs and it turns a smartphone into a virtual paint can on a projection wall. I think this is a fun idea but could also progress into even more interesting projects. For example, could you use this technology to create a laser pointer of sorts for PowerPoint presentations? I also wonder how this would work on a very large scale – projecting during a concert or a halftime event.

I also liked the Lumiphonic Creature Choir Synarcade Audio-Visuals. When a note was played on a keyboard a corresponding face opened its eyes and sung. I found the aesthetic very fun to watch and it drew me in. I’m not sure what purpose this will serve other than entertainment but it was very entertaining!
Other cool stuff:


Prepare a PDF documenting your work.
Written Documentation Guidelines:
This document will be composed of the following sections.
+ A Thesis Sentence and Thesis Paragraph: One sentence that summarized the big picture of the project. This is located in on paragraph that expands on that one sentence.
+Summary: a narrative description of the project: What is it, who is it designed for, what is it designed to do, what kind of technology, design, or culture does it explore, etc.
+Domains: What are the domains with which your project engages? What relationships exist between these domains? Use diagrams.
+Precedents: What are examples of work that share something in common with your project? These precedents can be contemporary or historical, can be drawn from the realms of design, technology, sociology, psychology, etc. In preparing this section of your document, please include the following information for each precedent discussed:
• title of work and author/designer/artist
• brief description of project
• relevance/relation of the project to your own work
+Iterative Design Process and User-testing: A narrative description of your process, prototypes, user-testing, key methods and discoveries, sample sketches, storyboards, diagrams, etc.
+Evaluation: the Evaluation section of your document has three parts:
• a narrative summary that outlines your thoughts on the strengths and
weaknesses of your project.
• a list of criteria that you are using to evaluate the quality of your project. These criteria will be shared with the critics during your final presentation, and will serve as the basis for feedback during your review.
• a summary of feedback you received during your final project presentation.
Future Directions: Summarizes what step would be taken if this project would be continued in the future. This should be written absolutely last, and after final presentations. Use photo-shopped images if needed to communicate future visions.
+Bibliography, References, Resources: a list of important works used to guide your project. Bibliographic information should include the title of the work, author(s), publication date, publisher, and pages cited.
“Zune as well as iPod: Most folks compare the actual Zune to touch, but right after seeing how slim and surprisingly tiny and light it really is, I consider it to become a rather unique hybrid which combines attributes of the two Touch and the Nano. It’s extremely colorful along with lovely OLED display is a bit smaller as opposed to touch display, but you itself feels quite a bit smaller as well as lighter. It weighs in at about 2/3 the maximum amount of, and can be noticeably smaller in width and level, while being just a hair thicker.”
Make and Post 7 Prototypes for your concept(s).
2-3 Role Specific Protos
2-3 Detailed Look and Feel Protos
2-3 Implementation Protos
–ALSO post your Venn Diagrams into your First Prototypes Post.
As of now my project is named “trick tracker”. It will be a device that tracks height and rotation for bmx riders. Some day I hope this device will be developed further to track an extensive library of bmx tricks.

Look and Feel Prototype:
1.
This device will be mounted on the down tupe on any bmx frame. This is the ideal placement due to it being the point of least contact during riding and other bmx tricks.
![]()
The electronics for the device will be imbedded into this foam pad that will be wrapped in decorative fabric. Not only is the padding practical but, the padding holds a nostalgic feeling to most riders and will be a retro throw back reference to the younger days of freestyle bmx of the early 1980’s.

2.
This second look and feel is strictly functional. This light weight plastic or rubber housing will contain all of the electrons and will aim to use the least amount of mounting space as possible. There is still room to play with color here but this design aims to remove itself practically and visual from the bike.
This is an example photo of a previously used bike mount for a cell phone camera, my model would ideally be similar.

Role Prototype:
1.
In the role involving the average consumer, I imagine this product being used as a way to document tricks and rider progression and sharing it on line.
2. I also can see a role being used in conjunction with a video camera app or camera app on smart phones to aid this documentation, sharing, and user experience.

3.
My last predicted role, this product could be used during televised competitions to create athletic statistics. A rider’s average speed, height, and rotation could be documented and displayed in a news ticker during the competition.
Implementation Prototype:
1. I imagine that this could be built as a smart phone app, as smart phones do possess most of the necessary hardware to achieve this. I am just concerned about physical placement of the phone on the bike or the body of the rider, and types on phones varying in too much of a degree for it to be widely accepted.
2. My second implementation involves actually building the electronics using arduino. I would like the arduino to transmit the athletic statistics to a smart via blue tooth.
I have already begun to test out a variety of sensors for this project. The height from the ground information will be gathered using an ultrasonic range finder, and rotation will use a combination of accelerometers, composes, and gyros. All of this will need to by gyroscopically mounted to the down tupe the bike frame.

3. Implementation three involves building a motion tracking suit. By using a camera in conjunction with a variety of motion tracking points on the bike and rider, one could eventually write computer vision software that tracked tricks. This is the most elaborate and complex theoretical implementation.

Precedence:
1.
Sports Bio Engineering PhD student Tristan McNab plans on developing iphone software to track athletic information during track and field sports .
also here is a link to an array of athletic uses for various sensors http://wockets.wikispaces.com/WirelessMonitors
2.
Chaotic Moon Labs’ “Board of Awesomeness” is intended as a technology teaser to show how perceptive computing can turn around the way we look at user experiences. The project utilizes a Microsoft Kinect device, Samsung Windows 8 tablet, a motorized longboard, and some standard and custom hardware to create a longboard that watches the user to determine what to do rather than have the operator use a wired or wireless controller. The project uses video recognition, speech recognition, localization data, accelerometer data, and other factors to determine what the user wants to do and allows the board to follow the operators commands without additional aid.
PRIOR ART:
KISSINGER: transmitting a kiss over a distance.
HERE AND THERE: Emotional communications tool for families that are separated by long distances.


FOR SOMETHING STRAIGHT UP CREEPY: ROBOT GIRLFRIEND : for lonely men. HIGHLY QUESTIONABLE. I don’t care how lonely you are.
Using her infrared sensors and battery power, the diminutive damsel named “EMA” puckers up for nearby human heads, entering what designers call its “love mode.”
She’s very lovable and though she’s not a human, she can act like a real girlfriend.”

PROTOTYPES:
ROLE PROTOTYPES/ LOOK AND FEEL/ IMPLEMENTATION:


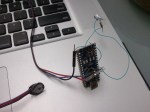
So the wiring is up and working. The code needs some work as I’m having a bit of trouble getting the lights to start pulsing upon reaching various levels of heart rate. Also, as of now I have built the prototype around an Arduino NANO but as soon as my LilyPad arrives I will be using that and embedding it into the wristband along with slimmer LEDS


The look at feel for my project is practical and simple. I want to embed the pulse sensor and an array of lights and possibly a speaker into a cotton wrist band. The lights that are aligned linearly with in the band will gradually light up appropriately as the users heart rate increase or decreases. The battery will also be embedded with an pocket that can be easily accessed when changing it. I also would like to add a light sensor as an on and off/reset switch.
-What surprised you?-
The wiring is fairly simple so I quickly wired up one LED at the start and attempted to slip my newly purchased arduino NANO into my wristband. The pins on the NANO make it extremely difficult to cleanly place inside the band and also make it uncomfortable to wear. Also, the led itself is rather large.
So I have decided to use a lily pad and possibly some smaller flatter LEDs if I can find them. I think I’ll also steal a small speaker from a pair of headphones.
I hope to have a usable and integrated prototype by Monday.
Any suggestion from any of you would be awesome.
Project overview:
Originally a screen based game that allowed the player to manipulate their BPM in order to complete a time color matching game against a set pattern created by the computer.( BPM ranges matched up to specific colors which the player must discover and manipulate to match the computer’s color based patter.)
Physical Object: The game became physical and now the player has a handheld object embedded with RGB leds. The concept is the same,however instead of squares on the screen the colors of leds are changed depending on BPMs.
known and unknown challenge :
To make a game ,using the heart sensor, that one could play alone or with another person. There was some initial trouble with mapping the BPM to the color ranges as well as creating a range that the player could manipulate to change the colors of the boxes(LEDs).
AND PROGRAMMING.
surprising: How the project evolved from living on the screen to a physical object and the natural handheld shape it took on.
jewel/wildcard: When the project was screen based and the players competed against each other to match the computer generated pattern we had trouble thinking about how to make this aspect physical. The idea of cards with pattens came up and I believed fit in with the feel of the game nicely.
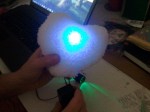
My second iteration was an experiment of creating a different shape with the fabric provided and adding additional circuits and leds, and an embedded speaker to work with the pulse sensor.
I began to see the limitations of using an arduino uno board with the pulse sensor as I would have enjoyed using pwm pins with this project to fade the lights but the timers are being devoted to the pulse sensors.
For my first use of the pulse sensor and its accompanying code, I created a heart as instructed on the pulse sensor website and embedded my arduino uno board inside it. I then powered my board with a 9volt battery. Performing this task allowed me to gain a feel of working with fabric as I have never worked with fabrics or sewing before. While doing this I also learned that the fade loop within the code actually disrupts the pulse sensors count, and the pulse was not accurate until this bit was commented out. In my next iteration I plan on creating an additional plush toy with additional circuits using more digital pins on my arduino uno board.


Reply